Weather Station Wirelessly Connected to Wunderground a learn.sparkfun.com tutorial
Available online at: http://sfe.io/t217
Wimp Weather
The Wimp is a personal weather station that uses the weather shield along with an Electric Imp to push live weather data up to Wunderground. You can help increase the accuracy and prediction of weather by adding a weather meter to your house! But why buy an off-the-shelf system when you can build you own? For around $250 you can build a cutting edge open source station that you have complete control over! All you need is a pile of parts and access to a Wifi network.
Live weather in downtown Boulder
Wunderground makes it really easy to setup your own weather station. You fill out a form, pick a username and password, then get a station ID. Using this ID and password, we can push weather data with a simple HTTP POST command:
http://rtupdate.wunderground.com/weatherstation/updateweatherstation.php?ID=KCOBOULD115&PASSWORD=SparkFun&dateutc=2014-03-18+03%3A32%3A42&winddir=270&windspeedmph=7.0humidity=45.4&tempf=43.1&baromin=29.4161&realtime=1&rtfreq=10&action=updaterawCopy and paste the above code into a browser, and press return. You should see success. Congrats! You’ve just published your first weather data to the Internet of Things.
The above link shows how to push temperature data to the web, but you can also post a large number of other weather metrics. This example will show you how to report the following bits of weather:
- Temperature
- Humidity
- Light level
- Rain fall
- Instantaneous Wind speed + direction
- Gusting speed + direction for the last 2 minutes
- Gusting speed + direction for the last 60 minutes
This project builds on quite a few concepts. You may want to read the following tutorials if they are unfamiliar to you:
- I2C
- Battery Technologies
- Analog to Digital Conversion
- What’s a Shield? - particularly soldering shield headers
- Weather Shield Hook Up Guide
- Electric Imp Hook Up Guide
Electronics
Here are the parts we used to build our weather station:
- RedBoard
- Electric Imp
- Electric Imp Shield
- Weather Shield
- RJ45 Jacks x 2
- Weather Meters
- Shield Header Kit x 2
- Solar Panel
- 6000mAh LiPo Battery
- Sunny Buddy MPPT Solar Charger
- Plastic Enclosure (optional)
- Light pipe (optional)
Below is a wishlist to make things a bit easier:
Here are additional parts that SparkFun doesn’t carry:
- Solar Shield - We got ours from Ambient Weather. $40, works great!
- Camera Tripod - We found a cheap one on Amazon for $20 and chopped the camera mount off.
- Handful-o-zipties - If you don’t have these laying around, you’ll need some to secure the various charging and weather meter cables.
- 2" Hose Clamps - Sometimes called worm clamps, these connect the weather meter to the headless camera tripod. The weather meters should come with a few to get you started.
- Cement ballast - Solid concrete blocks can be found for a few dollars at a hardware store
- Eyebolts and concrete anchors - Ballast is useless if you can’t attach to it securely. An eyebolt with a lead anchor makes a very secure connection to the cement block.
- Wire rope, cable clips, and turnbuckle - Wire rope with clips should survive extreme conditions. The turnbuckle was key; it allowed mass to be easily tensioned onto the tripod.
- Galvanized metal bits - To hold the solar panel in place.
The system is designed to be low-power enough that a battery+charger+solar combination will suffice, but, if you have a source of power near your weather station, feel free to simplify things and use a wall adapter.
RedBoard
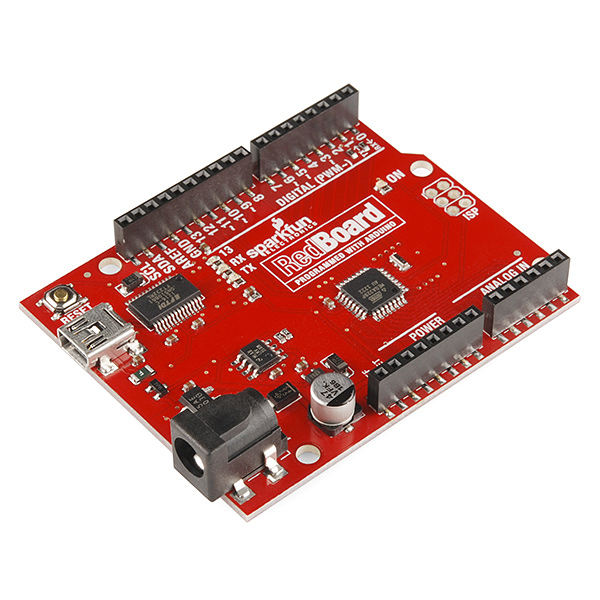
This is our Arduino-compatible workhorse. It will gather all the weather data from the weather shield and then pipe serial strings to the Imp.
Weather Shield
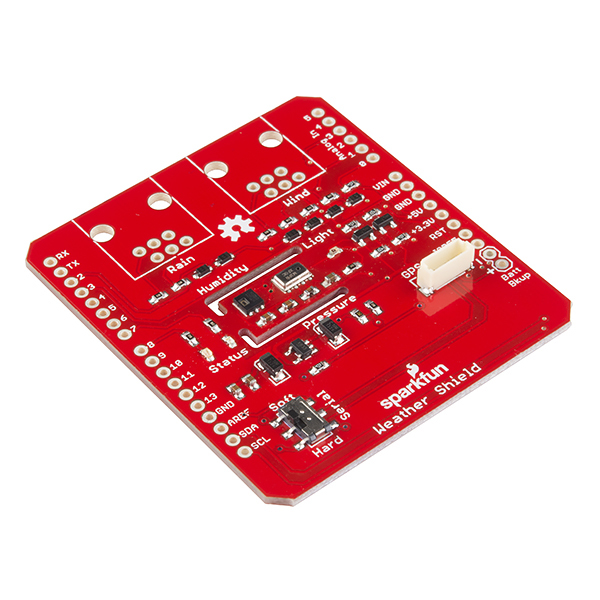
You can read all about the Weather Shield over on its hookup guide tutorial. All you really need to know is that it’s capable of reading a huge number of weather metrics but doesn’t have the capabilities to wirelessly report them.
Electric Imp

Modified for wireless Arduino bootloading
The Electric Imp is a simple to use internet-of-things device. It’s like a Wifi adapter with a bunch of built in bells and whistles. We’ll set it up to receive the serial strings from the RedBoard and pipe that data to an agent that will in turn post the weather metrics to Wunderground.
Note: The Electric Imp shield shown above has been modified for wireless bootloading of the Arduino. This saves an immeasurable amount of work! We can reprogram the Arduino from the comfort of our living room rather than climbing up on a ladder and plugging in a USB cable. To find out more checkout our tutorial on Wireless Arduino Programming.
Power System

Weather station stackup with solar charger and 2000mAh battery. Final installation uses a 6000mAh battery.
The Wimp runs off a 3.7V 6000mAh LiPo battery. The following measurements were taken for various bits of the project:
- Electric Imp (average when posting data every 5 seconds): [4.5mA during sleep for 8s, 80-100mA for 2s] = 22mA avg
- Weather Shield: 2mA (with out GPS)
- RedBoard: 15mA
The voltage of the LiPo battery will vary from 4.2V when fully charged to 3.2V when very dead. This is acceptable because the RedBoard can operate from 5V down to about 3V, and both the Electric Imp and the Weather Shield have on board 3.3V regulators. The RedBoard can also detect what the system voltage is at by doing an analog to digital conversion. Basically we connect the 3.3V rail of the Arduino to one of the analog pins so that we can establish what the battery level voltage actually is. You can read more about this trick over on the ML8511 UV tutorial.
The average total current consumption of the system is about 39mA. This means on a 6000mAh battery the system will run for about 150 hours or about 6 days. This should be pretty good for Colorado, with 300 days of sunshine. If the solar cell does get covered in snow, the angle of the panel will help remove it. If all things go pear shaped and the system dies, you’ve probably got bigger (weather) problems to be worrying about.
If anyone knows of a good article on how to size your battery capacity vs power requirements vs charging system, we would be thrilled to link to it!
Enclosure

Solar Shield with top mount
Creating a good weather station enclosure is difficult. There has been a fair number of comments on the Weather Shield product page and a great number of discussions and solutions proposed on the Internet.
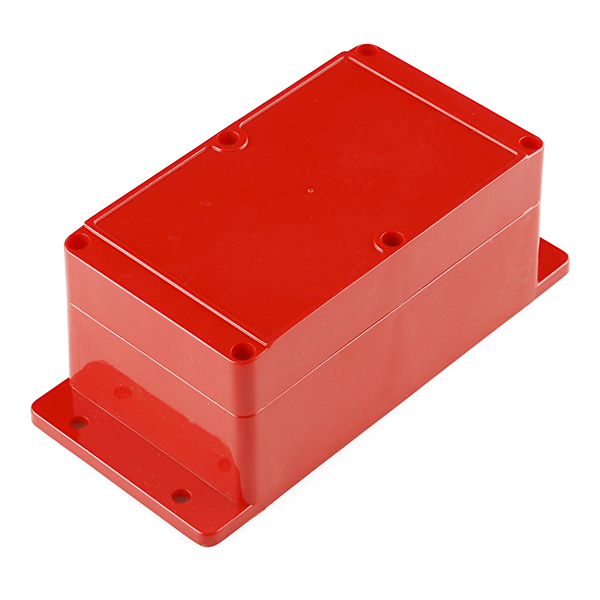
Our plastic red enclosure is very robust against adverse weather and is easily modified with tools found at home (hand drill, dremel, etc). The problem is that depending on where you want to mount your weather station, the red box enclosure can heat up quite a bit. In Colorado direct sunlight can be quite intense, so do plenty of Googling to determine what’s best for you.

For this project, we went all out and used a radiation shield from Ambient Weather. A solar shield allows for free flow of air across the sensors while reflecting the majority of incident heat. Additionally, this enclosure had plenty of room for our stack-up of Arduino shields, batteries, and solar charger. There are three long threaded rods with three wing nuts that hold the stack of plastic layers together. Opening the enclosure takes a few minutes but is pain free.
It is not obvious from the photo, but the three cables (wind, rain, and charging) enter into the enclosure through the gap between two of the layers about half way down the enclosure.
Initially, because the solar shield is open to the elements I was nervous that stray wind and rain would eventually cause the electronics to fail. My wife had the excellent idea of wrapping the non-sensor bits in cellophane. Two of the layers are wrapped, and the top shield (the weather shield) is left exposed so that the air can freely move across the sensors. It’s not entirely clear if this method is preventing water damage to the stack of boards, but it puts my mind at ease. When repairs are needed, I’ll update the tutorial with any future insights.
At first, I thought I would need a light pipe to get light into the enclosure. After installing the station on my roof, I found that plenty of light is passed through the gaps of the radiation shielding to get a great ambient light reading. If you’re looking for a more scientific reading, you might consider piping light directly.
Someday, it would be fun to gather UV data as well. We’ve got a great ultraviolet light sensor, but the light pipe material may or may not pass UV light specifically. If you have any information or experience gathering UV readings, we welcome your feedback!
Firmware
First, solder the headers onto the shields, and build up the stack. Not sure how to solder the headers on? Checkout this tutorial. Solder the two RJ45 jacks to the weather shield as well. These will connect to the cables coming off the weather meters.
You will need to associate your Imp to your Wifi network. This has been documented a few times. I used my cell phone and their free android app. It took a few tries, but I was eventually able to get the Imp to link up to my home network.
Below, you will find example code, but, for the latest version of everything, see the Wimp github repo.
Next, grab the above Arduino sketch. Load this onto your RedBoard (or Arduino of choice). Open a terminal window at 9600bps. You should see new weather data upon power up and every time you send the ! character.
Above is the agent code
Above is the device code
Next, grab the two code blocks (agent and device shown above) for the Imp. The Electric Imp has two types of code: the device code runs on the actual SD card, the agent runs out on the cloud. The Imp itself is pretty powerful, but the cloud has far more resources. Thus, we do the low-level string manipulation on the device but leave the heavy lifting to the agent.
You’ll need to replace STATION_ID and STATION_PASSWORD with your own ID and password.
Note: Because we are passing an http post, you can’t have symbols in your password. You may need to change your Wunderground password to only have alphenumerics.
Setting Proper Altitude

Weather stations across the world report a scaled pressure reading that takes into account the local altitude (this is often called the altimeter setting). In order to be as accurate as possible, we recommend you use a cell phone or a GPS module (my current favorite is the GP-635T) to obtain an altitude reading. Meters matter, so take a couple readings and average them together. Once you know your local altitude replace LOCAL_ALTITUDE_METERS in the agent.
You may also want to enter the altitude and location into Wunderground’s site. This will give people in your community a better idea of what weather is happening at what location. Publicly posting your weather station’s location has obvious privacy implications, so think about it before you make your station publicly viewable.
How it Works
The RedBoard monitors all the various sensors (humidity, temperature, rain gauge, etc) and does a little bit of processing on the data. It mashes up the individual data with identifiers and creates a comma delimited string. The Imp reads this concatenated string and looks for the correct header ($) and ender (#) characters. If an incomplete frame is received, it’s ignored. The Imp then reports this string, verbatim, to the Agent out in the cloud.
The Agent receives this string and cracks it apart into its pieces. Because the RedBoard has pretty limited resources, we report raw Pascals to the Imp and let the Agent do the complex mmHg pressure and dew point calculations. Once all the pieces are calculated, we create another big string that is an http:// address. Posting this long link causes the weather data to be transmitted to Wunderground. After all that, we can check our weather station and see what the weather is like!
Success! Live weather in downtown Boulder
Extra Bits
This project required quite a bit of extra mechanical bits to withstand mother nature.
Base
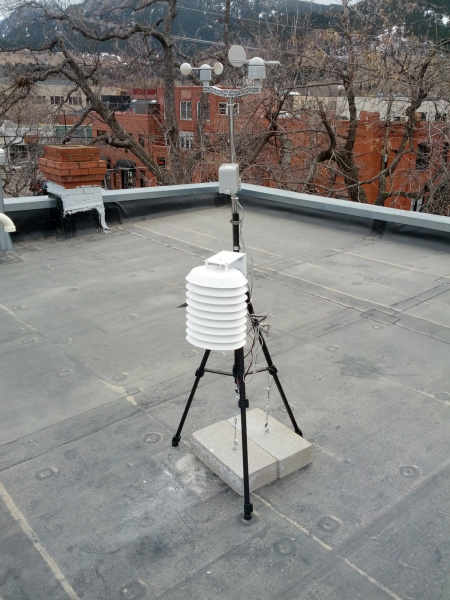
The weather station was installed on an old camera tripod. A hacksaw quickly removed the head of the tripod where the camera attaches.

The weather meters are attached using two hose clamps, and the solar shield is attached using the included U-bolts.
Solar

To hold the solar panel at the proper angle, a steel hanger was used. Commonly used with sheetrock, the metal was heavy enough gauge to be bent with hand tools but rigid enough to hold the solar panel in place. Using construction adhesive and a clamp, we attached the solar panel to a piece of metal then zip tied the metal to the camera tripod base. Be sure to mount the solar cell where it can get a clear view of the sky, away from any possible shading.

A common problem in Colorado
The incline angle of the solar panel was not scientifically determined - I pointed the solar panel to the south with about a 45 degree angle. This is a common orientation in Colorado, but there are plenty of solar angle calculators available to help you determine the best inclination for your part of the world.
Ballast

Because the winds are so strong in our area, I wanted to be sure to attach the base to as much ballast as possible. I found solid cinder blocks weighing 35lbs each (16 kilograms) along with eye-bolts and lead inserts at my local hardware store. Using a ½" mason bit, I drilled a hole for the lead inserts then used a cheater bar to twist the eye bolts into the cinder block. Notice that I rotated one eye bolt completely off its screw; I should have probably used slightly larger inserts to allow for that size eye bolt. I used a regular bolt with a few wing nuts on the second block. Once installed the eye bolt and screw were very solidly attached to the cinder block.
Wire Rope

One threaded screw with inverted wing nut on the left and one eye bolt on the right
Shown above is the final setup using wire rope with wire rope clips and turnbuckles. Zip ties prevent the turnbuckles from escaping from the eye bolts.
This provided a really solid connection from the ballast to the tripod. The turnbuckles are tensioned so that they were one twist away from raising the concrete block a smidge off the surface of the roof.
Lessons Learned
Lesson 1 - The Wind is Strong
Boulder is known for strong gusts of wind that can break 100MPH (160KPH) a few times a year. Finding a location on my roof where I could solidly attach the system was crucial. I didn’t watch to drill into my roof or the sides of the house, so instead I decided to use a tripod with ballast to hold the station in place.
When I originally setup the weather station I calculated (with words in my head) that a single 35lbs block would hold the station in place. Should be fine…

The first setup
This first setup used zip ties to tension the two blocks to the base of the tripod. Unfortunately I had some really bad zip ties. You know - the ones that snap or release as soon as you put a bit of force behind them? I know this attachment system was questionable, but note the snow and my decision to start this project in December.

Adding turnbuckles
After a bit of Googling, I discovered these things called turnbuckles! Wow they work. You probably fall into one of two categories. Either you know exactly what wire rope is, and you think I’m crazy, or you’re like me, never anchored something before, and think zip ties’ll do it. Believe me - they won’t.

Setup number 3 - now with wire rope!
The third setup adds a proper turnbuckle and wire rope. This setup is really nice and solid! The turnbuckle makes it really easy to tension the full 35lbs onto the tripod. Who needs the second ballast?

Weather station after the February 20th, 2014 wind storm
There are roughly a dozen nights a year in Boulder, CO where you question the build quality of your home. The windows vibrate, the walls shake, and you lay awake at night thinking about the large trees out front coming down on your car. On February 20th, 2014, the station blew over. A cup broke off the anemometer, the wind direction vane broke off completely, and the solar cell broke off its mount. The damage was rough, but I’m lucky the station didn’t leave the roof entirely.
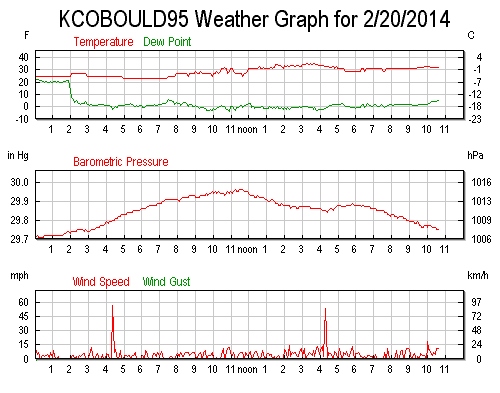
But it looks quiet at 10:30PM…
Late on February 20th, the station clocked a few 50mph gusts before the ballast was moved 6 inches and the turnbuckle came unhooked from the eye bolt. The station blew over, the Imp SD card popped out of the socket on the shield, and Wimp stopped reporting.

Because one ballast was attached and one was not, we get a neat view into how much the station actually dragged 35lbs across the roof. I believe the station would have not been blown over if the turnbuckle had not worked itself out of the eye bolt. Remember the previous picture? I never zip tied the hook to hold it against the eye bolt.
Double turn buckle with zip ties securing the connections
Here’s what the setup looks like today. I don’t recommend using zip ties for loads any more, but they do a great job of making sure the hooks won’t escape the eye bolts.
Lesson 2 - Make it Aaccessible
Above all else, put the Wimp where it can be easily maintained. Things will break - be sure you can access your weather station with as little danger as possible.
You may think you’ll only have to do maintenance on the weather station once a year. If you’re building your own, plan to be in the station once a week in the beginning and once a month after you get it up and running.
I ended up having to replace the battery pack a few times. I had problems with my solar charger due to a rouge piece of code failing to put the Imp properly to sleep and because the solar cell was shaded by a large clamp (repairs post wind storm). Even with the best laid plans, you’ll find yourself on the roof, in February, wondering why you started this project…
Lesson 3 - The Code is Wrong
No matter how much you try to prevent it, there will be problems with your code. Even Spirit, the Mars rover, had a rolling reboot issue. I had similar problems with small errors including a bug that arbitrarily zeroed the wind gust measurement.
When I started this project, I assumed the Arduino portion of the project would have to be locked in because who wants to climb on their roof to plug in a USB cable to reprogram the Arduino? Luckily, a few weeks after the first station was built I discovered the Imp could wirelessly reprogram the Arduino. This has proven to be extremely helpful. If you can, plan for bad code, and make your device remotely reprogrammable.
Resources and Going Further
By building your own weather station, not only are you learning a ton about DIY electronics, but you also get a good taste of what it takes to deploy an electronics project in the real world. And congratulations - you’ve added something to this thing everyone keeps calling the Internet of things. It’s a good thing! More weather data means better forecasting in the future.
This was a big tutorial to write! We hope you’ve enjoyed it. If you’ve got similar weather projects or lessons, please let us know.
Extra Resources:
- Read more about the Electric Imp
- Hacking MindWave Mobile
- Making Simon Says Wireless
Checkout these other great sensor tutorials as well:
- ML8511 UV Sensor Hookup Guide
- T5403 Barometric Pressure Sensor Hookup Guide
- Sound Detector Hookup Guide
- TSL2561 Luminosity Sensor Hookup Guide
- LSM9DS0 9DoF Sensor Hookup Guide
learn.sparkfun.com |CC BY-SA 3.0 | SparkFun Electronics | Boulder, Colorado