Re-Programming the LilyTiny / LilyTwinkle a learn.sparkfun.com tutorial
Available online at: http://sfe.io/t272
Introduction
The LilyTiny (and LilyTwinkle) are both great, low-cost, sew-able microcontrollers for eTextile projects. For most projects that only need to interface to a small number of LEDs or sensors, the LilyTiny is a great option.

The LilyTiny has 6 petals. Two are reserved for power(+) and ground(-). The other four are general purpose I/O pins (GPIOs). The LilyTiny is pre-loaded with a sample sketch which shows a variety of LED patterns on each of the pins:
- “breathing” pattern (pin 0)
- heartbeat pattern (pin 1)
- simple on-off blink (pin 2)
- random fade (pin 3)
This is a great place to start, but the only way to re-program one of these boards is to use an AVR Programmer and an ISP Pogo Pin Adapter to connect to the 6 exposed pins on the bottom of the LilyTiny board.
This is okay if you haven’t already sewn your board into your project. If you have, we can still re-program your board. This tutorial will show you exactly how to accomplish this.
Things you will need
- Pomona 5250 8 Pin SOIC Clip (available at Digikey)
- Male to Female Jumper wires
- Tiny AVR ISP Programmer
- 2 x 12" 4-wire ribbon cables
- Male break-away headers
Optional, but recommended: USB Extension Cable
1x LilyTiny or LilyTwinkle to reprogram. The Protosnap Twinkle Kit is a great option for beginners!
There are a couple of ways to re-program your board. We will focus on one of the easiest methods here – using the Tiny AVR Programming stick.

Tiny AVR Programming Stick with Pomona 5250 SOIC Clip used to re-rogram the ATtiny85 on the LilyTwinkle.
ATTiny Board Files
Before we start, we need to setup the Arduino programming environment to handle the ATTiny hardware. The ATTiny is not part of the “default” board files that comes with Arduino 1.x. You will need to “install” these board files to your Arduino environment in order to re-program your LilyTiny.
The High-Low Tech Lab at MIT has a really nice tutorial on this process here.
Install the ATTiny hardware files
We will first need to install the ATTiny hardware board files.
Create a folder under your Arduino sketchbook called “hardware.”
Locate your Arduino sketchbook folder (you can find its location in the preferences dialog in the Arduino software) - this is typically under Documents > Arduino
Create a new sub-folder called “hardware” in the sketchbook folder, if it doesn’t exist already.
Open (unzip) the ATTiny-master.zip file and copy the “attiny” folder (not the attiny-master folder) from the unzipped ATtiny master.zip file to your new “hardware” folder.
You should end up with folder structure like Documents > Arduino > hardware > attiny that contains the file boards.txt and another folder called variants.
Restart the Arduino development environment.
You should see ATtiny entries in the Tools > Board menu.
Tiny AVR Programmer
Follow the hook-up guide for the Tiny AVR programmer. For Windows / PC users, there are a few driver files that you’ll need. For Mac / OS X users, the Tiny AVR Programmer should be plug-and-play ready.
Tiny AVR Programmer Hookup Guide
October 28, 2013
Use the 4-wire ribbon cables and the straight pin break-away headers to connect the SOIC clip to the Tiny AVR Programmer. Make sure that the left side pins are wired to the left side of the SOIC clip and the right side pins are wired to the right side of the SOIC clip.
I also recommend using a USB extension cable with the Tiny AVR Programmer so you have a little more movement from your computer when re-programming.
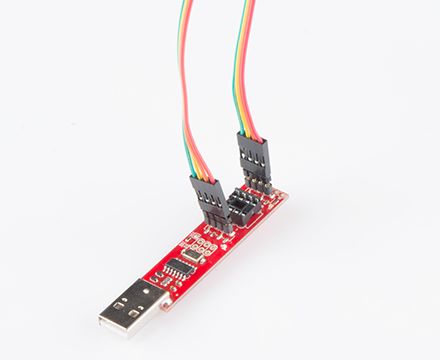
Tiny AVR Programmer with 4-wire ribbon cables and straight pin break-away headers.
Test Code - "Hello World!"
As with nearly every introductory Arduino project, we test our system with a “blink” program – the equivalent to “Hello World!” in most other programming environments. First, we need to make sure the configuration is set properly in the Arduino IDE.
Step 0 - Open up the Arduino IDE
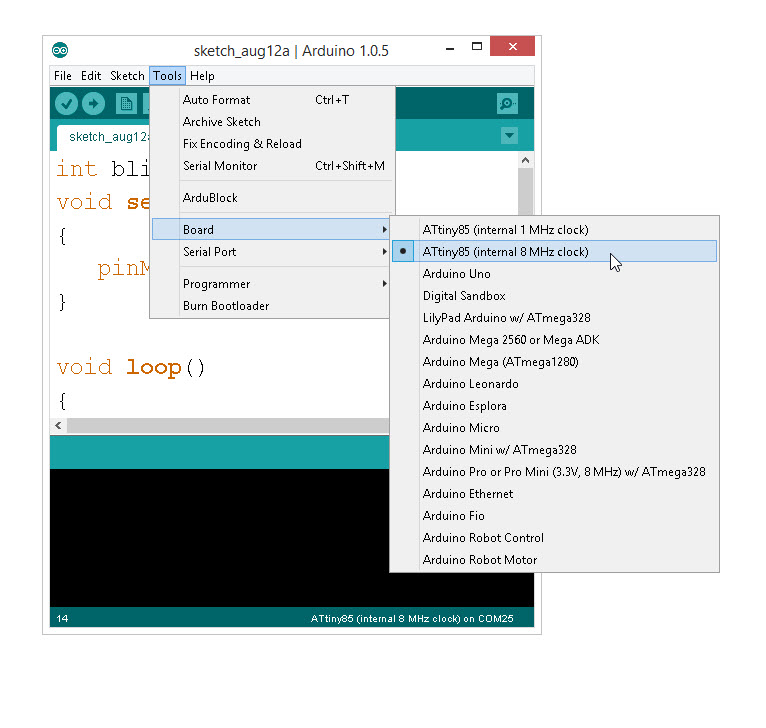
Step 1 - Setting the Board Type
The LilyTiny has an ATtiny85 microcontroller on it. Change the board type in the Arduino IDE to correspond with this. The ATtiny85 can be set with either a 1 MHz internal clock or an 8 MHz internal clock. Be sure to select 8 MHz. Select: Tools –> Board –> ATtiny85 (internal 8 MHz clock)
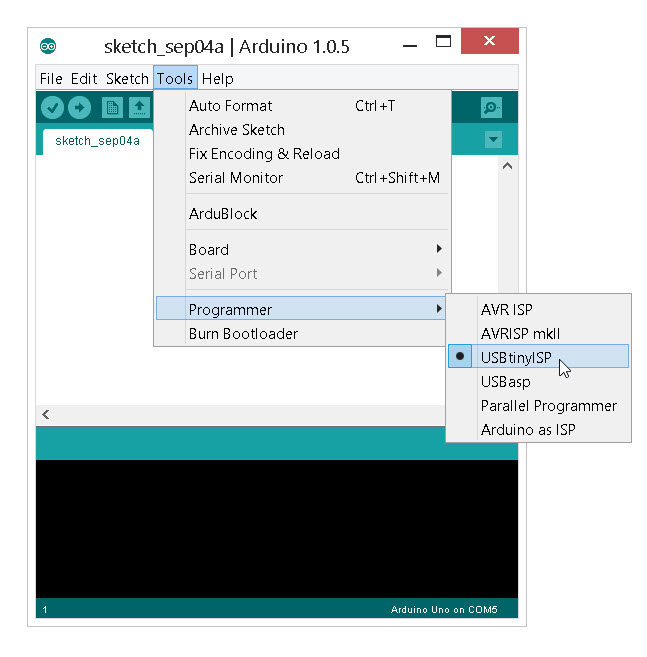
Step 2 - Setting the Programmer
Because we are using the Tiny AVR as our programmer, we need the change the default programmer. This settings is also under the Tools menu.
Step 3 - Upload Code
Copy the code below and paste this into your Arduino window.
int blinkPin = 0;
void setup()
{
   pinMode(blinkPin, OUTPUT);
}

void loop()
{
    digitalWrite(blinkPin, HIGH);
    delay(500);
    digitalWrite(blinkPin, LOW);
    delay(500);
}
Click the upload button. You may see a few warning messages such as:
avrdude: please define PAGEL and BS2 signals in the configuration file for part ATtiny85
You can ignore this one. If everything is working, you should be seeing a blink on GPIO 0 (pin 5 of the ATtiny).
Notes on Programming the ATtiny85

The ATtiny85 isn’t your everyday Arduino microcontroller. It packs a lot of punch for its small size. The following Arduino commands should be supported:
- pinMode()
- digitalWrite()
- digitalRead()
- analogRead()
- analogWrite()
- shiftOut()
- pulseIn()
- millis()
- micros()
- delay()
- delayMicroseconds()
- SoftwareSerial
All 5 pins are general purpose digital I/Os (GPIO). This means that they can be used with both digitalWrite() and digitalRead().
Pins 0 and 1 support PWM output (analogWrite).
Pins 2, 3, & 4 are tied to A/D on the chip (analogRead).
While the ATtiny85 supports most of the things you need, there are some things it can’t do.
No Hardware Serial (UART)
The ATtiny85 does not have a built in hardware UART. If you try to compile any Arduino code with Serial.begin() or Serial.print() you’ll get an error. However, there is a work around for this – using Software Serial. This tutorial shows an example of how to do this.
Resources and Going Further
For more information regarding the ATtiny85, LinyTiny/Twinkle or AVR programming, check out the following links:
- Original LilyTiny firmware (code)
- Original LilyTwinkle firmware (code)
- High-Low Tech Tutorial– An overview of programming the ATtiny85 using an Arduino Uno as a programmer.
- ATtiny85 Board Definitions– The attiny folder should live within a hardware folder in your Arduino sketchbook.
Tiny AVR Programmer The TinyAVR Programmer is a real slick way to re-program the ATTiny45 or ATTiny85 chips. However, it does require that you install a few additional drivers. You can use this programmer directly with the Pomona 5250 SOIC clip. This programmer already has a debug LED on pin 0.
We have a full hook-up guide for the Tiny AVR Programmer here.

Tiny AVR Drivers
- 32-bit USBTinyISP Driver– Windows driver for 32-bit systems
- 64-bit USBTinyISP Driver– Windows driver for 64-bit systems
Going Further
- H2OhNo!– The H2OhNo! water alarm and development board uses an ATtiny85 to sense the presence of water. This tutorial goes deep into getting the ATtiny85 into a very low power mode.
- Shift Registers– If you’re feeling restrained by the ATtiny’s lack of pins, you may be able to use a shift register to expand on that I/O count.
- Using the Arduino Pro Mini 3.3V– If you’re looking for small, but need more pins and functionality check out the Arduino Pro Mini.
learn.sparkfun.com |CC BY-SA 3.0 | SparkFun Electronics | Niwot, Colorado