Programming the Intel® Edison: Beyond the Arduino IDE a learn.sparkfun.com tutorial
Available online at: http://sfe.io/t317
Introduction
The majority of content in the wild for the Intel Edison seems to be focused on using the Edison while it is attached to the Arduino-compatible development board. With the release of the SparkFun Block line for the Edison, it becomes practical to use far less hardware to access the resources of the Edison.

This tutorial will show you how to write C++ code for the Edison without using the Arduino IDE or making the assumption that the Edison is mounted to an Arduino development board.
Components Used
We’re going to do this fairly minimally; we’re going to demonstrate the Edison’s most basic functionality without involving any fancy hardware. You’ll find more examples involving hardware in tutorials for individual blocks.
- Intel Edison Starter Pack - You’ll need the Console Block at a minimum to get your Edison onto your local WiFi network.
- Intel Edison Base Block (optional) - You may find that the latency of your WiFi network is unacceptable; in that case, you can connect to the OTG port on the Base Block to access the Edison via a USB RNDIS network interface. This is a highly recommended upgrade, however, as it will allow you to upgrade the flash image on the Edison to the latest version.
- Edison Hardware Kit - One will be enough to make the Edison/Console/GPIO stack.
Recommended Reading
Writing code for the Edison without using the Arduino IDE is an advanced topic; we’re going to assume that you’re conversant in at least basic Linux command line syntax and C++ syntax.
- Getting Started with the Edison - Getting the Edison powered up, connected to your network, and getting to the command line. Also updating the firmware, which is recommended before proceeding but not mandatory.
- General Edison Block Guide - Just what it says. This will give you some help understanding how to put the stack together and avoid inter-block conflicts.
- Console Block Hookup Guide - More information on the Console Block.
Toolchain: Eclipse
There are two approaches to writing C++ code on the Edison: Using the Eclipse IDE that Intel provides or going barebones using GCC and a command line directly on the Edison.
Using the Eclipse Environment
Intel has produced guides for installing the Eclipse IDE for Macintosh, Linux, and Windows.
Once you’ve installed it and launched it, come back here and we’ll walk through connecting the Edison to the IDE and loading an example program. The instructions there are incomplete and without additional work, you won’t be able to run programs on the Edison.
Connecting to the Edison
In order to connect to the Edison, you need to have some sort of open TCP/IP channel to it. This can be either through the USB-OTG port on the Edison or over your local WiFi network. You’ll need to know what the IP address of the Edison is; you can find more information on that on the Edison Getting Started tutorial.
Once you’ve discovered the IP address of the Edison in question, here’s how to connect:

As in the picture above, click on the “Remote System Explorer” button in the upper right corner.
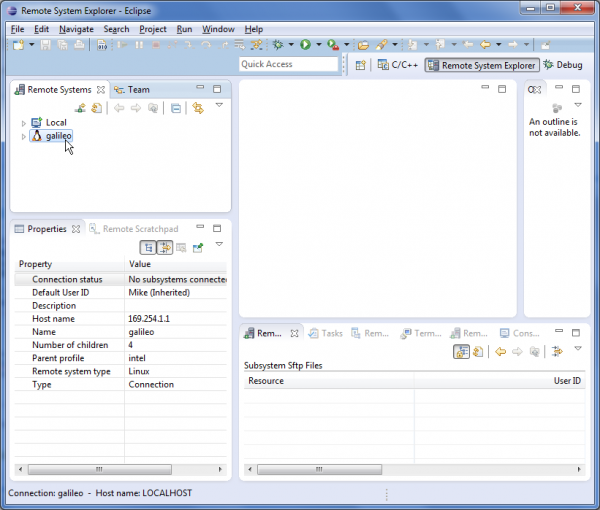
The IDE window should look like this. On the left side, there’s a frame called “Remote Systems” with two entries: “Local” and “galileo”. Delete the galileo entry (just click on it and hit the delete key).
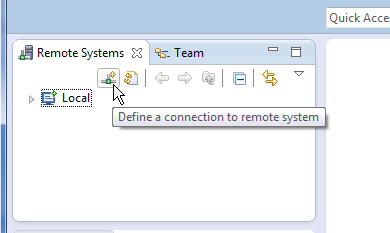
Now we’ll create a new entry. Click on the “Define a connection to a remote system” button.
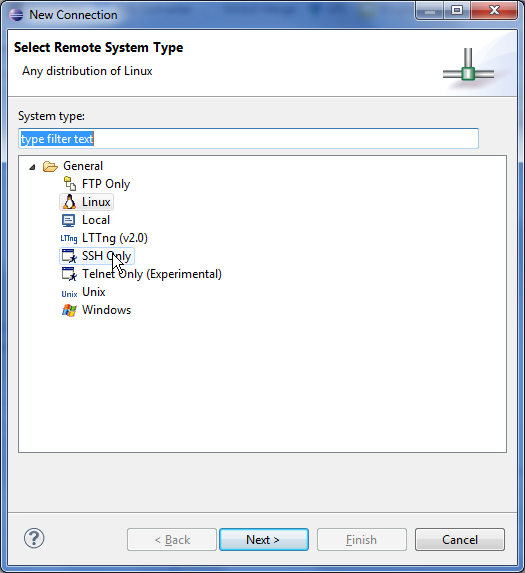
Choose “SSH Only,” and click next.
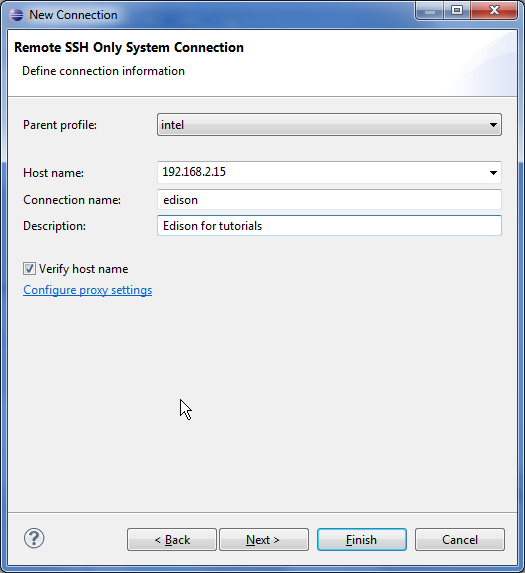
Enter the information for your device, as seen above as well. Click “Finish” (not “Next”). The window will close, and a new item will appear in the list.
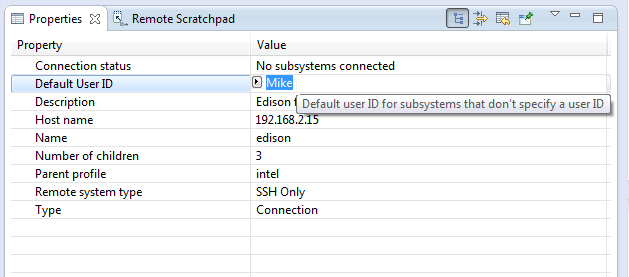
Select the “Edison” connection you just created, you should see a list of options in the lower left that should look mostly like the above. In the “Default user name field”, you can put in “root”; otherwise, it’ll ask for a user name when you connect and use that for future connections.
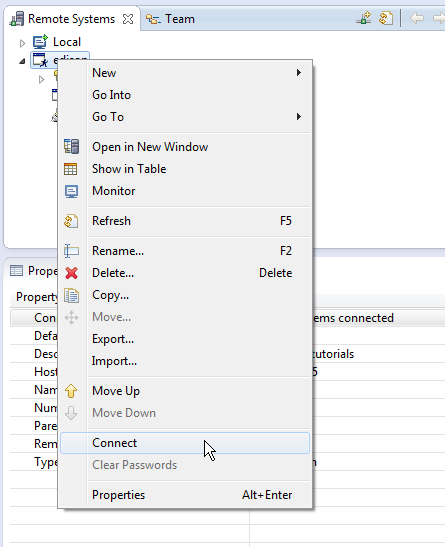
Use the “Connect” option in the contextual menu (right click on PC and Linux, CMD click on Mac). That will bring up this window…
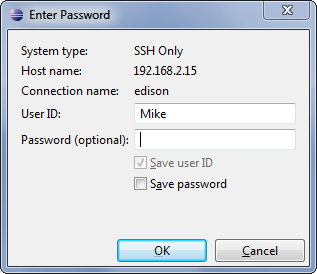
Make sure the IP address here looks right, then put in your password (if you have one). If you’ve never logged into your Edison and set it up, the default can be made “root” and the password can be left blank.
Check and make sure that the properties window in the lower left says “Some subsystems connected” under connection status. You may need to click the “Refresh information of selected system” button, at the top, before that will show up.
You’re now ready to write and run some code with the Eclipse IDE!
Toolchain: Command Line
I like to use the command line, myself; it gives me more options for my editor of choice and generally runs more lightly on my system than Eclipse. Here’s how to get there.
Most of the toolchain is installed on the Edison already: GCC, make, and vi come with the install. Yes, vi, not vim, and no, there’s no other option. I do my editing on the PC and then push the files over to the Edison via SCP or rsync for compilation.
If you’re like me, the thought of editing code remotely through vi makes you cringe. The version of vi on the Edison is so simple, it doesn’t support split frames or most types of search and replace. So, you’ll need some way to push the files up to your Edison once you’ve created them on a development computer.
rsync
The cross-platform option is rsync. It should be on your Mac or Linux computer already, and it can be found for Windows, if you find using Cygwin an acceptable practice.
I’m not going to go into the use of rsync here; it’s been covered extensively elsewhere, and its use with Edison is straightforward.
WinSCP
WinSCP is a Windows-only program that offers update-on-change synchronization over SCP. I’ve used it extensively, and it’s generally pretty good at detecting and keeping your files updated. The downside is that it requires the timebases of the two systems to be fairly synchronized, so you’ll need to make sure that Edison’s NTP is set up properly for your timezone (hint: /usr/share/timeinfo has many locality files; copy the best one for you over the /etc/localtime file, and use the sync command to force a time update.

Hello, world!
Now it’s time to try the classic “Hello, world!” program (not the classic “blinkenlight” one) in both Eclipse and via the command line.
Eclipse
The Edison Eclipse version we had you download and install comes with its own “Hello, world!” program. That’s nice, but it doesn’t really teach you anything about starting a new project on your own, does it?
Fire up Eclipse and let’s get started!
We’re going to cheat, a little, by starting with a project that was provided by Intel. Frankly, the hassle of trying to get all the build settings and environment variables right is just too big.
We’re going to start with the example project “2_cpp_helloworld”. That project, along with all the others, lives in the “iotdk-ide-(platform)/iot-devkit/workspace” directory.
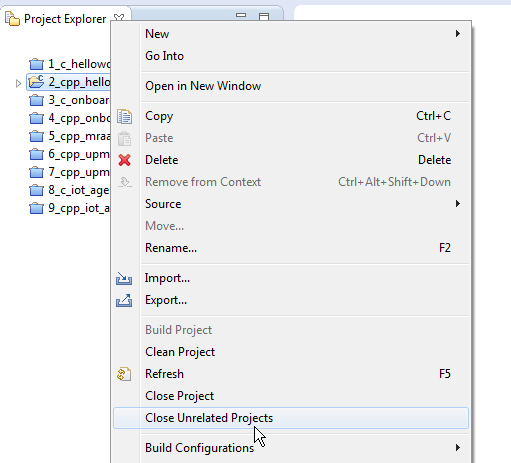
To copy that project, you’ll need it to be open and all the other projects in the workspace to be closed. The easiest way to do that is to open the project, open the contextual menu, and choose “Close Unrelated Projects”. That will close all the other projects in the workspace. Now you can do a simple Copy/Paste operation, with that project highlighted, to get a window that looks like this:

You can rename it to whatever you want, and store it wherever you want, but things will go more smoothly for you if you rename it to “sparkfun_helloworld” and leave it stored in the default location.
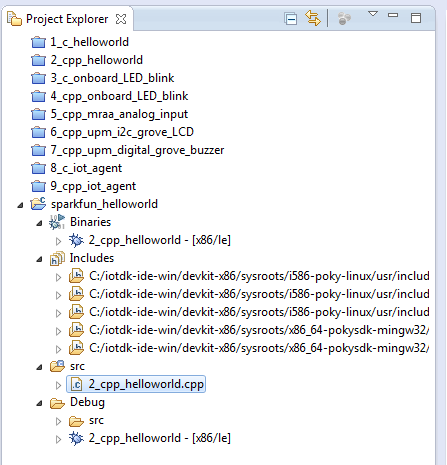
This should now appear in the project explorer window. You can close the original “2_cpp_helloworld” project, it’s just taking up space. I’ve got the subtabs expanded; there are a couple of things to notice about it. First, the source file and binary files are still there and still named “2_cpp_helloworld”. That’s okay, we’re going to delete them anyway.
You’ll also notice that the “Includes” section has several entries already. We’re going to leave those intact, because that’s all the magic that makes your binary work for Edison rather than using the stock includes for your development system. We’re also going to add our SparkFun libraries folder to that.
Before we do that, let’s delete the “2_cpp_helloworld.cpp” file from the project. Just highlight it, and hit the “delete” key. I suppose you certainly could leave the file in place, and just modify it, but I want to show you the process of adding a source file from scratch.
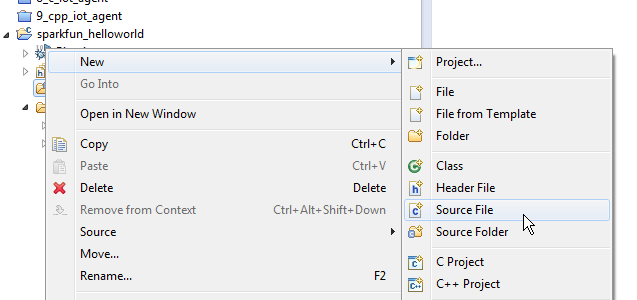
The contextual menu for the “src” sub-tree in this project (not the “debug/src” sub-tree!) will give you the option to create a new source file:
After you’ve created it (all the defaults are okay; the name I used was “helloworld.cpp”), your IDE window ought to look more or less like this:
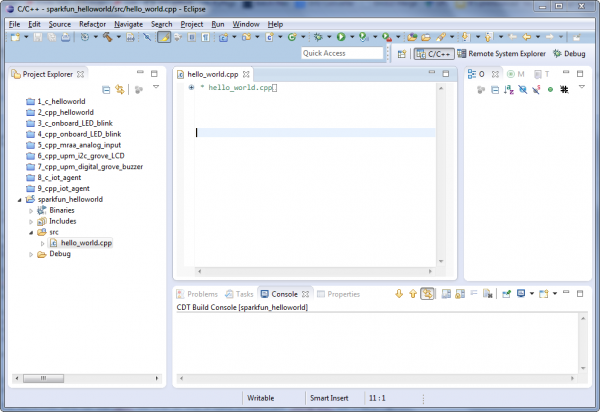
Now, we’re going to write some code!
Here’s the code for the program in question:
#include <iostream>
using namespace std;
int main()
{
  cout<<"Hello, world!"<<endl;
  return 0;
}
Put that code in your file, save it, and choose the “Build Project” entry in the “Projects” menu. I noticed that I had to do it a couple of times before Eclipse sorted out all the symbols and includes; I don’t know why that is, but once done, it seemed to stick.

See the entry in the console window, down at the bottom? Build finished! Also note that the “Problems” tab down there has nothing in it; if something stopped the build, it’ll complain there.
There’s one more step before running the program: you have to tell Eclipse that you want to run the program remotely, not locally. Unsurprisingly, the binary you just built for Edison probably won’t run locally.
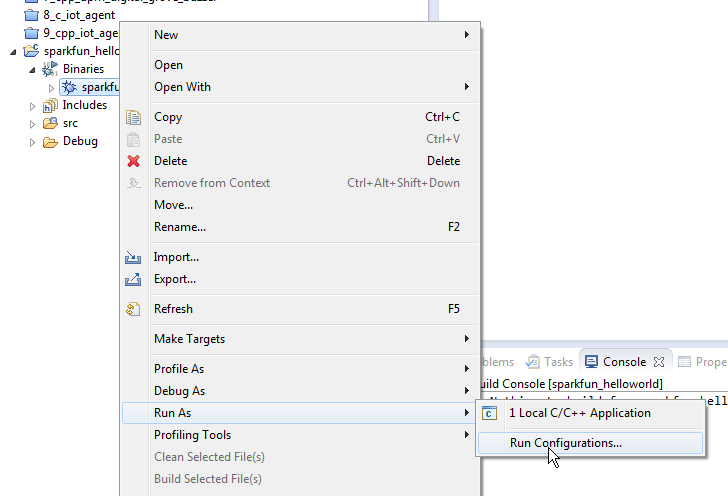
The contextual menu for the binary contains an entry called “Run As”. There are two options: “Local C/C++ Application” and “Run Configurations…” Open the “Run Configurations dialog. It’ll look like this:
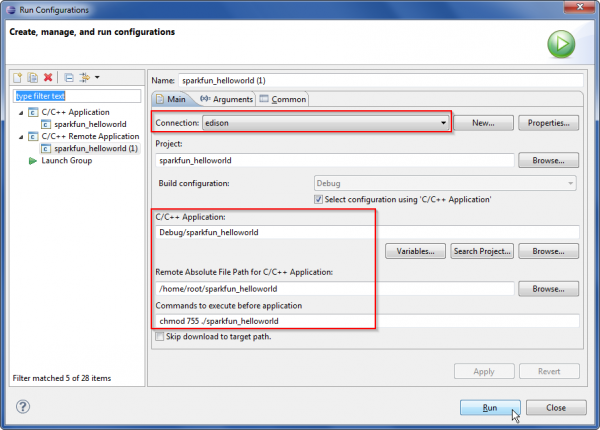
You may need to highlight “Remote C/C++ Application” on the left side and click the “New launch configuration” button first, but then you’ll see the options above. I’ve boxed in the areas of interest: make sure that the “Connection” dropdown has the connection to the Edison selected (whatever you may have named it) and that the “C/C++ Application” field has the path to the bin file. You may choose where to put the file on the Edison in the “Remote Absolute File Path” field; I’ve chosen /home/root, since that’ll be easy to find if I go in through a console later and /home has the most available free space on the Edison. Don’t forget to include the name of the executable in this field!
Finally, you have the option to run some commands before invoking the binary that you just sent to the Edison. The command listed here, chmod 755 ./sparkfun_helloworld, tells Linux on the Edison that this file is an executable and to allow it to run.
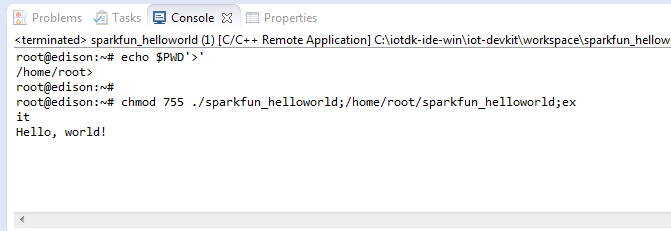
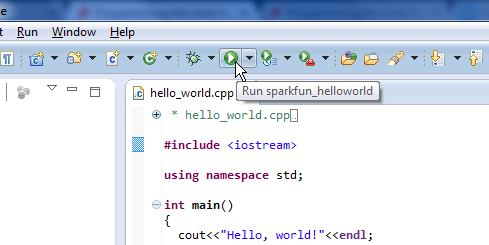
Hit “Apply”, then “Run”, and you should see some magic in the “Console” frame at the bottom of the IDE!
From here on out, after you save, change, and click “Run”, things should work swimmingly.
Console
The process for the console is much easier; in fact, in general, when working with smaller programs on the Edison, doing things over the console is the easier path. Larger projects may become unwieldy, and, in that case, Eclipse probably has the upper hand.
The code for the program is the same; in fact, if you already did the Eclipse project above, you can just copy that file over to the Edison using your favorite file copy method.

You can see that the contents of the file are the same. On the command line, I invoked g++, and then executed the binary it produced.
For smaller files, that’s fine, but what about more complex projects? That’s where Cmake comes in. Cmake uses a fairly simple syntax to determine how to build and link multiple files and libraries into one project. It then generates a make file that can be run to do the actual build. I’m not going to delve too deeply into Cmake here; I’ll reserve that topic for a later tutorial.
Resources and Going Further
That should get you started on writing programs in C++ for the Edison, without relying on the Arduino IDE. In later tutorials, we’ll cover Python, JavaScript, and other options for getting the Edison to do what you want.
Here are some other resources you might find useful for this topic from around the web:
- libmraa - libmraa is Intel’s highly structured framework for IoT hardware platforms. At the moment, it supports Edison, Galileo, Minnow, and Raspberry Pi B.
- cmake - CMake is a cross-platform utility used to build projects. libmraa uses it.
- userland - A useful treatise on the subtleties of living in a command-line world.
learn.sparkfun.com |CC BY-SA 3.0 | SparkFun Electronics | Niwot, Colorado