FLIR Lepton Hookup Guide a learn.sparkfun.com tutorial
Available online at: http://sfe.io/t359
Introduction
When our team found out that we’d be testing a Long Wave Infrared (LWIR) camera, there were two words that we couldn’t stop saying: Predator Vision. That’s right, we were finally going to be able to see the invisible world of heat, which would aid us greatly if we ever found ourselves hunting a team of special operatives in a remote jungle… or, you know, trying not to scald ourselves on a hot cup of tea.
As it happens, the FLIR Lepton is an excellent little module for the price and Pure Engineering has done a bang up job spinning the breakout board and documentation.
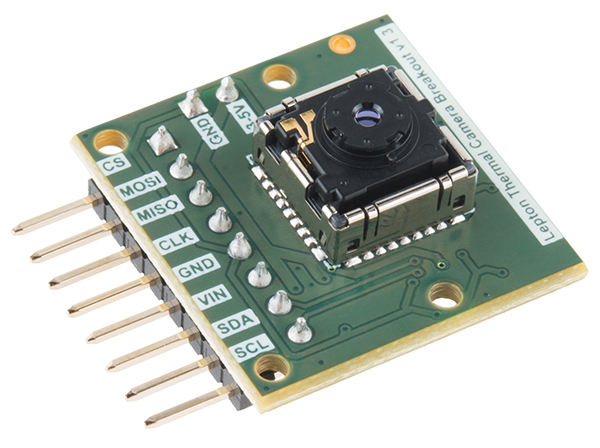
The FLIR Lepton in all its glory.
There are, however, a few minor “gotchas” in the setup process and so we figured it was best if we shared what we learned in playing with this thing.
But first… A bit of theory…
Suggested Reading
- This tutorial will assume you have a little bit of Raspberry Pi knowledge. If the Pi is new to you, have no fear. You can visit our Installing Raspbian and DOOM tutorial, if you need a primer. Also helpful is our Raspberry Pi GPIO tutorial.
- The Lepton uses SPI communication to send its video stream and it uses an I2C-like Communication protocol as the control interface. If you are unfamiliar with either of those communication methods, please visit the corresponding tutorial.
Theory
Electromagnetic radiation is all around (and within, and throughout) us and is comprised of everything from gamma radiation on the high frequency end to radio waves on the low frequency end. While most imaging sensors detect radiation in the visible spectrum (wavelengths from 380 to 700 nanometers), long Wave Infrared sensors detect radiation from 900 to 14,000 nanometers. This is known as the infrared spectrum, and it accounts for most of the thermal radiation emitted by objects near room temperature.
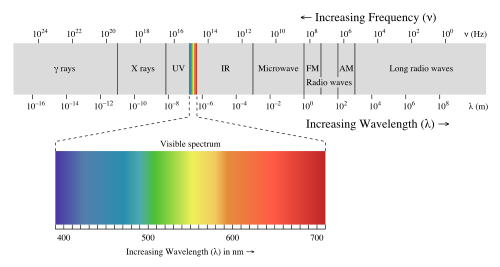
Electromagnetic spectrum with visible light highlighted. Wikimedia Commons.
The sensor inside the FLiR Lepton is a microbolometer array. Microbolometers are made up of materials which change resistance as they’re heated up by infrared radiation. By measuring this resistance, you can determine the temperature of the object that emitted the radiation and create a false-color image that encodes that data.
Thermal imaging of this type is often used in building inspection (to detect insulation leaks), automotive inspection (to monitor cooling performance) and medical diagnosis. Also, because of its ability to produce an image without visible light, thermal imaging is ideal for night vision cameras.
When it comes to robotics, thermal cameras are especially useful heat detectors because the image that they produce (by virtue of being, well, an image) can be processed using the same techniques and software as visible light images. Imagine using something like OpenCV to track, not just color centroids, but heat centroids! That’s right, you could be building heat-seeking robots right in your own home!
In fact, what are we waiting for? Let me give you the tour…
Hardware
Today we’ll be setting up the Raspberry Pi example code as provided by Pure Engineering and featured in our product video. So, of course, we’ll be needing a Raspberry Pi… and not much else, actually. Just a handful of F/F jumper wires as well as a monitor, keyboard and accompanying cables for your Raspberry Pi. The example code has been tested on a Raspberry Pi model B, but it should work fine on any model so long as you have Raspbian installed.
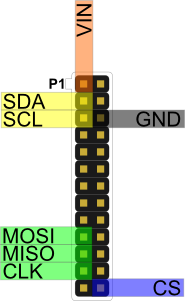
Make sure that your Lepton module is securely snapped into the socket on the breakout board and grab a few F/F jumper wires.
Connect the FLIR breakout to the Raspberry Pi GPIO according to the diagram below. If you need a refresher on how the GPIO pins are oriented, visit our Raspberry Pi GPIO tutorial
Congratulations, that’s the hardware part done. Now onto the software configuration!
Software
As I mentioned earlier, you’ll want to have the Raspbian OS installed on your Raspberry Pi. Boot it up, and open the Terminal program. Our first matter of business will be enabling the Pi’s SPI and I2C interfaces. Luckily, Raspbian makes this easy to do by including a utility called raspi-config. To run the utility just type:
sudo raspi-configYou should be presented with the following screen:

Click on the “Advanced Options” menu, as shown above.

Select SPI and follow the instructions on the following screens. After you’ve completed the SPI steps, do the same thing for I2C. When you exit raspi-config, it will ask if you want to reboot. Go ahead and do it so that the changes we just made will stick.
Pure Engineering’s example code is a QT application so we’ll need to get that dependency installed before we can compile it. Don’t worry, it’s easy to do. Make sure that the Pi has an Internet connection, and run the following command to install the QT dev tools:
sudo apt-get install qt4-dev-toolsWhich will look something like this…

Once installation is complete, go to the Pure Engineering github repo and retrieve the raspberrypi_video directory. If you’re familiar with git, you can do this from the command line. For most people, it’s just as easy to browse to the above link, and click “Download ZIP”. You can download the file to whatever directory you like, then cd to that directory in Terminal, and unzip it using the following command:
unzip LeptonModule-master.zip
Now cd into the unzipped folder “LeptonModule-master” and the directory “raspberrypi_video”. This directory contains all of the files you need to compile the example code. First, we need to “make” the Lepton SDK, so cd into the “LeptonSDKEmb32PUB” directory and run make.
Once that process has completed, cd back out to the “raspberrypi_video” directory and run qmake && make:

Congratulations! You’ve just compiled the example code, and you’re ready to run it. Simply type the following into your command line:
sudo ./raspberrypi_video
You may get an error like the one shown above: a red square in a blank window. If this is the case, carefully remove the Lepton module from the breakout board. That’s right, pull it from the socket, while it’s powered. Then (again, very carefully) pop it back into place. Images should start pouring in!

Visualizing the insulating properties of my beard
Resources and Going Further
Going Further
Now that you’re successfully retrieving LWIR images from the Lepton module you can dig into the example code and apply it to your own project! Try piping the frames captured from your Lepton module into some computer vision software like SimpleCV!
Thermography has hundreds of applications. Spend some time just playing with the camera to see where you might find uses for it. We’d love to see what you do with the FLIR Dev Kit so be sure to leave a comment and tell us all about it!
Resources
- FLIR Dev Kit Product Page
- Lepton Datasheet
- Lepton Module Github Repo
- FLIR Lepton Discussion Forum
- Raspbian OS Download
learn.sparkfun.com |CC BY-SA 3.0 | SparkFun Electronics | Niwot, Colorado