ZX Distance and Gesture Sensor Hookup Guide a learn.sparkfun.com tutorial
Available online at: http://sfe.io/t345
Introduction
The ZX Distance and Gesture Sensor is a collaboration product with XYZ Interactive. The very smart people at XYZ Interactive have created a unique technology that allows for simple infrared beams to be used to detect an object’s location in two dimensions.
The ZX Sensor is a touchless sensor that is capable of looking for simple gestures in the air above the sensor (e.g. swipe left or right). Additionally, the sensor can also recognize the distance of an object away from the sensor up to about 10 inches (the “Z” axis) and the location of the object from side to side across the sensor in about a 6 inch span (the “X” axis).

Covered in This Tutorial
We can use I2C or UART to communicate with the ZX Sensor. In this tutorial, we will show you how to connect the sensor to an Arduino as well as a computer. The tutorial is divided into the following sections:
- Board Overview– We go over the various pins and jumper settings on the ZX Sensor.
- Hardware Hookup– How to connect the sensor to an Arduino.
- Arduino Library Installation– Install the ZX Sensor library if you plan to use it with an Arduino
- Arduino: ZX Example– How to read Z- and X- axis data from the sensor on an Arduino.
- Arduino: Gesture Example– How to read gestures with an Arduino.
- PC: ZX Example– How to read Z- and X- axis data on a Windows computer.
- Resources and Going Further– This section gives you some additional resources for getting more use out of the ZX Sensor.
Materials Used
In addition to the sensor itself, you will need a few extra components to follow along with the Arduino examples:
If you would like to try the ZX Sensor on a Windows-based PC, you will need an FTDI Breakout:

Recommended Reading
There are a few concepts that you should be familiar with before getting started with the ZX Sensor. Consider reading some of these tutorials before continuing:
- What is an Arduino?– Two of the examples use an Arduino to control the ZX Sensor
- I2C– I2C is the one of the protocols used by the ZX Sensor
- Serial Communication– We use serial communications to program the Arduino, view debugging information, and transmit data from the ZX Sensor
- How to Use a Breadboard– The breadboard ties the Arduino to the ZX Sensor
- How to Install FTDI Drivers– If you are programming an Arduino or using the ZX Sensor demo app, chances are you will need to use an FTDI
Board Overview
The ZX Sensor works by bouncing infrared (IR) beams of light from the two LEDs on either side off of an object above the sensor. The bounced light returns to the receiver in the center of the sensor, and a microcontroller on the back of the sensor interprets the data. We can read the results using an I2C or UART connection.
Pin Descriptions
The ZX Sensor gives us 2 ports to connect to: I2C and UART.

| Pin Label | Description |
|---|---|
| GRN | Not used |
| TXO | UART transmit out from the ZX Sensor |
| RXI | UART receive. Not used at this time. |
| VCC | 3.3 - 5 V power supply |
| GND | Connect to ground |
| BLK | Not used, but connected to GND |
| DR | Data Ready. High when there is data to be read via I2C |
| CL | I2C clock |
| DA | I2C data |
Setting the Jumpers
The ZX Sensor has a couple of jumpers on the back of the board that can be opened or closed with a soldering iron.

I2C Pullups - The ZX Sensor, by default, comes with 4.7 kΩ pull-up resistors on the SDA and SCL I2C lines. Remove the solder on this jumper to disconnect the pull-ups.
I2C Addr - By default, this jumper is open. Close it to change the I2C address of the sensor.
| Jumper | I2C Address |
|---|---|
| Open | 0x10 |
| Closed | 0x11 |
The Infrared Shields
See those little brass tubes on the LEDs? They are needed to block any IR light going directly from the LEDs (inside the brass tubes) to the receiver (the black domed component in the center of the sensor). We want the light to bounce off an object first.

They are held on with Super Glue. You can remove them, but it might require a bit of acetone. If you plan to mount the ZX Sensors in your own housing, make sure IR light can’t travel directly from the sides of the LEDs to the receiver (i.e. you will want to make your own IR shields).
Hardware Hookup
Add Headers
Solder a row of break away male headers to the 9 headers holes on the board.

Connect the Breakout Board
For the Arduino examples, we will be using I2C. Connect the breakout board to the following RedBoard pins:

| ZX Sensor | RedBoard |
|---|---|
| VCC | 5V |
| GND | GND |
| DR | 2 |
| CL | A5 |
| DA | A4 |
Note that we connect the DR pin, but we will only use it in the Arduino: Gesture Example. DR stands for “Data Ready,” which is active high whenever data is ready to be read from the ZX Sensor. We can attach this to an Arduino interrupt so we don’t have to continuously poll the sensor.

Arduino Library Installation
All of the hard work for the ZX Sensor is being accomplished in the microcontroller on the sensor itself. All we need to do is read the results! We have created an Arduino library to make that even easier for you. Click the button to download the latest version of the ZX Sensor Arduino Library.
Download the ZX Sensor Arduino Library!
Unzip the downloaded file. Follow this guide on installing Arduino libraries to install the files as an Arduino library.
Arduino: ZX Example
Load the ZX Demo
Open up the Arduino program and select File → Examples → SparkFun_ZX_Distance_and_Gesture_Sensor → I2C_ZX_Demo.

Attach a USB mini cable from your computer to the RedBoard. If you have not previously done so, install the FTDI drivers.
For reference, here is the I2C_ZX_Demo.ino sketch.
Run
Make sure you have the correct serial port selected under Tools → Serial Port and “Arduino Uno” selected under Tools → Board. If you have never used the Arduino IDE before, this turoial should get you started.
Click the Upload button and wait for the program to finish uploading to the Arduino. Select Tools → Serial Monitor to open up the serial terminal. More info on the Serial Terminal can be found here. Note that the Serial Monitor settings are the default settings (9600, 8, n, 1). You should see a couple of messages noting that “ZX Sensor initialization complete.”
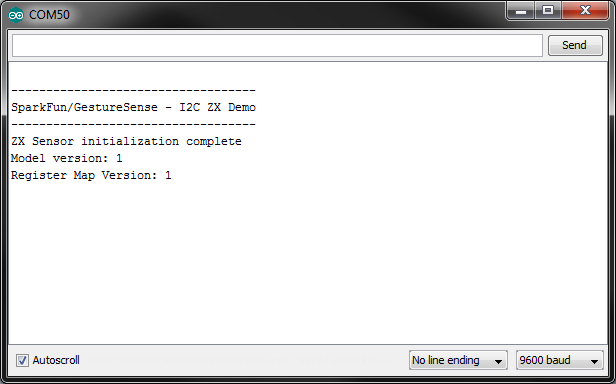
Hover your hand 4 to 10 inches (10 to 25 cm) above the sensor.

Move your hand around above the sensor, and you should see Z (height above the sensor) and X (position side to side) appear in the serial terminal.

Arduino: Gesture Example
Load the Gesture Interrupt Demo
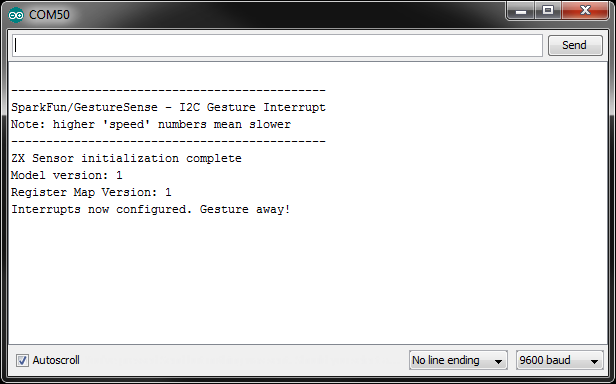
In addition to providing Z- and X- axis data about an object, the ZX Sensor is also capable of detecting simple gestures. To see an example of this, open File → Examples → SparkFun_ZX_Distance_and_Gesture_Sensor → I2C_Gesture_Interrupt.

Here is the I2C_Gesture_Interrupt.ino sketch for reference.
Run
Upload the sketch, and open the Serial Monitor. You should see a message stating that initialization is complete.
Start with your hand off to one side (a “side” being the one of the infrared LEDs with the brass covers) about 4 to 10 inches (10 to 25 cm) above the sensor. Swipe your hand horizontally across the sensor so that your hand passes over the one infrared LED and then the next infrared LED.

If you performed the gesture correctly, you should see a message appear in the Serial Monitor.
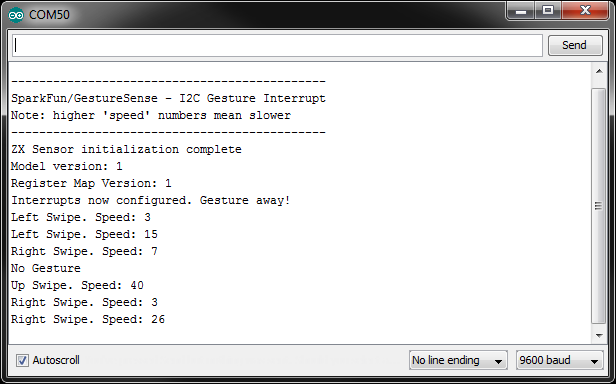
Supported Gestures
Here is a list of the currently supported gestures. Make sure each gesture begins outside of the range of the sensor, moves into the range of the sensor, and ends outside the range of the sensor.
| Gesture | Description |
|---|---|
| Right Swipe | A swipe from the left side of the board to the right and out of range of the sensor. Make sure that your wrist/arm is not in the sensor's range at the end of the swipe! |
| Left Swipe | A swipe from the right side of the board to the left and out of range of the sensor. |
| Up Swipe | Object starts near the sensor, hovers for at least 1 second, and then moves up above and out of range of the sensor. |
| No Gesture | The sensor could not correctly determine the gesture being performed. |
PC: ZX Example
The ZX Sensor, in addition to responding to I2C commands, continually transmits ZX data over its UART port. We can connect an FTDI Breakout directly to the ZX Sensor and read the output. You can use serial applications or the screen command (Linux or Mac) to view the output.
If you are on a Windows computer, you can use the demo application (linked below) provided by XYZ Interactive to test the ZX Sensor.
Setup
Connect the FTDI Breakout board to the ZX Sensor. Ensure the pins on the FTDI Brekaout line up with the pins on the ZX Sensor (e.g. GRN connects to GRN and BLK connects to BLK). Connect the FTDI Breakout to your computer with a USB cable.

Download the ZX Demo application, and unzip it.
Download the ZX Demo Application
Run
Double-click to run the ZX Demo application. Under “Input:” on the right side, drop down the list and select the COM port that corresponds to your FTDI Breakout (if you need a refresher on find the right COM port, check out this section of the Terminal Basics tutorial). You do not need to choose an “Output:” port.
Click Open to connect to the FTDI Breakout.

Move your hand around above the sensor, and you should see the red ball move.

Try out the other tabs in the application! The Z-Control tab lets your try moving your hand toward and away from the sensor, and the Gestures tab computes a few different gestures based on the Z- and X- data.
Resources and Going Further
After trying the basic ZX and gesture demos, you can try the other examples in the Arduino library. A description of each of the examples is given below:
- I2C_Gesture_Demo– Poll the sensor over I2C to see if any gestures have occurred.
- I2C_Gesture_Interrupt– The DR pin will go from low to high when a gesture is detected. This example reads the gesture over I2C and tells the sensor to clear DR.
- I2C_ZX_Demo– Poll the sensor periodically over I2C for Z- and X- axis data.
- I2C_ZX_Interrupt– The ZX Sensor will throw DR high whenever valid ZX data is ready.
- UART_Gesture_Demo– NOTE: Gestures over UART are not supported at this time. This demo is a placeholder for the time being.
- UART_ZX_Demo– Read Z- and X- axis data from a software serial port and display them on the Serial Monitor.
Resources
Here are some additional resources to help you with the ZX Sensor:
Other Tutorials
What will you make with the ZX Sensor? If you need some inspiration, check out these related tutorials:
Connecting Arduino to Processing
RGB Panel Hookup Guide
APDS-9960 RGB and Gesture Sensor Hookup Guide
learn.sparkfun.com |CC BY-SA 3.0 | SparkFun Electronics | Niwot, Colorado