Soil Moisture Sensor Hookup Guide a learn.sparkfun.com tutorial
Available online at: http://sfe.io/t390
Getting Started
Have you ever wanted your plants to tell you when they need watered? Or know how saturated the soil in your garden is? With the SparkFun Soil Moisture Sensor, you can do this plus more. This tutorial will show you how to get started using the Soil Moisture Sensor as well as how to build your own soil moisture sensing project.

Soil Moisture Sensor
Required Materials
To follow along with the project at the end of this tutorial, you will need the following:
Suggested Readings
There isn’t much to learning how to use the Soil Moisture Sensor. However, you may find the following concepts useful along the way.
- Voltage, Current, Resistance, and Ohm’s Law
- Resistors
- How to Solder
- Analog to Digital Conversion(ADC)
- Soil Moisture Sensing by Hacking a Solar Light
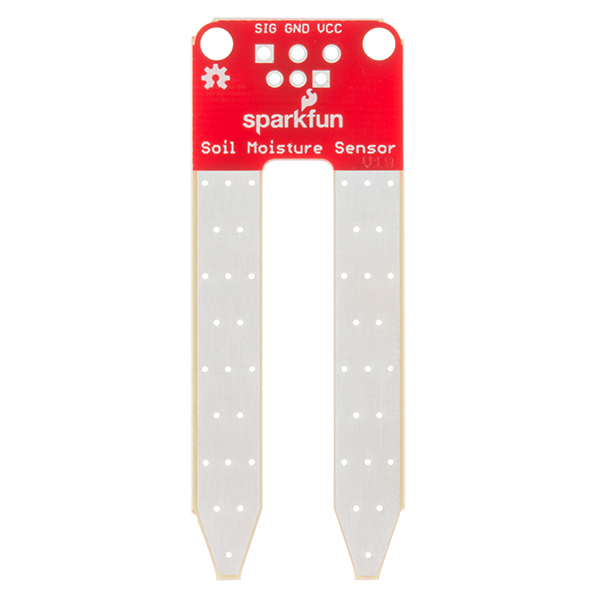
Hardware Overview & Assembly
The Soil Moisture Sensor is pretty straightforward when it comes to hookup. You need to supply VCC and GND. We recommend not powering the sensor constantly to prevent oxidation of the probes (more on this in a bit). You will get a SIG out, which will be between almost VCC and GND, depending on the amount of water in the soil. The two probes are acting as a variable resistor – more water in the soil means better conductivity and results in a lower resistance and a higher SIG out. Your analog readings will vary depending on what voltage you use for Vcc as well as the resolution of your ADC pins.
As for connecting the senor to your circuit, we’ve given you a few different options. You can solder on a 3-pin JST Jumper Wire Assembly if you need to easily switch sensors on your project.

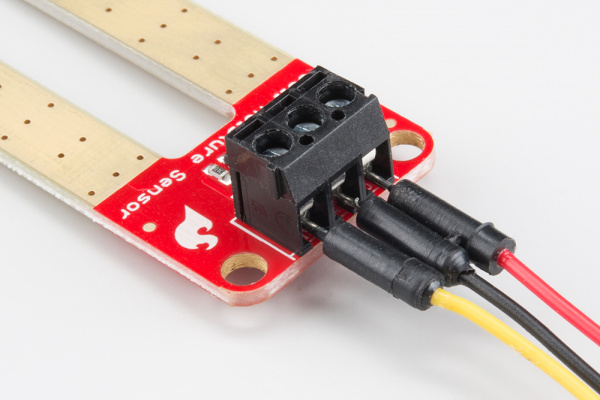
Another option is to solder on a 3-pin 3.5mm Screw Pin Terminal for a slightly more robust connection.
Of course, you can always solder some hookup wire straight to the sensor.
If you intend to use this sensor outdoors, we recommend adding a little protection to the PCB to extend its lifespan. You could always use good ol' fashioned hot glue. However, hot glue does not hold up well in the sun and is only recommended for projects that will not be exposed to high temperatures. For projects that need to be able to withstand all the elements, you could use a conformal coating to cover the SMD parts on the PCB as well as your solder connections.

Wires have been soldered to this sensor. All the SMD parts and solder joints have then been covered in conformal coating.
Powering the Soil Moisture Sensor
One commonly known issue with soil moisture senors is their short lifespan when exposed to a moist environment. To combat this, we’ve had the PCB coated in Gold Finishing (Electroless Nickel Immersion Gold).
Another way to extend the lifespan of your sensor is to only power it when you take a reading. Using a digital pin set to HIGH on an Arduino, for example, is an easy way to accomplish this. If you wish to power the sensor with more than a digital pin on your microcontroller can provide, you could always use a transistor.
Soil Moisture Sensing Project
For a simple setup that will read and display the water level value, and tell you whether the soil is wet/dry/needs watering, I have hooked the Soil Moisture Sensor to a RedBoard and a Serial Enabled LCD Screen.
Red (VCC) goes to 5V on the RedBoard, Black (GRN) goes to ground on the RedBoard, and Green (SIG) goes to analog pin 0 on the RedBoard (can be changed in the code).

Along with the soil moisture sensor, I have connected the LCD screen to 5V, ground, and digital pin 2 for serial communication (also can be changed in the code).
This is a good time to mention that if you want to prolong the life of your soil moisture sensor - meaning you don’t want it to corrode as quickly - you can instead hook up VCC to a digital pin and only power it at 5V when you want to take a quick reading, and then turn it off. If you constantly have the soil moisture sensor powered it will corrode over time, and the more water in your soil, the faster that will happen. Another way to protect your soil moisture sensor from corroding is by encasing the probes in gypsum; this allows water from the soil to be detected, but delays corrosion significantly.
Firmware
The code for this is fairly straightforward. You will need the Software Serial library to interact with the serial LCD screen. If you do not have this library you can get it from the Arduino GitHub here. If you have never uploaded a library or want a quick refresher on how to do that, check out our tutorial here.
For more specific information about the code, you can read the comments in the code itself:
language:c
// SparkFun Soil Moisture Sensor and Serial LCD example 1
// By Sarah Al-Mutlaq 2015
// Sketch reads sensor and desplays level and whether soil is wet or dry

// Use the softwareserial library to create a new "soft" serial port
// for the display. This prevents display corruption when uploading code.
#include <SoftwareSerial.h>

// Attach the serial display's RX line to digital pin 2
SoftwareSerial mySerial(3,2); // pin 2 = TX, pin 3 = RX (unused)


// Here we are setting up some water thersholds that we will
// use later. Note that you will need to change these to match
// your soil type and environment.

int thresholdUp = 400;
int thresholdDown = 250;

// We are setting up the pin A0 on the redboard to be our sensor
// pin input:

int sensorPin = A0;


void setup(){
  mySerial.begin(9600); // set up serial port for 9600 baud (speed)
  delay(500); // wait for display to boot up
}

void loop(){
  // Here we are declaring a string, which are lines of words,
  // and we want DisplayWords to be the words displayed on
  // the LCD screen, which will change based on whether the soil
  // wet or dry based on our threshold values above.
  String DisplayWords;

  // We need to set up a pin to get the value that the soil
  // moisture sensor is outputting, so sensorValue will get the
  // analog value from the sensor pin A0 on the redboard that we
  // set up earlier.

  int sensorValue;
  sensorValue = analogRead(sensorPin);

  // move cursor to beginning of first line on LCD:
  mySerial.write(254);
  mySerial.write(128);

  // clear display:
  mySerial.write("");
  mySerial.write("");

  // move cursor to beginning of first line of the LCD screen:
  mySerial.write(254);
  mySerial.write(128);

  //Write what we want to desplay on the screen:
  mySerial.write("Water Level: ");
  mySerial.print(sensorValue); //Using .print instead of .write for values

  // Now we are going to check if the water level is below a
  // out thresholdDown value we set earlier, and if it is have
  // words "Dry, Water it!" display one column over on the first
  // row:

  if (sensorValue <= thresholdDown){
    // move cursor to beginning of second line on LCD:
    mySerial.write(254);
    mySerial.write(192);

    DisplayWords = "Dry, Water it!";
    mySerial.print(DisplayWords);

  // If the value is not below our thresholdDown value we want to
  // check if it is above our thresholdUp value, and if it is
  // change the display words to "Wet, Leave it!":


  } else if (sensorValue >= thresholdUp){
    // move cursor to beginning of second line on LCD:
    mySerial.write(254);
    mySerial.write(192);

    DisplayWords = "Wet, Leave it!";
    mySerial.print(DisplayWords);

  // Otherwise if it is inbetween the two values we want it to
  // the display it had, so if our soil was really wet and drying
  // the words would only change to "Dry, Water it!" when it got to the lower threshold
  // (thresholdDown), but if it was dry and getting wetter the words
  // would only change to "Wet, Leave it!" when it got to the upper
  // threshold (thresholdUp_):

  } else {
    // move cursor to beginning of second line on LCD:
    mySerial.write(254);
    mySerial.write(192);

    mySerial.print(DisplayWords);
  }

  delay(500); //wait for half a second, so it is easier to read
}
This code has different values for an upper threshold and a lower one, so you have a middle zone that could either be wet or dry depending on whether the soil is drying out (coming down from being wet) or getting wet (coming up from being dry). If you don’t want this middle zone, you can set both thresholds to the same value, but I have found that having this middle area is more similar to how soil actually works; there really isn’t a point at which soil goes from being wet to dry. If you are interested in soil and how it reacts to water, you should read up on it; it can be very complicated and interesting.
You will need to adjust the code variables anyway, since this will be unique to your setup, soil type, and how wet you actually want your soil to be. Test out the reading and play around with the values until you find some that fit your needs.
Automating Your Watering
Now that we have a project that reads the soil moisture, we can take it a step further and set up a small self-watering system.

Soil moisture sensor with self-watering system
Using some Actobotics parts…
…and some things I picked up from my local Home Depot (bucket, O rings, and PVC pipe) and Hobby Lobby (Crazy straw, zipties, and glues), as well as a small piece I laser cut, I was able to put together the watering system I wanted.

Parts for self-watering system
This is just one of many ways you could hook up a motor to run a self-watering system. Other ways include putting a gear directly into the water and having it rotate fast enough to pull the water up and into the plant. Or you could have the motor running a system somewhat like our Bartendro Dispenser.

Wiring from RedBoard to motor
Here is the code used (basically the same code with just a few additions for the motor):
language:c
// SparkFun Soil Moisture Sensor and Serial LCD example 2
// By Sarah Al-Mutlaq 2015
// Sketch reads sensor and desplays level and whether soil is wet or dry
// and turns on motor if dry

// Use the softwareserial library to create a new "soft" serial port
// for the display. This prevents display corruption when uploading code.
#include <SoftwareSerial.h>

// Attach the serial display's RX line to digital pin 2
SoftwareSerial mySerial(3,2); // pin 2 = TX, pin 3 = RX (unused)

// We'll be controlling the motor from pin 9.
// This must be one of the PWM-capable pins.
const int motorPin = 9;


// Here we are setting up some water thersholds that we will
// use later. Note that you will need to change these to match
// your soil type and environment.

int thresholdUp = 400;
int thresholdDown = 250;

// We are setting up the pin A0 on the redboard to be our sensor
// pin input:

int sensorPin = A0;


void setup(){
  pinMode(motorPin, OUTPUT); // set pin controlling the motor as an output pin
  mySerial.begin(9600); // set up serial port for 9600 baud (speed)
  delay(500); // wait for display to boot up
}

void loop(){
  // Here we are declaring a string, which are lines of words,
  // and we want DisplayWords to be the words displayed on
  // the LCD screen, which will change based on whether the soil
  // wet or dry based on our threshold values above.
  String DisplayWords;

  // We need to set up a pin to get the value that the soil
  // moisture sensor is outputting, so sensorValue will get the
  // analog value from the sensor pin A0 on the redboard that we
  // set up earlier.

  int sensorValue;
  sensorValue = analogRead(sensorPin);

  // move cursor to beginning of first line on LCD:
  mySerial.write(254);
  mySerial.write(128);

  // clear display:
  mySerial.write("");
  mySerial.write("");

  // move cursor to beginning of first line of the LCD screen:
  mySerial.write(254);
  mySerial.write(128);

  //Write what we want to desplay on the screen:
  mySerial.write("Water Level: ");
  mySerial.print(sensorValue); //Using .print instead of .write for values

  // Now we are going to check if the water level is below a
  // out thresholdDown value we set earlier, and if it is have
  // words "Dry, Water it!" display one column over on the first
  // row:

  if (sensorValue <= thresholdDown){
    // move cursor to beginning of second line on LCD:
    mySerial.write(254);
    mySerial.write(192);

    DisplayWords = "Dry, Water it!";
    mySerial.print(DisplayWords);

    // turns the motor on at a slow speed (0 is stopped, 255 is full speed):
    analogWrite(motorPin, 75);


  // If the value is not below our thresholdDown value we want to
  // check if it is above our thresholdUp value, and if it is
  // change the display words to "Wet, Leave it!":


  } else if (sensorValue >= thresholdUp){
    // move cursor to beginning of second line on LCD:
    mySerial.write(254);
    mySerial.write(192);

    DisplayWords = "Wet, Leave it!";
    mySerial.print(DisplayWords);

    // turns the motor off (0 is stopped, 255 is full speed):
    analogWrite(motorPin, 0);

  // Otherwise if it is inbetween the two values we want it to
  // the display it had, so if our soil was really wet and drying
  // the words would only change to "Dry, Water it!" when it got to the lower threshold
  // (thresholdDown), but if it was dry and getting wetter the words
  // would only change to "Wet, Leave it!" when it got to the upper
  // threshold (thresholdUp_):

  } else {
    // move cursor to beginning of second line on LCD:
    mySerial.write(254);
    mySerial.write(192);

    mySerial.print(DisplayWords);
  }

  delay(500); //wait for half a second, so it is easier to read
}
If you are looking for something on a larger scale for your self-watering system, take a look at our Liquid Pump or our 12V Solenoid Valve for outdoor garden hoses.
Have fun sensing your soil’s moisture and adding a few electronics to your plants!
Resources and Going Further
Interested in sensing more things? Check out some of our other sensors and tutorials!


HTU21D Humidity Sensor Hookup Guide
H2OhNo!
ISL29125 RGB Light Sensor Hookup Guide
MMA8452Q Accelerometer Breakout Hookup Guide
learn.sparkfun.com |CC BY-SA 3.0 | SparkFun Electronics | Niwot, Colorado