Using SparkFun Edge Board with Ambiq Apollo3 SDK a learn.sparkfun.com tutorial
Available online at: http://sfe.io/t866
Introduction
The SparkFun Edge Development Board is designed to disconnect artificial intelligence capabilities -- such as voice or image recognition -- from the cloud. The idea of performing these computations in a decentralized location (or "edge") is how the board gets its name, but the Ambiq Apollo3 microcontroller is how the Edge gets its power. The Apollo3 is an ultra-low power microcontroller that features an Arm Cortex-M4 core running at 48 MHz but uses only 6 microamps per megahertz. Such a high computational to electrical power ratio can enable machine learning features even in battery powered IoT devices.

The Apollo3 doesn't yet have the convenience of support in Arduino, so our goal for this tutorial is to set up a tool-chain that will allow you to start programming your board.
Required Materials
To follow along with this tutorial, you will need the following materials. You may not need everything, depending on what you have. Add it to your cart, read through the guide, and adjust the cart as necessary.
Serial Terminal
For Windows, you will also want a serial terminal of your choice. A couple options exist such as:
- The Serial Monitor found in Arduino IDE
- CoolTerm (Mac and PC)
- Putty
Suggested Reading
If you aren’t familiar with the following concepts, we recommend checking out these tutorials before continuing.
How to Install FTDI Drivers
Serial Terminal Basics
SparkFun Edge Hookup Guide
Bash, Make, and Python -- Oh My
You can learn a lot about embedded software development without ever using command line tools but for brand new systems (like the Apollo3), GUIs and Integrated Development Environments (IDEs) just haven't been built yet. If you're a veteran developer you'll feel right at home. If you're new to this whole idea don't worry -- after you go through this process you'll have a better idea of the steps IDEs take to add convenience. For this tutorial we will standardize our environment so that everyone can follow the same instructions.
Our standardized setup will assume that we are using a Bash shell that has access to Make and Python3.
Bash
Bash is a command line tool for unix-like operating systems. Windows users should install one of the several options listed below to emulate bash.
- Unix, Linux, or similar: chances are good that your shell is bash. If it is not bash should be an option.
- Mac OS X: the Terminal program uses bash by default.
Windows: you will need a Bash shell that has access to your filesystem. Here are several options:
- Git Bash: the preferred option for this tutorial. Download and install here or by clicking on the button below:
- MSYS, MSYS2, WinGW, CygWin: These are some other possible bash shells
- Git Bash: the preferred option for this tutorial. Download and install here or by clicking on the button below:

Make
Make is an automated build tool - you give it information about source locations and dependencies and it will automatically call a sequence of commands to compile or re-compile your project based only on the changed files. This can speed up compilation significantly in large projects. Make is a time-tested tool.
- Unix, Linux, or similar: most unix-like OS's come with Make. Try typing make into your shell to find out. If it does not exist check your package manager's documentation to find out how to get Make.
- Mac OS X: you can get Make on your Mac by installing developer command line tools. Try it out by typing make in your shell (Terminal).
Windows: sadly Windows seems to have been left out from the Make crowd. The GNU folk are happy to help by providing the GNU MCU Eclipse Windows Build Tools. Here's how to install them:
- Download the latest release from GitHub here (choose the 32-bit or 64-bit option correctly for your system) or click on the button below to be redirected to the download location:
- Extract the contents of the .zip into a temporary folder.
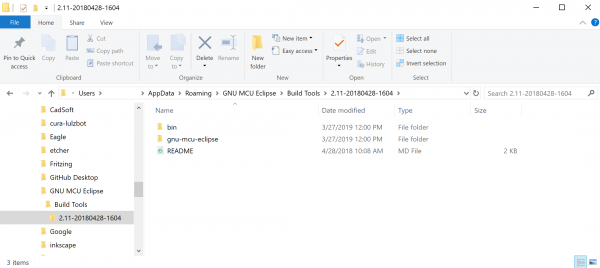
- Within that folder locate the specific release version folder (should be under a directory structure like temp_folder/GNU MCU Eclipse/Build Tools/ and should have a string of numbers indicating the release version.)
- Copy that folder underneath the path
%userprofile%\AppData/Roaming/GNU MCU Eclipse/Build Tools. (You can create the higher level directories if needed. - You should now have a path like
%userprofile%/AppData/Roaming/GNU MCU Eclipse/Build Tools/%release_version_number%/binin which you will find the executable make.exe.
![windows file location of make build tools]() Need a better look? Click the image!
Need a better look? Click the image!At this point, if you tried to use the make command in your shell it would not work because your computer isn't aware of that executable file. We will need to add the path to it to the
PATHenvironment variable.- Here's a great tutorial for editing the PATH on many versions of Windows.
- Add the path to the Make executable in your PATH
- Realize that you can change either your system or user PATH -- both will work.
Restart your bash shell and type make to check if your computer can now access the command.
- Download the latest release from GitHub here (choose the 32-bit or 64-bit option correctly for your system) or click on the button below to be redirected to the download location:
Python3 and Packages
Some of the scripts used in the SDK as well as those that upload new code over serial require Python3 and some additional packages.
Check if you have Python3 available in your shell by entering python3. If all is well you'll see the Python version (we have 3.7.2) and the REPL. Enter quit() to get back to the command line.
- If you don't have Python3 then you can follow the instructions for your particular system on the Python website. Pay attention to the install location so that you can add it to your PATH if needed.
- Once Python3 is installed make sure it is accessible from your shell - if it is not then follow the above process to add the location of the executable to your PATH.
- With Python3 installed we will also need 'pycryptodome' to generate secure bootloader images and 'pyserial' to upload them over the UART. If you haven't used pip before, head on over to the pip documentation page here.
- TL;DR: try
pip3 install pycryptodomeandpip3 install pyserialfrom your shell
- TL;DR: try
Things to Note:
Be sure that you are installing these packages to the correct Python executable -- the one that will be used when you call
python3from your bash shell. One trick to do this is to usepip3by explicitly giving the path to the pip that you installed along with your Python3 install (in the 'scripts' folder)If you're on Windows remember that you may need to rename the Python executable as 'python3.exe'
Finally, let's just triple-check that you can run
python3as a command from your shell.
With Bash, Make, and Python3 all set up you're good to move on! Fortunately all that foundation laying is the hard part. Next all we need to do is install the compiler toolchain: Ambiq's SDK and the SparkFun Edge Board Support Package.
Toolchain Setup
What is a Toolchain? Well according to Wikipedia:
In software, a toolchain is a set of programming tools that is used to perform a complex software development task or to create a software product, which is typically another computer program or a set of related programs.
The complex task we're trying to solve here is to write an application that can make use of the myriad of features found on the Apollo3 from the comfortable convenience of C or C++. The toolchain that we will construct for this purpose is made up of two main parts:
- Software Development Kit (SDK): a smorgasbord of useful software definitions that are specific to the microcontroller
- Compiler: turns the SDK code into the specific machine language that the Apollo understands.
Later in this tutorial, we will discuss yet another part of the SDK that helps upload your compiled code to the device.
The SDK is just a big file structure filled with harmless source files - it can't help you much on its own. The compiler is a great tool that you can use but without any source files it won't do much more than get mildly irritated. Our goal in this section is to make sure that the two tools are working together seamlessly.
Installing the Compiler
The compiler that we will use is provided by ARM and is thus capable of turning C or C++ code into machine instructions that the Cortex-M4 core can understand. Follow these steps to install the compiler:
- Visit the GNU-RM Download Site and scroll down to download the proper installer for your system (for Windows you will need one with the SHA extension). Alternatively, click the button below to be redirected to the download page:
- Run the installer -- if you get a warning from your OS dismiss it because you trust ARM. (You do trust ARM... don't you?)
- If there is an option to add the tools to your PATH choose that. If there is not then pay extra close attention to the install directory -- you'll need to make sure the directory that contains your tools is included in your PATH system variable.
- Complete the installation
With the tools installed we will need to make sure that they're accessible from your Bash shell. Here's how:
- Enter arm-none-eabi-gcc into Bash to verify whether you have access to the tool. If a 'command not found' or similar error occurs then proceed with adding the tool to your path. Make sure that you know where the tools were installed. For example the default location on Windows is something like C:/Program Files (x86)/GNU Tools ARM Embedded/8 2018-q4-major/bin. This is what you need to add to your PATH.
- Unix, Linux, or similar:'How to permanently set $PATH on Linux/Unix?' on StackOverflow
- Mac OS X: Here's a good concise example of how to 'Add to the Path On Mac OSX'
- Windows: Here's a great tutorial for editing the PATH on many versions of Windows
Restart your Bash shell for the changes to take effect. You can check that you've correctly modified your PATH by entering echo $PATH in the Bash shell. Repeat the test of the tool by entering arm-none-eabi-gcc into the command line. This time the command should be recognized and there should be an error message about 'no source files' instead.
Downloading the SDK
The software development kit (SDK) is a collection of header files and functions that make using the Apollo3 much easier. Rather than reading the 900+ page datasheet and changing bits in registers the SDK gives the user functions and nearly-human-readable constants. On top of that, Ambiq has included a large number of examples to demonstrate all the bells and whistles of the Apollo3.
The SDK is a relatively big collection of files so you won't want to move it around often. You may also want to reference this location when you create a new project so make sure you download this to a location on your computer that makes sense.
This tutorial uses the Ambiq SDK v2.0.0. You can download it from this link, but we recommend getting the latest version here. Alternatively, you can click one of the buttons below:
Once you have the SDK downloaded, extract it to your preferred location. Within that location, you should see a folder named something like AmbiqSuite-Rel2.0.0 -- from now on we'll call that the SDK root directory, with the path $AMB_ROOT where AMB expands to something like C:/Users/you/Documents/AmbiqSuite-Rel2.0.0.
In the Ambiqsuite-Rel2.0.0 SDK file structure you'll find the primary folders that contain source code that makes it really easy to use the microcontroller - for example drivers for UART, SPI, I2C, GPIO, ADC's -- you name it! You can explore these files in depth if you really need to know how the chip actually works, otherwise it suffices just to know that they are there to support your code-writing efforts.
- $AMB_ROOT/boards : Here you can add custom definitions of the hardware or software capabilities of a given board that you might write code for - instead of having to manually include a custom header file all over the place. Ultimately this is where the SparkFun Edge Board Support Package will be placed.
- $AMB_ROOT/CMSIS - This is a unified set of instructions for cortex processors.
- $AMB_ROOT/mcu
- apollo3
- hal: Here you'll find the Ambiq interfaces for the hardware peripherals on the board.
- apollo3
- $AMB_ROOT/tools
- apollo3_scripts: Python scripts for making and transmitting update images
- $AMB_ROOT/utils: Utilities that aren't related to hardware peripherals - delays, string operations, etc...
Adding SparkFun Edge Support
It is very easy to add support for your Edge board to the SDK. Our Board Support Package (BSP) is kept up-to-date in the SparkFun_Edge_BSP Repo on GitHub. Use your favorite method of copying GutHub repos (clone, or download .zip) to put the repo contents under its own folder within the $AMB_ROOT/boards directory. For example my path is $AMB_ROOT/boards/SparkFun_Edge_BSP underneath which are the contents of the repo. The structure is important because the example projects use makefiles with relative paths.
Housekeeping
For various and sundry reasons, there are a few housekeeping items that need to be addressed. Please make sure to go through the steps below:
- Within the Ambiq SDK, there is an incorrectly named file. Rename /tools/apollo3_scripts/keys_info0.py to /tools/apollo3_scripts/keys_info.py.
- Permissions on bsp/tools/uart_wired_update_sparkfun.py may be incorrect. Make sure to change the permissions on this file to 755. (ie: chmod 755 uart_wired_update_sparkfun.py)
Example Applications
Having arrived here you should have all the components that you need to write an application for the Apollo3:
- The SDK that contains useful source files and other definitions
- An ARM compiler to translate your code into machine instructions
- Make and a Bash shell to use to build the projects.
Coming up next we will look at two example projects. The first will be a basic demonstration of some hardware capabilities like GPIO, UART, ADCs, and I2C communication and it will be pre-configured to build. The second example will be a simple "Hello World" with the main intent of explaining how to set up your own build process.
The examples live in the SparkFun Edge Board Support Package (BSP), which you (hopefully) got while setting up the toolchain. To ensure that the makefile in the first example works be sure to place your copy of the repo in the $AMB_ROOT/boards/ folder. You can achieve the same effect in a number of ways:
- Using Git, clone the repo directly into $AMB_ROOT/boards/ so that you can pull updates as they become available
- Using Git, clone to a location of your preference and make a symbolic link to the $AMB_ROOT/boards/ directory
- Download the repo as a .ZIP and extract it into the $AMB_ROOT/boards/ directory.
Whichever method you choose you should end up with the directory $AMB_ROOT/boards/SparkFun_Edge_BSP that contains the BSP contents.
Get the SparkFun Edge Board Support Package here or by clicking the download link below:
Example: Edge Test
This example will test the hardware features of the Edge board as a starting point to get acquainted with the features of the SDK. The expected behavior of this example is to turn on all four LEDs and transmit data from one microphone and the accelerometer over the serial connection at 115200 baud. When you press Button 14 the loop will break and the board will turn off to conserve power.
If you've followed the rest of this tutorial then getting this example working should require only a few steps. In your Bash shell navigate to $AMB_ROOT/boards/SparkFun_Edge_AmbiqSDK_BSP/examples/edge_test/gcc. This is where the makefile for the gcc toolchain lives. The only change that you should have to make to it to get everything working is to choose the correct serial port.
- Arduino provides a pretty convenient and cross-OS way to see all available serial ports - just use the 'Tools->Port' dialogue.
- On Mac, you can simply list ls /dev/tty.*
- On Unix-like operating systems you should also be able to show all available serial ports by entering ls /dev/cu* into the Bash shell.
- On Windows (command prompt, cmd.exe) the mode command will list COMX ports, but they have to have an open connection which sort of defeats the purpose in my opinion.
Now use your favorite text editor to open that file (gcc/Makefile) and replace COM4 with the serial port that your Edge board is connected to (On Windows it will look like COMX, and on Unix-like systems it will be a short string beginning with /dev/cu)
#### Bootloader Configuration
SERIAL_PORT ?= COM4# Or perhaps a Unix-like machine might put '/dev/cu.usbserial-1410'
Let's make sure that there is a nice area for make to work: enter make clean at the Bash prompt.
Flashing Code to Board
Now to flash your code to the Edge hold down Button 14, press and release reset, and type make bootload into your Bash shell. The process that unfolds should take you through compiling and linking the application, then begin uploading the code.
The uploader script will automatically try to reset the board when it says 'Sending Reset Command,' but if it has trouble it helps to do it manually -- just let go of Button 14 and press reset (some USB-serial bridges seem to work better than others in this scenario). If you have an error like 'could not open port', make sure that the right port is selected and that there are no other serial terminals connected.
Once the code is uploaded, use your favorite serial terminal program to inspect the output (115200 baud).
- For Windows, the serial terminal will be such as we listed in the introduction - either via Arduino, CoolTerm, or Putty
- For Mac, you can list the serial output by using screen <device
> 115200 ie: screen /dev/tty.usbserial-DN05KQGX 115200 - Unix systems can also use the screen command as such: screen /dev/device baud-rate
Try hitting Button 14 to exit the main loop and turn off the board - then press 'reset' to start it up again.
To help guide you to your own exploration of the chip let's look at how we used Ambiq's Hardware Abstraction Layer (HAL) to perform GPIO functions. First off we included am_mcu_apollo.h which in turn includes a whole lot of HAL headers like am_hal_gpio.h. Then we looked through the HAL GPIO header and got a feel for how to use it.
- When setting up the board we use
am_hal_gpio_pinconfig()along with a pre-defined pin configuration structure calledg_AM_HAL_GPIO_OUTPUT_12which indicates an output that can drive up to 12 mA. We also use some pin number definitions likeAM_BSP_GPIO_LED_REDthat come from our Board Support Package in the am_bsp_pins.h file. - To set or clear the output of a pin we use
am_hal_gpio_output_set()oram_hal_gpio_output_clear()respectively. - To read the value of a pin we use
am_hal_gpio_state_read()- a catch here is that the return value of this function is an error code. The value on the pin is returned by passing the function a pointer to the variable that you'll use to store the value.
You can explore the HAL in the SDK at $AMB_ROOT/mcu/apollo3/hal to find information about the ADCs, Bluetooth, timers, interrupts, I/O masters (I2C or SPI) and a lot more!
Example: Makefile Project Template
This example will cover what you need to know to start making your own projects on your filesystem and include source and header files of your own for library management. We will go into more detail about what happens when you use make or make bootload.
To get the ball rolling let's look at the first few lines of code in SparkFun_Edge_Project_Template/gcc/Makefile.
# Here are some user modifiable settings. Note that leading spaces are used to separate strings when appending to a variable
TARGET := SparkFun_Edge_Project_Template# this name is the name of the resulting binary file
PROJECT := SparkFun_Edge_Project_Template_gcc

COM_PORT             = COM4
SDKPATH              = # Note that if you copy/paste a windows file path here you need to change backslashes to forward slashes
BOARDPATH            = ${SDKPATH}/boards/SparkFun_TensorFlow_Apollo3_BSP# One day I hope to rename the BSP folder to: SparkFun_Edge_AmbiqSDK_BSP

USER_INCLUDE_DIRS    = -I../src/inc1
USER_INCLUDE_DIRS   += -I../src/inc2

USER_SOURCEDIRS      = ../src
USER_SOURCEDIRS     += ../src/inc1
USER_SOURCEDIRS     += ../src/inc2

USER_MAIN_SRC        = main.c
USER_SOURCE_FILES    = inc1.c
USER_SOURCE_FILES   += inc2.c
Here we are declaring, initializing, and sometimes appending to variables that will be known to make when it executes.
- TARGET: is the prefix of the binary file that will be created
- PROJECT: is unused
- COM_PORT: is the serial port to use when uploading code with 'make bootload'
- SDKPATH: should be the path to the root directory of the SDK
- BOARDPATH: is the path to the BSP folder
The next two variables USER_INCLUDEDIRS and USER_SOURCEDIRS inform the process where to look for files. The include directories are given to the compiler as flags so they are prefixed with '-I'. The source directories tell make where to look for source files that the user wants to compile. In both cases the append operation '+=' is used to add more lines. It is important to include a space after the '=' sign so that all your paths remain separated.
The last two variables USER_MAIN_SRC and USER_SOURCE_FILES are used to create a list of all the files to compile.
The above variables are all that you should need to set up to have a successful build. You can try it out by making sure you're in the directory SparkFun_Edge_Project_Template/gcc and then entering make into the command prompt. If there are no errors then the /bin directory will contain a '.bin' file with the name that you chose for the TARGET variable. Entering make bootload with Button 14 held down, and hitting reset once prompted, should get your code on the board.
Now let's take a moment to explore the highlights of what exactly gets done with those variables that you defined. A little way down the prefix of compiler executables is listed as a variable along with other values to give t the compiler in the PART, CPU, and FPU flags. Then the suite of suffixes for C / C++ compilation, linking, and other toolchain elements are given short easy names like CC, GCC, CPP, and LD. After this the included directories and files that you defined at the top are combined with those coming from the SDK. Near the end, the makefile automatically assembles a list of recipes that explain the dependencies in the build process. To wrap it all up the makefile actually spits out the commands required to build the executable (.bin) into the shell. As a cherry on top if you used 'make bootload' then it will also create an Over The Air (OTA) image blob, convert it to a wire update blob, and then begin the serial upload process using a few Python scripts.
Now, go boldly into development for this powerful new microcontroller armed with the knowledge of exactly how your application gets from a smattering of source code to a lean mean machine-code package.
Troubleshooting
Getting started with an advanced development board like the Edge can be difficult. Especially with this process it is easy to get off into the weeds. The first steps to troubleshooting should always be to carefully re-check the work you've done. Pretend you're explaining what you're doing to your grandmother. If that doesn't work then try checking out the Edge Troubleshooting thread on the SparkFun Forums.
SparkFun Edge Troubleshooting Forum
Resources and Going Further
Congratulations! If everything went according to plan then you've run an example on the Edge board and you are now all set up to start building your own applications. Here are a few resources to help guide that process and explain more about the topics covered in the tutorial.
Tutorial Links:
- Windows Git Bash Install
- Make for Windows
- Python Installs
- GNU-RM GitHub Site
- Ambiq Micro Apollo3 Blue SDK Rel2.0.0
- SparkFun Edge Board Support Package GitHub
- Makefile Tutorial
Want more information on the Ambiq Apollo3 or the SparkFun Edge Board?
- Using TensorFlow on Microcontrollers
- Ambiq Apollo3 Datasheet
- SparkFun Edge Board Schematic (PDF)
- SparkFun Edge Board Eagle Files (ZIP)
- Machine Learning on a Microcontroller with SparkFun Edge
- SparkFun Edge Board Hardware GitHub
Need some inspiration for your next project? Check out some of these tutorials!
SparkFun Blocks for Intel® Edison - I2C Breakout Block
Logging Data to Google Sheets with the Tessel 2
IoT Weight Logging Scale
learn.sparkfun.com | CC BY-SA 3.0 | SparkFun Electronics | Niwot, Colorado