Stepping Up to the Challenge
There are a handful of motors to choose from, and sometimes it’s unclear as to which one will be best suited for your particular application. In this tutorial, we will discuss one of these motors, the stepper motor, and when it best to choose a stepper motor over the alternatives. We will also discuss how to use this motor with the EasyDriver Stepper Motor Driver board, one of the simplest driver boards around.
Requirements
Here is a list of recommended items needed to follow along:
- EasyDriver Stepper Motor Driver
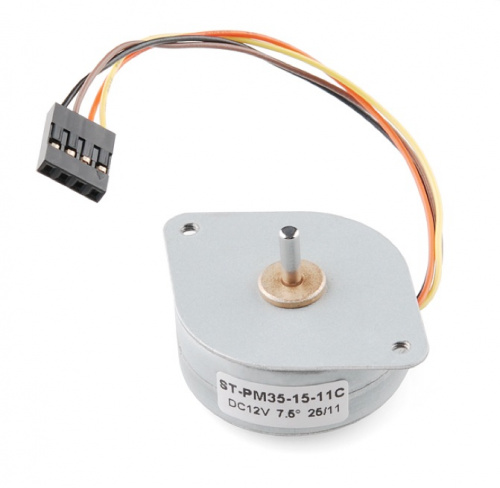
- Small Stepper Motor
- Breadboard
- Male-to-male Jumper Wires
- Male Break Away Headers – Straight
- Arduino Uno (or similar microcontroller)
- Soldering iron and accessories
- 12V Power supply (or variable power supply)
How it Works
Stepper motors vary from regular DC motors in that, rather than just spinning in one direction or another, they can spin in very precise increments. Imagine a motor on an RC airplane. The motor spins very fast in on direction or another. You can vary the speed with the amount of power given to the motor, but you cannot tell the propeller to stop at a specific position. Now imagine a printer. There are lots of moving parts inside a printer, including motors. One such motor acts as the paper feed, spinning rollers that move the piece of paper as ink is being printed on it. This motor needs to be able to move the paper an exact distance to be able to print the next line of text or next line of an image. There is another motor attached to a threaded rod that moves the print head back on forth. Again, that threaded rod needs to be moved an exact amount to print one letter after another. This is where stepper motors come in handy.
Stepper motors can move an exact amount of degrees (or steps) when told to do so. This gives you total control over the motor, allowing you to move it to an exact location and hold that position. It does so by powering coils inside the motor for very short periods of time. The trade off is that you have to power the motor all the time to keep it in the position that you desire. We won’t go into too much detail here, but you can check out this Wikipedia article on stepper motors for all the nitty-gritty information. All you need to know for now is that, to move a stepper motor, you tell it to move a certain number of steps in one direction or the other, and tell it the speed at which to step in that direction.
There are numerous varieties of stepper motors as well as driver boards with which to control them. The methods described here can be used to infer how to use other motors and drivers not mentioned in this tutorial. However, it is always recommended that you consult the datasheets and guides of the motors and drivers specific to the models you have.
How to Use it
Here we will discuss how to assemble, hook up and control your motor with firmware uploaded to the Arduino.
Assembly
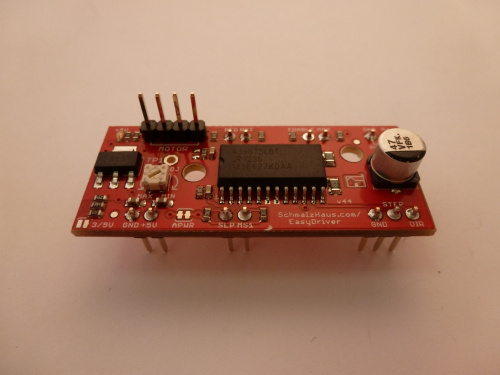
The simplest way to use the EasyDriver is to attach headers to it for easy insertion onto a breadboard. Alternatively, you could solder the wires straight to the board. These instructions will assume you are using the breadboard method.
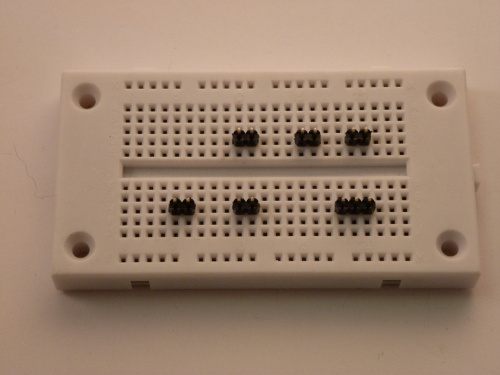
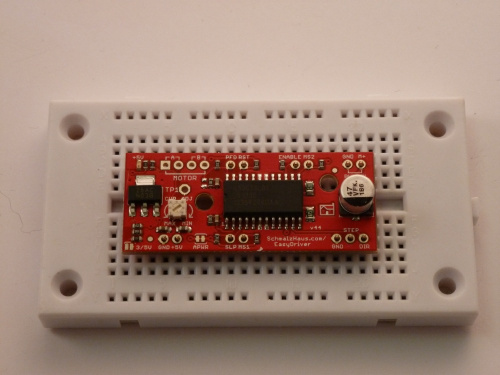
The first step is to solder straight male headers to the EasyDriver. Very few of the actual pins on the EasyDriver will be used in this example. However, soldering headers on all the broken out pins is recommended to give the board more stability when attached to a breadboard. A simple method for this is to break off the desired amount of headers, place them in the breadboard in the appropriate locations, place the EasyDriver on top, and then solder all the connections.
Hook-up
Once you have all the headers soldered on, it’s time to hook up the EasyDriver to your Arduino. Using the picture below, make all the necessary connections.
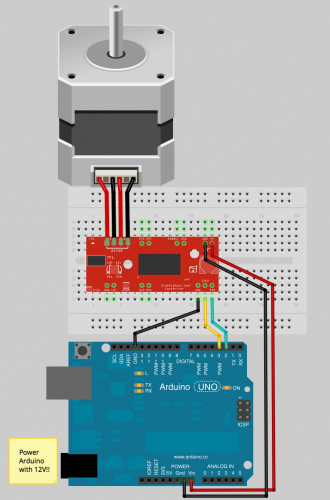
Note: The small stepper motor looks different than the one pictured. It should have a 4-pin connector on the end. This will be attached to the 4-pin male header facing upward (see picture #3 in Assembly). Because of the nature of this particular stepper, you can hook up the connector in either orientation, i.e. either the black wire on the left or the yellow wire on the left. It will work either way. If you are using a different motor, consult its documentation to find out which wires should go where.
IMPORTANT: Stepper motors require more power than can be supplied by the Arduino. In this example we will be powering the Uno with a 12V external supply. Notice that the power input (M+) on the EasyDriver is attached to the Vin pin on the Arduino. This will allow you to power both the Arduino and the motor with the same power supply.
Firmware
Once you have everything hooked up correctly, you can upload firmware to the Arduino. The following is some very simple example code to get you up and running. There are numerous examples online, as well as a Stepper library included with the Arduino IDE. Feel free to play around with this code, changing values to see what happens, and feel free to explore other code.
/*************************
Joel Bartlett
SparkFun Electronics
December 27, 2012

This code controls a stepper motor with the
EasyDriver board. It spins forwards and backwards
***************************/
int dirpin = 2;
int steppin = 3;

void setup()
{
pinMode(dirpin, OUTPUT);
pinMode(steppin, OUTPUT);
}
void loop()
{

  int i;

  digitalWrite(dirpin, LOW);     // Set the direction.
  delay(100);


  for (i = 0; i<4000; i++)       // Iterate for 4000 microsteps.
  {
    digitalWrite(steppin, LOW);  // This LOW to HIGH change is what creates the
    digitalWrite(steppin, HIGH); // "Rising Edge" so the easydriver knows to when to step.
    delayMicroseconds(500);      // This delay time is close to top speed for this
  }                              // particular motor. Any faster the motor stalls.

  digitalWrite(dirpin, HIGH);    // Change direction.
  delay(100);


  for (i = 0; i<4000; i++)       // Iterate for 4000 microsteps
  {
    digitalWrite(steppin, LOW);  // This LOW to HIGH change is what creates the
    digitalWrite(steppin, HIGH); // "Rising Edge" so the easydriver knows to when to step.
    delayMicroseconds(500);      // This delay time is close to top speed for this
  }                              // particular motor. Any faster the motor stalls.

}
Going further
Now that you’ve figured out how to operate your stepper motor at the simplest level, it’s time to take it to the next level. There is a vast amount of information on the web regarding the Easy Driver and stepper motors in general. The best place to look next would be the EasyDriver website. There is also an great tutoral on the bildr website. Another great resource is the EasyDriver Schematic. If you’re curious as to what the other pins on the EasyDriver do, the schematic will give you some insight. Lastly, you can check out one of my projects involving stepper motors, the Arduija. In it, I use stepper motors controlled by EasyDrivers to create an X-Y gantry that moves a Ouija board automatically.
You should be well on your way to adding stepper motors to your next project. If you have any questions, comments or just want to show off your project, drop us a line in the comments below. Happy hacking!