Choosing a LilyPad Arduino for Your Project a learn.sparkfun.com tutorial
Available online at: http://sfe.io/t438
Introduction
You are ready for your first programmed LilyPad project, but which LilyPad Arduino do you choose? In this guide, we’ll go over the features of each of the Arduinos in the LilyPad line and their strengths and weaknesses.
| Board | Microcontroller | Digital I/O Pins | Analog Input Pins | Programming Interface | Battery Attachment |
|---|---|---|---|---|---|
| LilyPad Arduino Simple | ATMega328 | 9 | 4 | FTDI | JST Connector |
| LilyPad Arduino USB | ATmega32U4 | 9 | 4 | USB | JST Connector |
| LilyPad Arduino SimpleSnap | ATMega328 | 9 | 4 | FTDI | Built in LiPo |
| LilyPad Arduino 328 Main Board | ATMega328 | 14 | 6 | FTDI | Sew Tabs |
Suggested Reading
If you have never worked with LilyPad or other wearable technology before, you may find the following resources useful.
- E-Textiles Basics
- Insulation Techniques for E-Textiles
- ProtoSnap LilyPad Development Simple Hookup Guide
LilyPad Arduino Simple Board
Features:
- 5 Digital I/O pins
- 4 Analog pins
- ATmega328
- Built-in ON/OFF switch
- Built-in power supply socket (JST connector) for a 3.7V LiPo battery and charging circuit (no additional battery charger needed)
- Simplified layout with less pins, giving more space for sewing or less complex projects
The LilyPad Arduino Simple Board is one of our most popular for beginner Arduino projects because of its spacious layout. It is easier to identify pins and has more room for stitching without the risk of accidentally touching other pins on the board. The built-in battery port makes it easy to choose a LiPo battery that suits the run time requirements of your project and recharge the battery by simply plugging the board into a USB port on your computer or 5V wall charger.
LilyPad Arduino USB - ATmega32U4 Board
Features:
- 5 Digital I/O pins
- 4 Analog pins
- ATMega32U4
- Built-in ON/OFF switch
- Built-in power supply socket (JST connector) for a 3.7v LiPo battery and charging circuit (no additional battery charger needed)
- Simplified layout with less pins, giving more space for sewing or less complex projects
- Micro USB connection instead of FTDI header pins
The LilyPad Arduino USB is similar to the LilyPad Arduino Simple Board, but uses a different chip - the ATMega32U4, which has built-in USB support. If the FTDI header pins on other LilyPad Arduinos feel too bulky or FTDI Boards are often lost or misplaced, this board is a great alternative.
Note: the digital I/O pin layout is slightly different than the LilyPad Arduino Simple - the USB uses pins 2 and 3 instead of 5 and 6.
LilyPad Arduino SimpleSnap
Features:
- 5 Digital I/O pins
- 4 Analog pins
- ATmega328
- Built-in ON/OFF switch
- Built-in LiPo battery and charging circuit
- Simplified layout with less pins, giving more space for sewing or less complex projects
- Built-in snaps for quick attachment/detachment to multiple projects
The LilyPad Arduino SimpleSnap is similar to the LilyPad Simple Board, except for two major differences: a built-in rechargeable 110mAh LiPo battery and female snap connectors. This board requires connection to a SimpleSnap Protoboard or an arrangement of sew-on fabric snaps so that the board is removable from a project. This gives you the ability to swap out the LilyPad Arduino to reprogram and share in multiple projects.
LilyPad Arduino 328 Main Board
Features:
- 14 Digital I/O pins
- 6 Analog pins
- ATmega328
The LilyPad Arduino 328 Main Board has all of the ATmega 328 pins available for connecting to a wearable project. This board is recommended if your project needs access to more analog input pins than the other LilyPad Arduino offerings. Unlike the others, it does not have a battery port – you will need to stitch a power supply to the + and - pins on the board. We recommend the LilyPad Simple Power board to provide a LiPo connection and charging circuit to your project.
LilyPad ProtoSnap Kits
If you are looking for a kit that includes sensors and LEDs with a LilyPad Arduino, SparkFun offers two development kits:
ProtoSnap - LilyPad Development Board
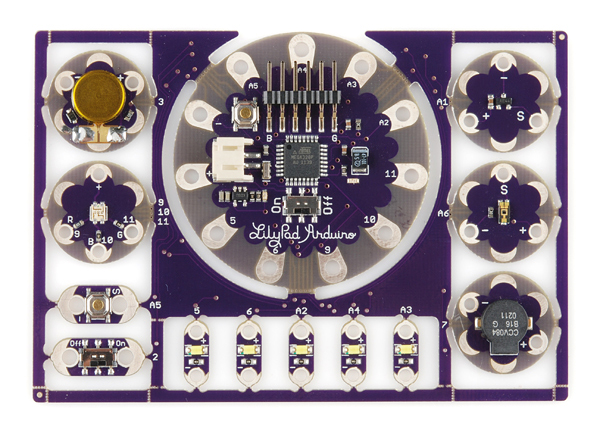
The ProtoSnap - LilyPad Development Board is a way to prototype with LilyPad Arduino and components that are pre-wired together. After uploading code to the LilyPad Arduino, you can easily snap apart the components and sew them into a project.
Features:
- LilyPad Arduino Simple Board
- FTDI Basic Breakout
- 3.7v LiPo Battery
- Pre-wired components: light sensor, temperature sensor, buzzer, vibe motor, 5 LEDs, tri-color LED, slide switch, button
- Conductive thread bobbin
- Needle set
ProtoSnap - LilyPad Development Board Simple
The ProtoSnap - LilyPad Development Board Simple is similar to the Development Board, but with less components pre-wired to the Arduino.
Features:
- LilyPad Arduino Simple Board
- FTDI Basic Breakout
- 3.7v LiPo Battery
- Pre-wired components: buzzer, 4 LEDs
- Conductive thread bobbin
- Needle set
Resources and Going Further
Now that you’ve decided on the ‘brain’ for your project, here are some tutorials to get you started creating:
- Planning a Wearable Electronics Project
- LilyPad Simple Power Hookup Guide
- ProtoSnap LilyPad Development Simple Hookup Guide
learn.sparkfun.com |CC BY-SA 3.0 | SparkFun Electronics | Niwot, Colorado


