Quantcast
Channel: SparkFun Tutorials
Viewing all 1123 articles
Browse latest View live

RedBot Assembly Guide Rev 02

$
0
0

RedBot Assembly Guide Rev 02 a learn.sparkfun.com tutorial

Available online at: http://sfe.io/t182

Introduction

The RedBot is robotic development platform capable of teaching basic robotics and sensor integration! Based on the SparkFun RedBoard and programmable in the Arduino environment, the RedBot has all the I/O you need to make a small robot in no time at all.

Assembled RedBot Kit from SparkFun

Materials

This tutorial will cover how to install all the parts you received with your RedBot Kit, PLUS it will go over how to install a few extra parts NOT included with the kit. These parts include the Wheel Encoder Kit, RedBot Buzzer, and twoRedBot Mechanical Bumpers.

RedBot Buzzer

RedBot Buzzer

In stock ROB-12567

This buzzer is an add-on for your RedBot that gives your robot the ability to make awesome beep-boop noises or alerts when so…

5.95
RedBot Sensor - Mechanical Bumper

RedBot Sensor - Mechanical Bumper

16 available SEN-11999

These simple switches are the Mechanical Bumper sensor for the SparkFun RedBot, giving you the ability to detect a collision …

4.95
Wheel Encoder Kit

Wheel Encoder Kit

In stock ROB-12629

This is the Wheel Encoder Kit from DAGU, a simple add-on to any wheeled robot that can help measure the speed or distance the…

9.95

Again, you do not need these parts to assemble your RedBot, but they will be present throughout this guide. Please ignore any instances of said extra sensors should you not need to assemble them. Sections pertaining strictly to these extra parts will be marked with **asterisks**.

If you are installing one or all of these extras, you may also want to get a few more jumper wires.

Along with everything listed above, you will also need 4x AA batteries to power your RedBot.

Suggested Parts

If you are following this tutorial and using the Wheel Encoder Kit, you will want 2x 4"zip-ties to connect the wheel encoder to the motors included in the RedBot kit.

Suggested Tools

Having a needle nose pliers, Flush Cutters and screwdriver are nice to have when putting together the RedBot.

Pocket Screwdriver Set

Pocket Screwdriver Set

In stock TOL-12891

What should every hacker have available to them? That's right, a screwdriver (you have to get into those cases somehow). What…

3.95
Needle Nose Pliers

Needle Nose Pliers

Out of stock TOL-08793

Mini Pliers. These are great little pliers! A must have for any hobbyist or electrical engineer. Crucial for inserting device…

1.95
Flush Cutters - Hakko

Flush Cutters - Hakko

In stock TOL-11952

These are our new and improved flush cutters, giving you a way to cut leads very cleanly and close to the solder joint. Diago…

6.95

Suggested Reading

Before you go any further, you should probably make certain that you're familiar with the RedBot:

Getting Started with the RedBot

August 8, 2013

A simple introduction to SparkFun's RedBot robotics platform.

**Wheel Encoder**

Read on if you are using the Wheel Encoder Kit. If not, skip to the next section.

Wheel Encoder Kit is a simple add-on to any wheeled robot that can help measure the speed or distance the chassis travels. For the RedBot, we found that it is easier to use this wheel encoder.

Locate the Following:

2x Motor2x 4" Zip-Tie1x Wheel Encoder Kit
MotorZip-tiesFemale Servo Headers

Adding the Wheel Encoder to Motors

First, you will want to grab a 4" zip-tie (smaller zip-tie will work as well). Push the zip-ties inside the opening between the clear plastic and the motor. Make sure the zip-tie is going through the opening that isn’t on the same side as the black and red wires soldered to the motor.

Zip ties through plastic

Next, slightly close the zip-tie. Make sure not to fully tighten the zip-tie yet.

Slightly close zip tie

Grab the hall effect sensors terminated with 150mm cables and 3-pin female servo header, from the Wheel Encoder Kit. Bend downwards, at a 90 degree angle, the hall effect sensor side, as shown in the photo below.

Bent wire

Bend the hall effect sensors cable again, so this time it is laying horizontal on itself. Bending the cable again makes this setup sturdier and the hall effect sensor less likely to move around.

Second bend on encoder wires

Place the bent hall effect sensors cable through the zip-tie loop created earlier. You will want to line up and point the hall effect sensor to the middle of the shaft of motor.

PLacement of the encoder wire

Tighten the zip-tie firmly. Make sure the hall effect sensor is still pointing inward to the shaft of motor. Using flush cutters, cut the zip-tie's extra end that is hanging out.

Cut zip tie

Add the neodymium 8-pole magnet with rubber hub to the shaft of motor. The hall effect sensor should be horizontal.

Encoder top

Go ahead and do the same the wheel encoder setup to the other motor.

Second motor is the same

Double check the hall effect sensors are nice and lined up between the motor and magnet with rubber hub. Also that it is point inward towards the shaft of the motor.

Motors

In this section, you will be placing the two motors on the bottom side of the bottom chassis piece.

Locate the Following:

1x Bottom Chassis Piece4x Motor Holder2x Motor
Bottom Chassis PieceMotor HolderMotor
2x 4-40 x 1 1/4" Flat Head Screw2x 4-40 Hex Nut
Screw - Flat HeadM3 Nut

Please note: Pay close attention to which screws you are using. There are two different screws in the RedBot Kit. (30x of the 4-40 x ¼" Phillips screw and 4x of the 4-40 x 1 ¼" flat head screw)

Adding the RedBot Sensor - Mechanical Bumper? You will have 3x of the 4-40 x ⅜“ Phillips screw.

Adding the Motors

Locate the correct location on the bottom chassis piece.

Bottom Motor Graphic

Place one of the motor holders through the chassis at that location.

Motor holder in the correct spot

Push the motor holder all the way down.

Motor holder placed down

Place the first motor on the bottom side of the chassis piece. It is important to make sure the side of the motor with the wheel encoder is pointing to the back side of the RedBot bottom chassis piece. To tell the difference between the back and front of the chassis, the chassis's back is flat and the chassis's front is curved. (The back of the chassis is where the metal ball caster will go. You will be putting that on later.)

Line up the two motor holes with the two motor holder holes. Make sure that the red wire soldered wire on motor is on top and away from the chassis piece.

Motor placed on board

Place the 4-40 x 1 ¼" flat head screw through the top motor holder and motor holes.

Screw going through top hole

Using a screwdriver and 4-40 hex nut, tighten the screw.

Using screwdriver to tighten screw

Double check the side of the motor with the wheel encoder is pointing to the back side of the RedBot bottom chassis piece.

Following the same steps as the first motor, add the second motor holder on the other side.

Second motor screwed in

Place the motor's black and red wires through the bottom chassis, so the wires are through to the top side of the chassis.

Motor jumper wires through chassis holes holes

Now, push the wheel encoder's wires through to the top side of the chassis. It is best to push through the chassis opening that is closest to the motor as shown below.

Encoder jumper wires though chassis holes

As you can see, the wires are now through the top of the chassis piece. It is highly recommended to have the wires push through the same chassis openings as shown below. This way it is easier to connect to the RedBot Mainboard towards the end.

Top view of chassis with jumper wires out

Ball Caster

In this section, you will be adding the metal ball caster to the bottom side of your bottom chassis piece.

Locate the Following:

4x 4-40 x 1/4" Phillips Screw1x Metal Ball Caster2x 4-40 x 1" Metal Standoff
4-40 x 1/4 inch Phillips ScrewMetal Ball Caster4-40 x 1 inch Metal Standoff

Please note: Pay close attention to which screws you are using. There are two different screws in the RedBot Kit. (30x of the 4-40 x ¼" Phillips screw and 4x of the 4-40 x 1 ¼" flat head screw)

Adding the RedBot Sensor - Mechanical Bumper? You will have 3x of the 4-40 x ⅜“ Phillips screw.

There is also different standoffs in the RedBot Kit and add-ons. The RedBot Kit comes with 7x 4-40 x 1" metal standoff, 4x 4-40 x ⅜“ metal standoff, and 3x 4-40 x 1 ½” metal hex standoff.

Adding the RedBot Sensor - Mechanical Bumper? You will have 3x of the 4-40 x ¾"nylon standoffs.

Adding the Metal Ball Caster

Place a 4-40 x ¼" Phillips screw through one of the ball caster's holes. The screw's head should be on the same side as the ball caster's metal ball. Then, screw in one of the 4-40 x 1" metal standoffs to the metal ball caster.

Screw through ball caster

Using a 4-40 x ¼" Phillips screw, screw on the second 4-40 x 1" metal standoffs on the other side of the ball caster.

Second stand off in

Locate the two positions on the chassis piece where you will be screwing down the metal ball caster.

Bottom chassis graphic for ball caster

Now, you can use two 4-40 x ¼" Phillips screws to tighten down the metal ball caster to the bottom side of the chassis piece. The metal ball caster should be on the same chassis side as the motors.

Screw in ball caster

Wheels

In this section, you will be putting two wheels on the RedBot motors. It will start to look like a movable robot!

Locate the Following:

2x Wheels
Wheels

Adding the Wheels

Simply, place the two tires on the ends of the motors. No sweat needed to complete this step!

Adding wheel

If you are having a hard time getting the wheels on, make sure to line up the inside notches of the wheel to the motor notches.

RedBot Sensor - Line Followers

In this section, you will be putting standoffs on the RedBot Sensor - Line Followers. Then, you will add the sensors to your chassis.

Locate the Following:

6x 4-40 x 1/4" Phillips Screw3x 4-40 x 1 1/2" Metal Hex Standoff
4-40 x 1/4 inch Phillips ScrewHex standoff
3x RedBot Sensor - Line Follower9x Jumper Wire
RedBot Line FollowerJumper Wire

Please note: Pay close attention to which screws you are using. There are two different screws in the RedBot Kit. (30x of the 4-40 x ¼" Phillips screw and 4x of the 4-40 x 1 ¼" flat head screw)

Adding the RedBot Sensor - Mechanical Bumper? You will have 3x of the 4-40 x ⅜“ Phillips screw.

There is also different standoffs in the RedBot Kit and add-ons. The RedBot Kit comes with 7x 4-40 x 1" metal standoff, 4x 4-40 x ⅜“ metal standoff, and 3x 4-40 x 1 ½” metal hex standoff.

Adding the RedBot Sensor - Mechanical Bumper? You will have 3x of the 4-40 x ¾"nylon standoffs.

Adding the RedBot Line Followers

Place a 4-40 x ¼" Phillips screw through one of the line followers. Then, twist on the 4-40 x 1 ½" metal hex standoff. Make sure to tighten the standoff on the line follower’s header side. The top of the screw should be on the same side as the line follower’s sensor.

Screwing stand off to line follower

Do this for the other two line followers.

All three line followers with stand offs

Locate three spots on the chassis where you will be adding the line followers.

Line follower locations

Place a 4-40 ¼" Phillips screw through the top side of the chassis piece. Tighten down the 4-40 x 1 ½" metal hex standoff with a line follower into bottom chassis piece. The line follower should be on the bottom side of the chassis piece. The headers on the line follower should be pointing in towards the chassis. Do this for the other two line followers.

All line followers in correct chassis locations

Adding Jumper Wires

Time to add some jumper wires! You will need you connect a jumper wire to each female header pin on the line followers. There will be 9x total jumper wires.

You do not need to have the same color jumper wires as this assembly guide. However, following along with the jumper wire colors, in this assembly guide, may be helpful if this is your first time assembling the RedBot. See below if you are following along with the jumper wire colors to help lessen confusion when hooking up to the RedBot Mainboard later in the guide.

Left RedBot Sensor - Line Follower:

Jumper WiresLeft RedBot Sensor - Line Follower
Jumper Wire - YellowOUT
Jumper Wire - RedVCC
Jumper Wire - BlackGND

Please note: When you have the RedBot upright and the front of the chassis facing north, the left line follower will be on the left side.

Middle RedBot Sensor - Line Follower:

Jumper WiresMiddle RedBot Sensor - Line Follower
Jumper Wire - BlueOUT
Jumper Wire - RedVCC
Jumper Wire - BlackGND

Right RedBot Sensor - Line Follower:

Jumper WiresRight RedBot Sensor - Line Follower
Jumper Wire - GreenOUT
Jumper Wire - RedVCC
Jumper Wire - BlackGND

Please note: When you have the RedBot upright and the front of the chassis facing north, the right line follower will be on the right side.

Here is the view from the bottom side:

Added Jumper Wires

Take the jumper wires and place through the chassis openings. The jumper wires should be sticking out on the top side of the chassis. We recommend that each group of three jumper wires, for each line follower, goes in a different chassis opening, as shown below. This helps keep track of the different jumper wires when connecting to the RedBot Mainboard later.

Jumper wires through the top side of the bottom of the chassis

**RedBot Sensor - Mechanical Bumpers**

Read on if you are using the RedBot Sensor - Mechanical Bumpers. If not, skip to the next section.

You will need to prepare the music wire by bending the wire itself. Then, you will add standoffs and screws to your mechanical bumpers. Followed by adding the mechanical bumpers to the RedBot chassis.

Locate the Following:

2x 4-40 x 3/8" Phillips screw4x 4-40 x 1/4" Phillips Screw2x 4-40 x 3/4" Nylon Standoff
4-40 x 3/8 inch Phillips screw4-40 x 1/4 inch Phillips Screw4-40 x 3/4 inch Nylon Standoff
4x Jumper Wire1x RedBot Top Chassis2x RedBot Sensor - Mechanical Bumper
Jumper WireTop ChassisRedBot Bumper
2x Whisker2x 4-40 Hex Nut
WhiskerM3 Nut

Please note: Pay close attention to which screws you are using. There are two different screws in the RedBot Kit. (30x of the 4-40 x ¼" Phillips screw and 4x of the 4-40 x 1 ¼" flat head screw)

Adding the RedBot Sensor - Mechanical Bumper? You will have 3x of the 4-40 x ⅜“ Phillips screw.


There is also different standoffs in the RedBot Kit and add-ons. The RedBot Kit comes with 7x 4-40 x 1" metal standoff, 4x 4-40 x ⅜“ metal standoff, and 3x 4-40 x 1 ½” metal hex standoff.

Adding the RedBot Sensor - Mechanical Bumper? You will have 3x of the 4-40 x ¾"nylon standoffs.

Prepare the RedBot Sensor - Mechanical Bumpers

Screw a 4-40 x ⅜“ Phillips screw and 4-40 hex nut to one of the two mechanical bumper bigger holes.

Screw and nut in one side of bumper

Time to bend the whisker! It is easy to bend the whisker with needle nose pliers. However, there is a trick to bend the whisker using the mechanical bumper PCB itself. First, stick one of the whiskers through one of the smaller side holes. It only needs to stick out a little bit.

wire through hole

Bend the whisker 90 degrees.

Benting the wire

Bend the whisker 90 degrees again.

Benting the wire even more

Now that the whisker is bent, take the wire out of the PCB hole. Add a 4-40 x ¼" Phillips Screw from the bottom and loop the bend whisker around the screw. It is very important that you do not let whisker touch the other side's 4-40 hex nut and 4-40 x ⅜" Phillips screw, since that is what triggers the sensor. Leave a little space between the wire and other side's nut.

Wire looped around screw

Twist on a 4-40 x ¾" nylon standoff on top of the screw to secure the wire.

Adding standoff

Double check that the wire does not touch the other side's 4-40 hex nut and 4-40 x ⅜" Phillips screw.

Do not let wire touch

Do this for the other mechanical bumper. Take note of which side your 4-40 x ¾" nylon standoff is on for the first mechanical bumper. Do the opposite for the other bumper. Double check that there is one mechanical bumper that has a 4-40 x ¾" nylon standoff on the right side of the “RedBot Bumper” silkscreen and one that has a 4-40 x ¾" nylon standoff on the left side.

Do the opposite for the other music bumper

Adding RedBot Sensor - Mechanical Bumpers

Locate the two positions on the top chassis piece.

Top chassis locations for Mechanical Bumpers

Using two 4-40 x ¼" Phillips Screws, tighten down the mechanical bumpers, with the two wires pointing in opposite directions, on the bottom side of the top chassis piece. The mechanical bumpers' header pins should be pointing towards the chassis piece.

Screw on top of chassis

Adding Jumper Wires to the RedBot Sensor - Mechanical Bumpers

Add jumper wires to the GND and OUT pins on both of the mechanical bumpers. You will not add jumper wires to the 5V pins. Again, which color jumper wires you choose does not matter, but it might be helpful to follow along with this assembly guide.

Left RedBot Sensor - Mechanical Bumper:

Jumper WiresLeft RedBot Sensor - Mechanical Bumper
Jumper Wire - GreenGND
Jumper Wire - YellowOUT

Please note: When you have the RedBot upright and the front of the chassis facing north, the left mechanical bumper will be on the left side.

Right RedBot Sensor - Mechanical Bumper:

Jumper WiresRight RedBot Sensor - Mechanical Bumper
Jumper Wire - YellowGND
Jumper Wire - GreenOUT

Please note: When you have the RedBot upright and the front of the chassis facing north, the right mechanical bumper will be on the right side.

Here is the view from the bottom side:

Added Jumper wires

Put the other ends of the jumper wires through the top chassis piece.

Jumper wire going through chassis hole

Make sure the jumper wires are all the way through.

Both jumper wire sets through the chassis

Standoffs

Time to add the standoffs! Adding the standoffs will allow us to connect the top and bottom chassis pieces.

Locate the Following:

12x 4-40 x 1/4" Phillips Screw4x 4-40 x 3/8" Metal Standoff4x 4-40 x 1" Metal Standoff
4-40 x 1/4 inch Phillips Screw4-40 x 3/8 inch Metal Standoff4-40 x 1 inch Metal Standoff

Please note: Pay close attention to which screws you are using. There are two different screws in the RedBot Kit. (30x of the 4-40 x ¼" Phillips screw and 4x of the 4-40 x 1 ¼" flat head screw)

Adding the RedBot Sensor - Mechanical Bumper? You will have 3x of the 4-40 x ⅜“ Phillips screw.

There is also different standoffs in the RedBot Kit and add-ons. The RedBot Kit comes with 7x 4-40 x 1" metal standoff, 4x 4-40 x ⅜“ metal standoff, and 3x 4-40 x 1 ½” metal hex standoff.

Adding the RedBot Sensor - Mechanical Bumper? You will have 3x of the 4-40 x ¾"nylon standoffs.

Adding the Standoffs

Locate the following locations, on the top chassis, piece where you will add four 4-40 x ⅜" metal standoffs.

Stand offs for RedBot Mainboard

Using the 4-40 x ¼" Phillips Screws, add all four 4-40 x ⅜" metal standoffs on the top chassis piece.

Stand off on

In order to connect the top chassis piece, to the bottom piece, you will need to put standoffs between the two chassis pieces. Follow along to see the best locations to place the metal standoffs.

Locate the four 4-40 x 1" metal standoff locations.

Stand off locations

Using 4-40 x ¼" Phillips screws, tighten down all four 4-40 x 1" metal standoffs on the top side of the bottom chassis piece.

Standoffs on bottom chassis part

Now it is time to connect the top chassis piece to the bottom chassis piece. First, push all the jumper wires through the top chassis piece. Make sure the top chassis piece has the 4-40 x ⅜" metal standoffs at the very top. Also, pay attention that both chassis pieces front and back sides line up and are correct.

Jumper wires through top piece

Push the jumper wires all the way through the top.

Jumper wires all the way through

All the jumper wires should now be through the top. Using the 4-40 x ¼" Phillips screws, screw down the top chassis piece to the 4-40 x 1" metal standoffs already on the bottom chassis piece.

Top chassis piece tighten to the bottom chassis piece

RedBot Mainboard

In this section, you will adding the brains of the robot, the RedBot Mainboard.

Locate the Following:

4x 4-40 x 1/4" Phillips Screw1x RedBot Mainboard
4-40 x 1/4 inch Phillips ScrewRedBot Mainboard

Adding the RedBot Mainboard

Line up the four corner holes of the RedBot Mainboard to the four 4-40 x ⅜" metal standoffs on the top chassis piece. You will want the barrel jack on the RedBot Mainboard to be on the left side. Using four 4-40 x ¼" Phillips screws, tighten down the RedBot Mainboard to the four 4-40 x ⅜" metal standoffs.

RedBoard Mainboard

Battery Holder

Your robot needs power! In this section, you will be adding the battery holder to the RedBot.

Locate the Following:

4x Pieces of Double-Sided Sticky Foam Tab1x Battery Holder
Pieces of Double sided foam tapeBattery Holder

Adding the RedBot Mainboard

Peel and stick one pieces of double-sided sticky foam tabs to the back side of the top chassis piece.

Sticky tab

Add the other three pieces of double-sided sticky foam tabs to the back side of the top chassis piece.

Other sticky tabs

Peel off the tops of all the pieces of double-sided sticky foam tabs. Then, place the battery holder on top. The battery holder barrel jack connector should be on the same side (left side) as the RedBot Mainboard's barrel jack connector.

alt text

Connecting the Jumper Wires

Now that you have the top chassis piece down, it is time to connect the jumper wires. It is really important that the connections are right. Please remember that the jumper wire color is meant to help lessen confusion when making connections. However, the actual color of jumper wires does not matter as long as the connections from pin to pin are correct.

Pin Outs

You can follow along with the pin out tables or scroll down for a Fritzing image.

Left RedBot Sensor - Line Follower:

RedBot Mainboard PinsJumper WiresLeft RedBot Sensor - Line Follower
A3Jumper Wire - YellowOUT
5VJumper Wire - RedVCC
GNDJumper Wire - BlackGND

Please note: When you have the RedBot upright and the front of the chassis facing north, the left line follower will be on the left side.

Middle RedBot Sensor - Line Follower:

RedBot Mainboard PinsJumper WiresMiddle RedBot Sensor - Line Follower
A6Jumper Wire - BlueOUT
5VJumper Wire - RedVCC
GNDJumper Wire - BlackGND

Right RedBot Sensor - Line Follower:

RedBot Mainboard PinsJumper WiresRight RedBot Sensor - Line Follower
A7Jumper Wire - GreenOUT
5VJumper Wire - RedVCC
GNDJumper Wire - BlackGND

Please note: When you have the RedBot upright and the front of the chassis facing north, the right line follower will be on the right side.

Left RedBot Sensor - Mechanical Bumper:

RedBot Mainboard PinsJumper WiresLeft RedBot Sensor - Mechanical Bumper
GNDJumper Wire - GreenGND
3Jumper Wire - YellowOUT

Please note: When you have the RedBot upright and the front of the chassis facing north, the left mechanical bumper will be on the left side.

Right RedBot Sensor - Mechanical Bumper:

RedBot Mainboard PinsJumper WiresRight RedBot Sensor - Mechanical Bumper
11Jumper Wire - YellowGND
GNDJumper Wire - GreenOUT

Left Motor:

RedBot Mainboard PinsLeft Motor Jumper Wires
REDSoldered on Motor Jumper Wire - RED
BLACKSoldered on Motor Jumper Wire - Black

Please note: When you have the RedBot upright and the front of the chassis facing north, the left motor will be on the left side.

Right Motor:

RedBot Mainboard PinsRight Motor Jumper Wires
REDSoldered on Motor Jumper Wire - RED
BLACKSoldered on Motor Jumper Wire - Black

Please note: When you have the RedBot upright and the front of the chassis facing north, the right motor will be on the right side.

Left Wheel Encoder:

RedBot Mainboard PinsLeft Wheel Encoder Jumper Wires
A2Wheel Encoder Jumper Wire - White
5VWheel Encoder Jumper Wire - RED
GNDSoldered on Motor Jumper Wire - Black

Please note: When you have the RedBot upright and the front of the chassis facing north, the left wheel encoder will be on the left side.

Right Wheel Encoder:

RedBot Mainboard PinsRight Wheel Encoder Jumper Wires
10Wheel Encoder Jumper Wire - White
POWWheel Encoder Jumper Wire - RED
GNDWheel Encoder Jumper Wire - Black

Please note: When you have the RedBot upright and the front of the chassis facing north, the right wheel encoder will be on the right side.

All jumper wires on RedBot

Fritzing Image

Fritzing image

Look at all those connections! Having a hard time seeing the image? Click on the Fritzing image to see a bigger diagram and stop straining your eyes.

RedBot Accelerometer

Time to add the RedBot Accelerometer! If you do not have headers on your Accelerometer already (older revisions of the RedBot Accelerometer did not have headers), we recommend soldering on female headers to your Accelerometer to fit on top of the RedBot Mainboard’s female headers.

Locate the Following:

1x RedBot Accelerometer
 RedBot Accelerometer

Adding the RedBot Accelerometer

Locate the position on the RedBot Mainboard to add the Accelerometer. Line up the “A4” pin on the accelerometer to the “A4” male header pin in the “SENSOR” section on the RedBot Mainboard.

Adding the Accelerometer

**RedBot Buzzer**

Read on if you are using the RedBot Buzzer. If not, skip to the next section.

Adding the RedBot Buzzer is nice and easy!

Locate the Following:

1x RedBot Buzzer
RedBot Buzzer

Adding the RedBot Buzzer

Locate the position on the RedBot Mainboard to add the RedBot Buzzer. With the buzzer side and female header PCB side of the RedBot Buzzer facing to the left, place the RedBot Buzzer on top of the “9”, “POW”, and “GND” male header pin row in the “SERVO” section on the RedBot Mainboard.

Adding the RedBot Buzzer

Batteries

Whew, you are so close to being done! Time to add 4x AA batteries and plug in the battery holder.

Locate the Following:

1500 mAh Alkaline Battery - AA

1500 mAh Alkaline Battery - AA

In stock PRT-09100

These are your standard 1.5V AA alkaline batteries from Duracell. Don't even think about trying to recharge these. Roughly 15…

0.5

Adding Batteries

Use the graphics on the battery holder to place the batteries in the right orientation. Plug in the battery holder’s barrel power plug into the barrel power jack on the RedBot Mainboard.

alt text

Resources and Going Further

What a rockstar! With all that building, bet you are ready to start cruising. Check out the following tutorials to help you get started with the RedBot.

Getting Started with the RedBot

August 8, 2013

A simple introduction to SparkFun's RedBot robotics platform.

learn.sparkfun.com |CC BY-SA 3.0 | SparkFun Electronics | Niwot, Colorado


Using AT&T's M2X With the CC3000

$
0
0

Using AT&T's M2X With the CC3000 a learn.sparkfun.com tutorial

Available online at: http://sfe.io/t291

Introduction

M2X is AT&T’s Machine-to-Machine (M2M) cloud solution. You can set up any number of “streams” on https://m2x.att.com/ and post, fetch, delete data from any number of Internet-connected devices.

Great, but what does all that mean? Well, let’s say you have a sensor (temperature, pressure, carbon monoxide, wind speed, etc.), and you want to log all that data to somewhere on the Internet. M2X allows you to post that sensor data and view that data from any computer or smart phone connected to the Internet.

Office temperature logging

Logging the temperature in my office for about 3 hours on M2X

Conversely, we can control a device connected to M2X from anywhere (as long as we have Internet access). While M2X is not explicitly set up to push data to connected devices, we can write a program for the device that polls an M2X stream for data and performs some action based on that data.

Lighting up an LED using M2X

All of this falls under the umbrella of Internet of Things (IOT), in which Internet-connected embedded systems can communicate with Internet services, such as web sites or other connected devices.

In this tutorial, we use a SparkFun RedBoard (an Arduino Uno R3 will work, as well) and a CC3000 Shield to connect to M2X via WiFi. A temperature sensor, level shifter, LED, and resistor will also be needed for the tutorials. The specific components will be covered in each section.

We show how to set up an M2X account, create a stream, post sensor data to that stream, and control an LED from a stream. Keep in mind that these are just starting points for projects; if you want to monitor your oven or control your refrigerator, go for it!

Note: At the time of this tutorial’s publication, M2X is still in beta form. You may find some bugs along the way. Feel free to ask questions or post bugs on the M2X Forums. Also, expect things to change as AT&T improves the M2X service.

Suggested Reading

M2X Setup

In order to use the M2X streams, we need to set up an AT&T M2X account.

Navigate to m2x.att.com.

M2X Site

Click on the “Sign Up” button.

M2X Sign Up

Follow the instructions on the screen to sign up for an account using your GitHub or email. If you use your email, you will need to verify your account through a link in an email from the M2X site.

Once you click on the link, you will be presented with your dashboard and a “Welcome to M2X” pop-up. Feel free to read the welcome messages or click “Skip.”

After you are done with the welcome screen, you will see your dashboard.

M2X Dashboard

Click “Create Data Source Blueprint.” Blueprints are a collection of data sources (streams) that can be multiplied and scaled to handle production data (known as a “batch”).

M2X Blueprint info

You will be asked to give your Blueprint some information. Fill out whatever you like in the Name and Description fields. For now, leave the Visibility at “Private.” Click “Create.” You will be presented with the dashboard for your Blueprint.

M2X Blueprint Dashboard

And that’s it! We created a blueprint, which will hold our data streams for the tutorials. Before we can add data, we need to install a few Arduino libraries.

Install Libraries

In order to use the CC3000 and M2X with Arduino, we need to install a few libraries. Make sure you do not have the Arduino IDE open at this time.

SFE_CC3000

Download the SFE_CC3000_Library from GitHub: https://github.com/sparkfun/SFE_CC3000_Library. You can clone the library or download a ZIP of the whole library here.

If you downloaded the ZIP, extract the folder.

Extract ZIP file

Navigate to <Arduino installation folder>\libraries (e.g. C:\Program Files (x86)\Arduino\libraries in Windows) and create a folder named “SFE_CC3000_Library.”

Create library folder

Navigate back to the downloaded library and copy all of the files inside SFE_CC3000_Library-master/SFE_CC3000_Library-master to <Arduino installation folder>\libraries\SFE_CC3000_Library.

Copy library files

jsonlite

Just like we did with the CC3000 library, clone or download the ZIP file for the jsonlite library. The ZIP can be downloaded here.

If you downloaded the ZIP, extract it.

Create a folder named “jsonlite” in <Arduino installation folder>\libraries. Copy in the contents from the downloaded jsonlite-master\jsonlite-master\amalgamated\jsonlite directory.

Copied jsonlite library files

M2XStreamClient

Clone or download the ZIP file for the m2x-arduino library. The ZIP can be downloaded here.

If you downloaded the ZIP, extract it.

Create a folder named “M2XStreamClient” in <Arduino installation folder>\libraries. Copy in the contents from the downloaded m2x-arduino-master\m2x-arduino-master\M2XStreamClient directory.

Copied m2x-arduino library files

Note: AT&T maintains their own m2x-arduino library, but at the time of this writing, that library did not have a “Delete” function, which is necessary for one of the tutorials. We forked the git repository and added a “Delete” function. If “Delete” is added to the AT&T library, we will update this tutorial to use theirs.

Post Temperature Data

The first logical step in using the M2X service is to create a data stream and post information to it. In this tutorial, we connect a temperature sensor to an Arduino equipped with a CC3000 shield and send temperature readings to our M2X stream. This stream will automatically display the data in an easy-to-read chart for us to look at.

Posting temperature and humidity data to M2X

Required Materials

The Circuit

Connect the CC3000 shield to the Arduino, and connect the level shifter and temperature sensor as shown.

Fritzing of CC3000 with HTU21D

Example Code

Open up the Arduino IDE and paste in the following code:

language:c
/****************************************************************
M2X_CC3000_Post.ino
Post temperature data to AT&T's M2X
Shawn Hymel @ SparkFun Electronics
August 19, 2014

Manually connects to a WiFi network and an M2X stream. Reads
temperature data from an HTU21D temperature and posts it to the
M2X stream.

Change AP_SSID, AP_PASSWORD, AP_SECURITY, FEED_ID, STREAM_NAME,
and M2X_KEY to match your WiFi and M2X parameters.

The security mode is defined by one of the following:
WLAN_SEC_UNSEC, WLAN_SEC_WEP, WLAN_SEC_WPA, WLAN_SEC_WPA2

Resources:
Include SPI.h, SFE_CC3000.h, SFE_CC3000_Client.h, jsonlite.h,
M2XStreamClient.h, Wire.h, HTU21D.h

Development environment specifics:
Written in Arduino 1.0.5
Tested with Arduino UNO R3

This code is beerware; if you see me (or any other SparkFun
employee) at the local, and you've found our code helpful, please
buy us a round!

Distributed as-is; no warranty is given.
****************************************************************/

#include <SPI.h>
#include <SFE_CC3000.h>
#include <SFE_CC3000_Client.h>
#include <jsonlite.h>
#include <M2XStreamClient.h>
#include <Wire.h>
#include <HTU21D.h>

// Parameters
#define POST_DELAY_MS   10000 // Post to stream every 10 seconds
#define DEGREE_SYMBOL   176   // Degree symbol for Serial.write

// Pins
#define CC3000_INT      2   // Needs to be an interrupt pin (D2/D3)
#define CC3000_EN       7   // Can be any digital pin
#define CC3000_CS       10  // Preferred is pin 10 on Uno

// Connection info data lengths
#define IP_ADDR_LEN     4   // Length of IP address in bytes

// WiFi Constants
#define AP_SSID         "<SSID>"      // SSID of network
#define AP_PASSWORD     "<PASSWORD>"  // Password of network
#define AP_SECURITY     WLAN_SEC_WPA2 // Security of network
#define TIMEOUT         30000         // Milliseconds

// M2X Constants
#define FEED_ID         "<FFED ID>"
#define STREAM_NAME     "<STREAM NAME>"
#define M2X_KEY         "<M2X MASTER KEY>"

// Global Variables
SFE_CC3000 wifi = SFE_CC3000(CC3000_INT, CC3000_EN, CC3000_CS);
SFE_CC3000_Client client = SFE_CC3000_Client(wifi);
M2XStreamClient m2x_client(&client, M2X_KEY);
HTU21D sensor;
float temp;
int g_response;

// Setup. Configure HTU21D, WiFi, and M2X.
void setup() {

  g_response = 0;

  // Initialize UART for debugging
  Serial.begin(9600);
  Serial.println();
  Serial.println(F("SparkFun CC3000 - M2X Post"));

  // Initialize HTU21D
  sensor.begin();

  // Initialize CC3000 (configure SPI communications)
  if ( wifi.init() ) {
    Serial.println(F("CC3000 initialization complete"));
  } else {
    Serial.println(F("Something went wrong during CC3000 init!"));
  }

  // Connect using DHCP
  Serial.print(F("Connecting to SSID: "));
  Serial.println(AP_SSID);
  if(wifi.connect(AP_SSID, AP_SECURITY, AP_PASSWORD, TIMEOUT)) {
    Serial.println(F("Connected!"));
  } else {
    Serial.println(F("Error: Could not connect to AP"));
  }
}

// Main loop. Post sensor readings at regular intervals.
void loop() {

  // Read sensor
  temp = sensor.readTemperature();

  // Print reading to console with degree symbol and 'C'
  Serial.print(F("Temperature: "));
  Serial.print(temp, 2);
  Serial.write(176);
  Serial.println("C");

  // Post data to your stream
  g_response = m2x_client.post(FEED_ID, STREAM_NAME, temp);

  // If we fail to receive a response, stop running
  Serial.print(F("Post response: "));
  Serial.println(g_response);
  if ( g_response == -1 ) {
    while(1);
  }

  // Wait to post to stream again
  delay(POST_DELAY_MS);
}

Before you can run the code, you will need to update a few variables:

  • <SSID> should be changed to your WiFi network name (SSID)
  • <PASSWORD> is your WiFi password
  • Make sure AP_SECURITY matches your WiFi security type (e.g. WPA, WEP)
  • Change <FEED ID>, <STREAM NAME>, and <M2X MASTER KEY> to match your M2X stream information (see next section)

Make a Data Stream

Log in to https://m2x.att.com/.

M2X Main Dashboard

Click on the Blueprint that we created (“CC3000 Test”).

M2X Blueprint Dashboard

Click on “Add Stream” and fill out some information about your stream. We call it “temperature.” Under “Units & Symbol,” start typing “Celsius,” and you will be presented with a drop-down list. Select “degree Celsius.”

M2X Add a Stream

Click “Add Stream.” You will be returned to your Blueprint dashboard with a new “temperature” stream added. Click “temperature” to drop down your stream data. There should not be anything in it right now (don’t worry, we are about to add some data!).

m2x new stream with no data

Scroll up on that same page to find your “FEED ID.” Copy that long string and paste it into our M2X_CC3000_Post sketch (replace <FEED ID>).

M2X Feed ID

Replace <STREAM NAME> in our code with the name of the stream (“temperature” in this case).

Back on the M2X site, click “ACCOUNT” to go to your account settings.

M2X Account Page

Click on “MASTER KEYS” to see your M2X Master Key. Copy that string and paste it into your code (replace <M2X MASTER KEY>).

M2X Master Key

Run Your Program

Verify that AP_SSID, AP_PASSWORD, AP_SECURITY, FEED_ID, STREAM_NAME, and M2X_KEY are correct in your code. Click “Upload” and wait for the Arduino IDE to upload the code to your Arduino or RedBoard. Open a Serial Monitor, and you should see temperature data being posted to your M2X stream!

Note: the response should be “204.” If you see “404” or “-1” it means there was an error connecting to your WiFi or to the M2X service. If you see “422” it means that your M2X_KEY, FEED_ID, or STREAM_NAME is incorrect. To learn more about response codes, see the M2X API documentation.

Temperature data logging

Temperature data logged to M2X

Public Data Stream

If you want others to be able to view your data, you can make your Blueprint (and associated streams) public. On the Blueprint dashboard, click the “Edit” button next to your Blueprint name and change the visibility from “Private” to “Public.” Click “Save” and wait a few minutes for this to update (this can take upwards of 15 minutes).

Underneath your Blueprint name on the dashboard, click the link “Preview Public Page URL.” This will take you to a separate page where you can view the streams associated with that Blueprint. If you made your Blueprint public, you can share this URL with anyone.

M2X Public Blueprint

Controlling a Device From M2X

Sending information to M2X is great for logging sensor data, but we can also control hardware devices from M2X. This technique requires a bit of trickery, as there is no way to push data to the Arduino (without turning the Arduino into a web server). So, we have the Arduino poll an M2X stream every few seconds looking for data. If it sees a “0” it will turn off the LED. If it sees any other value, it will turn the LED on. Any time the Arduino reads data from the stream, it immediately deletes all data on the stream.

Circuit for controlling an LED from M2X

Required Materials

The Circuit

Connect the CC3000 shield to the Arduino, and connect the resistor and LED as shown.

Fritzing of the CC3000 with LED

Make M2X Stream

Rather than use our “temperature” stream, we are going to make another stream in the same Blueprint. We will poll this stream from the Arduino, read values, and delete entries as we read them.

Log in to your AT&T M2X account.

Click on your Blueprint (e.g. “CC3000 Test”).

Scroll down, and click on “Add Steam.” Name the stream something memorable (we’ll call ours “control”). Pick any Unit and Symbol (it really does not matter. “Barn” seemed like a silly unit, so we used that).

Add a control stream to your Blueprint

Click “Add Stream.” Don’t add any values! We will add some data later.

Blank control data stream

Adjust Serial Buffer

Sadly, the poor Arduino UNO (i.e. ATmega328P) simply does not have enough RAM to control the CC3000 and process the incoming M2X data. To free up some space in the RAM, we are going to reduce the size of the Serial buffer. Don’t forget to change it back for your other projects!

Navigate to <Arduino installation folder>\hardware\arduino\cores\arduino and open up HardwareSerial.cpp with your favorite text editor.

Note: If you are using a different Arduino with more RAM (e.g. the Arduino Mega), then you don’t need to perform this step.

HardwareSerial.cpp location

Scroll down and change SERIAL_BUFFER_SIZE from 64 to 32.

HardwareSerial change serial buffer size

Example Code

Open up the Arduino IDE and paste in the following code:

language:c
/****************************************************************
M2X_CC3000_LED.ino
Control an LED with AT&T's M2X
Shawn Hymel @ SparkFun Electronics
August 19, 2014

Manually connects to a WiFi network and performs a GET to the
provided M2X stream. It reads the last data point available
and deletes all data points. This acts as a "producer-consumer"
model.

IMPORTANT: This WILL cause an Uno to run out of RAM. You need to
change SERIAL_BUFFER_SIZE from 64 to 32 in HardwareSerial.cpp,
which can be found in:
C:\Program Files (x86)\Arduino\hardware\arduino\cores\arduino

Change AP_SSID, AP_PASSWORD, AP_SECURITY, FEED_ID, STREAM_NAME,
and M2X_KEY to match your WiFi and M2X parameters.

The security mode is defined by one of the following:
WLAN_SEC_UNSEC, WLAN_SEC_WEP, WLAN_SEC_WPA, WLAN_SEC_WPA2

Resources:
Include SPI.h, SFE_CC3000.h, SFE_CC3000_Client.h, jsonlite.h,
M2XStreamClient.h

Development environment specifics:
Written in Arduino 1.0.5
Tested with Arduino UNO R3

This code is beerware; if you see me (or any other SparkFun
employee) at the local, and you've found our code helpful, please
buy us a round!

Distributed as-is; no warranty is given.
****************************************************************/

#include <jsonlite.h>
#include <SPI.h>
#include <SFE_CC3000.h>
#include <SFE_CC3000_Client.h>
#include <M2XStreamClient.h>

// Parameters
#define POLL_DELAY_MS   1000 // Poll M2X stream every 1 second

// Pins
#define CC3000_INT      2    // Needs to be an interrupt pin (D2/D3)
#define CC3000_EN       7    // Can be any digital pin
#define CC3000_CS       10   // Preferred is pin 10 on Uno
#define LED_PIN         9    // LED (we can't use pin 13!)

// Connection info data lengths
#define IP_ADDR_LEN     4    // Length of IP address in bytes
#define TIME_LEN        25   // Length of timestamp string

// WiFi Constants
#define AP_SSID         "<SSID>"      // SSID of network
#define AP_PASSWORD     "<PASSWORD>"  // Password of network
#define AP_SECURITY     WLAN_SEC_WPA2 // Security of network
#define TIMEOUT         30000         // Milliseconds

// M2X Constants
#define FEED_ID         "<FFED ID>"
#define STREAM_NAME     "<STREAM NAME>"
#define M2X_KEY         "<M2X MASTER KEY>"
#define FROM_TIME       "1970-01-01T00:00:00.000Z"

// Global Variables
SFE_CC3000 wifi = SFE_CC3000(CC3000_INT, CC3000_EN, CC3000_CS);
SFE_CC3000_Client client = SFE_CC3000_Client(wifi);
M2XStreamClient m2x_client(&client, M2X_KEY);
uint8_t g_new;
int g_response;
int g_index;
char g_time[TIME_LEN];
uint8_t led_state;

// M2X fetch callback. This is called for each entry found.
void on_data_point_found( const char* at, \
                          const char* value, \
                          int index, \
                          void* context) {

  // Index 0 is the most recent. Save the timestamp so we can
  // delete all the entries up to that point. If the value is
  // exactly 0, turn off the LED. Otherwise, turn it on.
  if ( index == 0 ) {
    g_new = 1;
    strncpy(g_time, at, TIME_LEN);
    if ( strcmp(value, "0") == 0 ) {
      led_state = 0;
    } else {
      led_state = 1;
    }
  }
}

// Setup. Configure WiFi and M2X connections.
void setup() {

  g_response = 0;
  g_new = 0;

  // Initialize LED
  led_state = 0;
  pinMode(LED_PIN, OUTPUT);
  digitalWrite(LED_PIN, LOW);

  // Initialize UART for debugging
  Serial.begin(9600);
  Serial.println();
  Serial.println(F("SparkFun CC3000 - M2X LED"));

  // Initialize CC3000 (configure SPI communications)
  if ( wifi.init() ) {
    Serial.println(F("CC3000 initialization complete"));
  } else {
    Serial.println(F("Something went wrong during CC3000 init!"));
  }

  // Connect using DHCP
  Serial.print(F("Connecting to SSID: "));
  Serial.println(AP_SSID);
  if(wifi.connect(AP_SSID, AP_SECURITY, AP_PASSWORD, TIMEOUT)) {
    Serial.println(F("Connected!"));
  } else {
    Serial.println(F("Error: Could not connect to AP"));
  }
}

// Main loop. Poll M2X stream, update LED, and delete entries.
void loop() {

  // Fetch values from M2X stream
  g_response = m2x_client.fetchValues(FEED_ID, \
                                      STREAM_NAME, \
                                      on_data_point_found, \
                                      NULL);

  // If we fail to receive a reponse, stop running
  Serial.print(F("Fetch response: "));
  Serial.println(g_response);
  if ( g_response == -1 ) {
    while(1);
  }

  // Update LED and delete entries if there was a new value
  if ( g_new ) {

    // Update LED state
    digitalWrite(LED_PIN, led_state);
    Serial.print(F("LED: "));
    Serial.println(led_state);

    // Fetch drops last 4 chars. Add some so we can delete entries.
    strncpy(g_time + 20, "999Z", 5);

    // Delete all entries
    g_response = m2x_client.deleteValues( FEED_ID, \
                                          STREAM_NAME, \
                                          FROM_TIME, \
                                          g_time);

    // If we fail to receive a reponse, stop running
    Serial.print(F("Delete response: "));
    Serial.println(g_response);
    if ( g_response == -1 ) {
      while(1);
    }

    // Reset new flag
    g_new = 0;
  }

  // Wait to poll stream again
  delay(POLL_DELAY_MS);
}

Don’t forget to update the WiFi and M2X stream parameters:

  • <SSID> should be changed to your WiFi network name (SSID)
  • <PASSWORD> is your WiFi password
  • Make sure AP_SECURITY matches your WiFi security type (e.g. WPA, WEP)
  • Change <FEED ID> and <M2X MASTER KEY> to match your M2X information (see the Post Temperature Data example)
  • Change <STREAM NAME> to your new stream name (e.g. “control”)

Run Your Program

Upload your program to the Arduino. Open up a Serial Monitor, and you should see the Arduino connect to WiFi and start to poll your M2X stream.

Arduino and CC3000 connected to M2X control stream

While your Arduino is polling the M2X stream, go back to your M2X Blueprint in your browser and expand our new data stream.

Expanded data stream

Click the “Edit” button and enter a value (anything other than “0”) into the “Log a Value” field.

M2X log a value

Click “Save Stream.” In a few seconds, your Arduino should see that a value was logged to the stream and turn on the LED as a result.

LED on

To turn off the LED, click on “Edit” again for your data stream. This time, set “Log a Value” to 0 and click “Save Stream.” Your LED should turn off within a few seconds.

LED off

So What?

OK, so blinking an LED might seem a little simplistic. However, being able to control a microcontroller from the Internet is a pretty big thing (and will garner the admiration of all your geek friends).

You could write a phone app to control the lights in your house by posting and reading values in M2X. You could remotely start your car, computer, stereo, etc. as long as there is Internet connectivity. The list goes on.

Resources and Going Further

We showed you how to set up an M2X account, connect your Arduino to an M2X stream to post some values, and even how to control an LED from M2X. These examples are really just the first few steps in the Internet of Things world.

Beyond the Tutorial

Resources


learn.sparkfun.com |CC BY-SA 3.0 | SparkFun Electronics | Niwot, Colorado

Digital Sandbox Arduino Companion

$
0
0

Digital Sandbox Arduino Companion a learn.sparkfun.com tutorial

Available online at: http://sfe.io/t267

Introduction

The Digital Sandbox is a learning platform that engages both the software and hardware worlds. It’s powered by a microcontroller that can interact with real-world inputs – like light or temperature sensors – while at the same time controlling LEDs, motors, and other outputs. The Digital Sandbox is equipped with everything, on board, that you will need to complete 13 experiments including controlling an LED, measuring how loud things are, detecting the temperature is, and more. Think of this as a SparkFun Inventor’s Kit all in one board!

DS graphic

In our original Digital Sandbox Experiment Guide, we show you how to program the Sandbox using a simple, graphical programming language called ArduBlock. This time around, we’ll show you how to ditch the graphical editor in favor of actual Arduino code.

If you’re looking to get into Arduino coding, this is a great place to begin. Grab a Sandbox and get started!

Experiment List (Table of Contents):

We’ll explore the Sandbox through a series of progressive experiments. If you’ve already completed the Sandbox Experiment Guide, this list will look familiar. We’ve recreated the code from those experiments using Arduino code instead of ArduBlock.

After setting up your Sandbox, here’s what’s covered:

  1. Setup and Loop
  2. Exploring Blink
  3. Multi-Blink
  4. Dimming (the Hard Way)
  5. Dimming (the Easy Way)
  6. Color Mixing
  7. Number Storage with Variables
  8. If This Then That
  9. The Reaction Tester
  10. Serial Calculator
  11. Do the Analog Slide
  12. Automatic Night Light
  13. Thermal Alert!
  14. Sound Detecting
  15. Opto-Theremin (Addon)
  16. Serial Motoring (Addon)
  17. Servo Sweeper (Addon)

What is the Digital Sandbox?

The Digital Sandbox is a learning platform that engages both the software and hardware worlds. It’s powered by a microcontroller that can interact with real-world inputs – like light or temperature sensors – while at the same time controlling LEDs, motors, and other outputs.

By interfacing the Sandbox to your PC or Mac via a USB cable, the Sandbox can be programmed using the popular Arduino programming environment.

The Anatomy of the Digital Sandbox

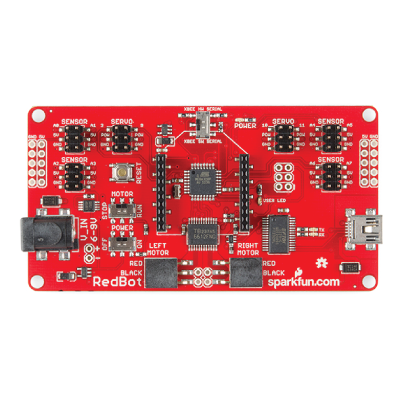
The Digital Sandbox includes a variety of on-board inputs and outputs that are commonly encountered in the world of electronics. Here is an overview of what’s included on the board:

Annotated image of the Digital Sandbox

  1. USB Mini-B Connector– Used to connect to a computer.
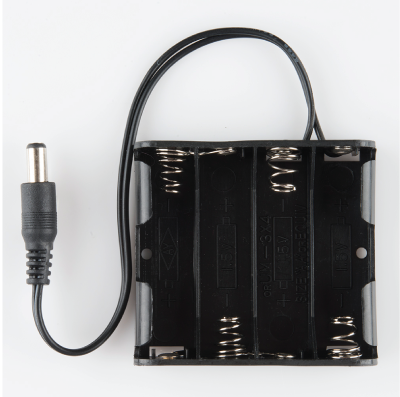
  2. JST Right-Angle Connector– Used to supply power to the board.
  3. Slide Switch for Charging– Used to charge a lithium polymer battery that is plugged into the two-pin JST connector, while the Digital Sandbox is connected to a computer and the slide switch is in the “ON” position.
  4. Reset Button– This is a way to manually reset your Digital Sandbox, which will restart your code from the beginning.
  5. Slide Switch (Pin 2)– On or off slide switch.
  6. LEDs (Pins 4-8)– Use one or all of the LEDs (light-emitting diodes) to light up your project!
  7. LED (Pin 13)– Incorporate this into your sketch to show whether your program is running properly.
  8. Temperature Sensor (Pin A0)– Measures ambient temperature.
  9. Light Sensor (Pin A1)– Measures the amount of light hitting the sensor.
  10. RGB LED (Pins 9-11)– RGB (red/green/blue) LEDs have three different color-emitting diodes that can be combined to create many colors.
  11. Slide Potentiometer (Pin A3)– Change the values by sliding it back and forth.
  12. Microphone (Pin A2)– Measures how loud something is.
  13. Push Button (Pin 12)– A button is a digital input. It can be either “on” or “off.”
  14. Add-on Header (Pin 3)– Three-pin header for add-ons. Example add-ons are servos, motors and buzzers.

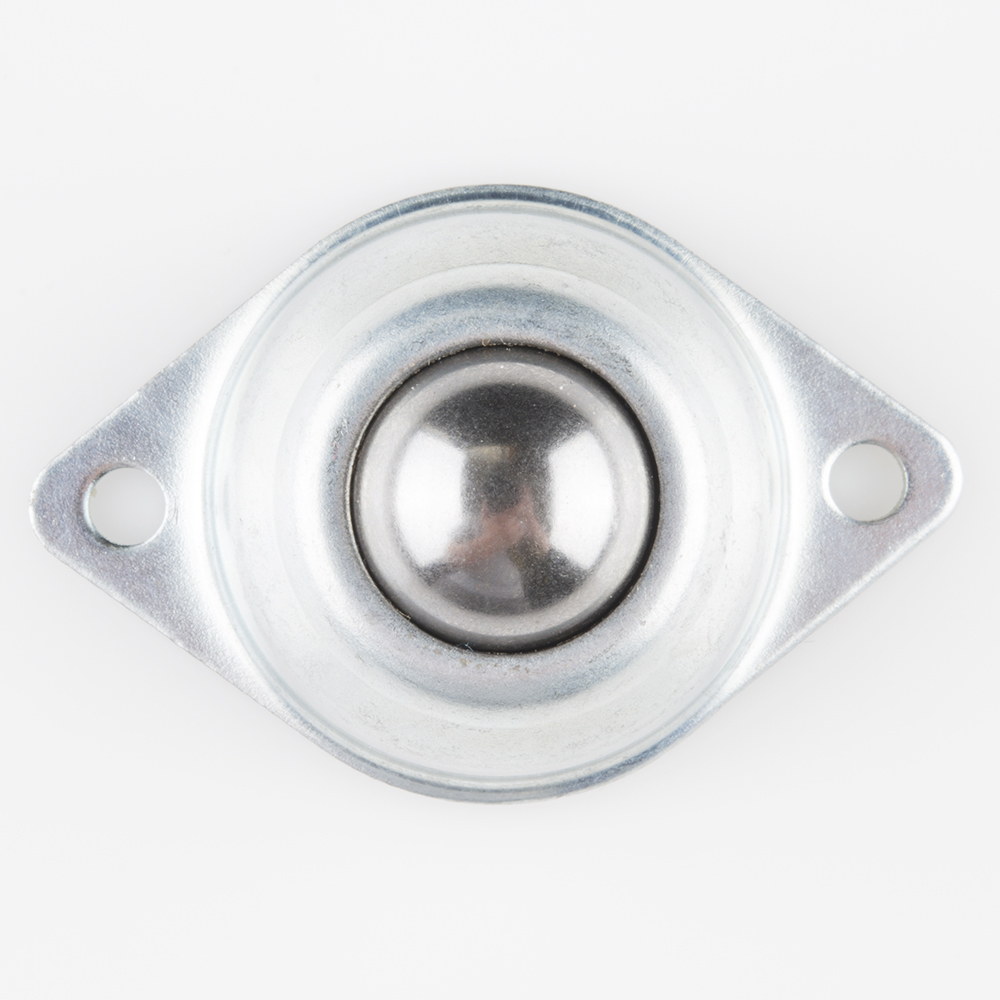
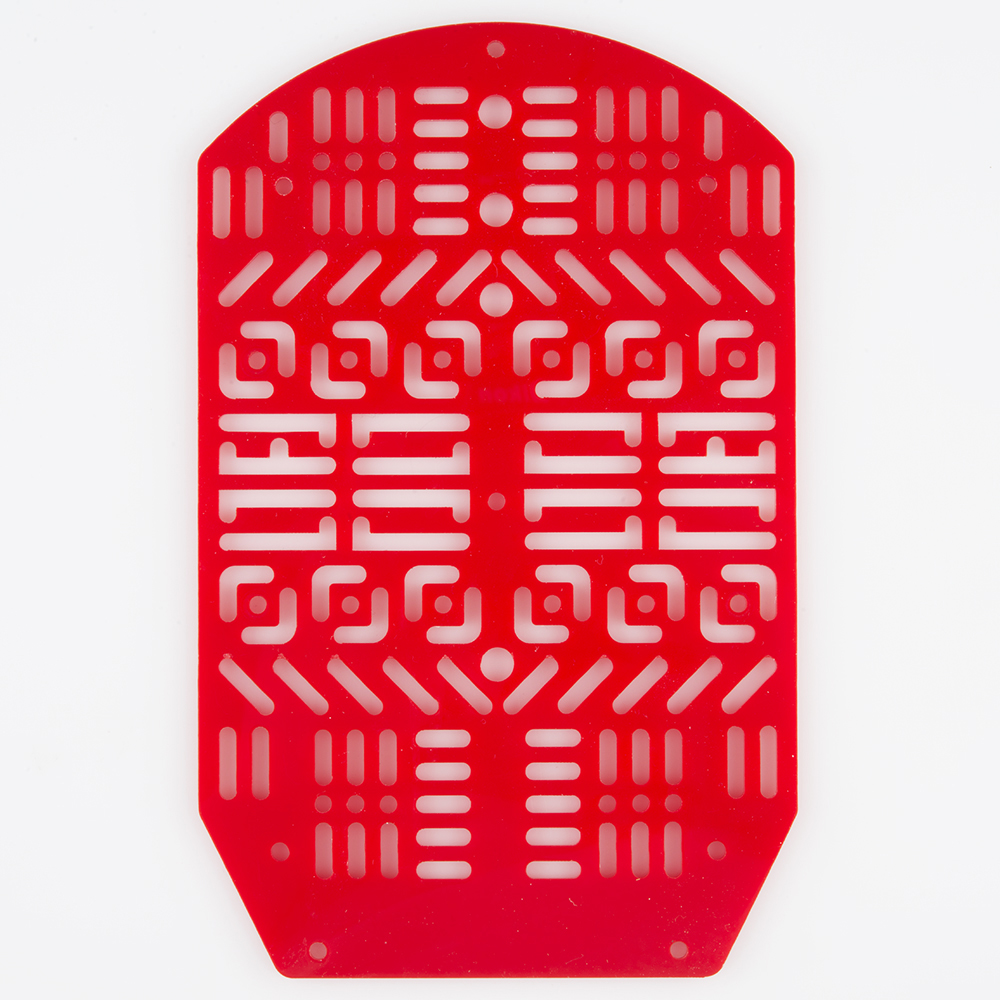
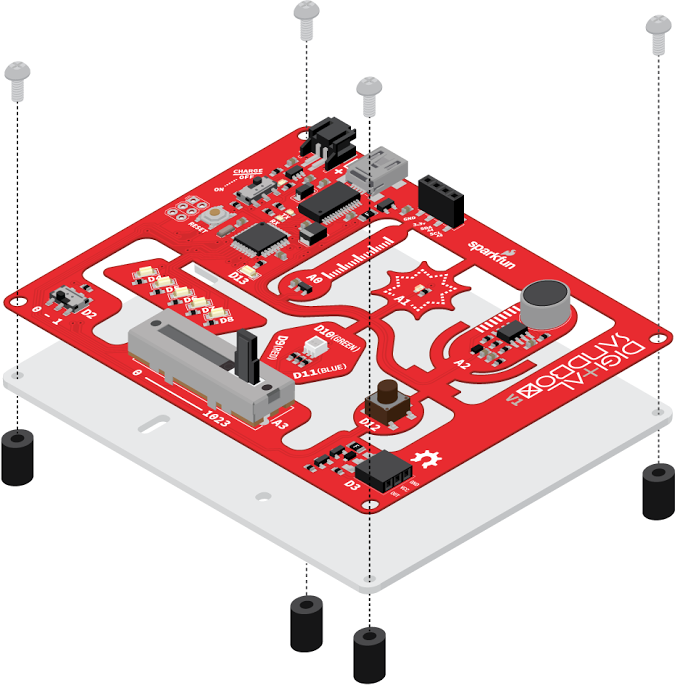
Digital Sandbox Baseplate Setup

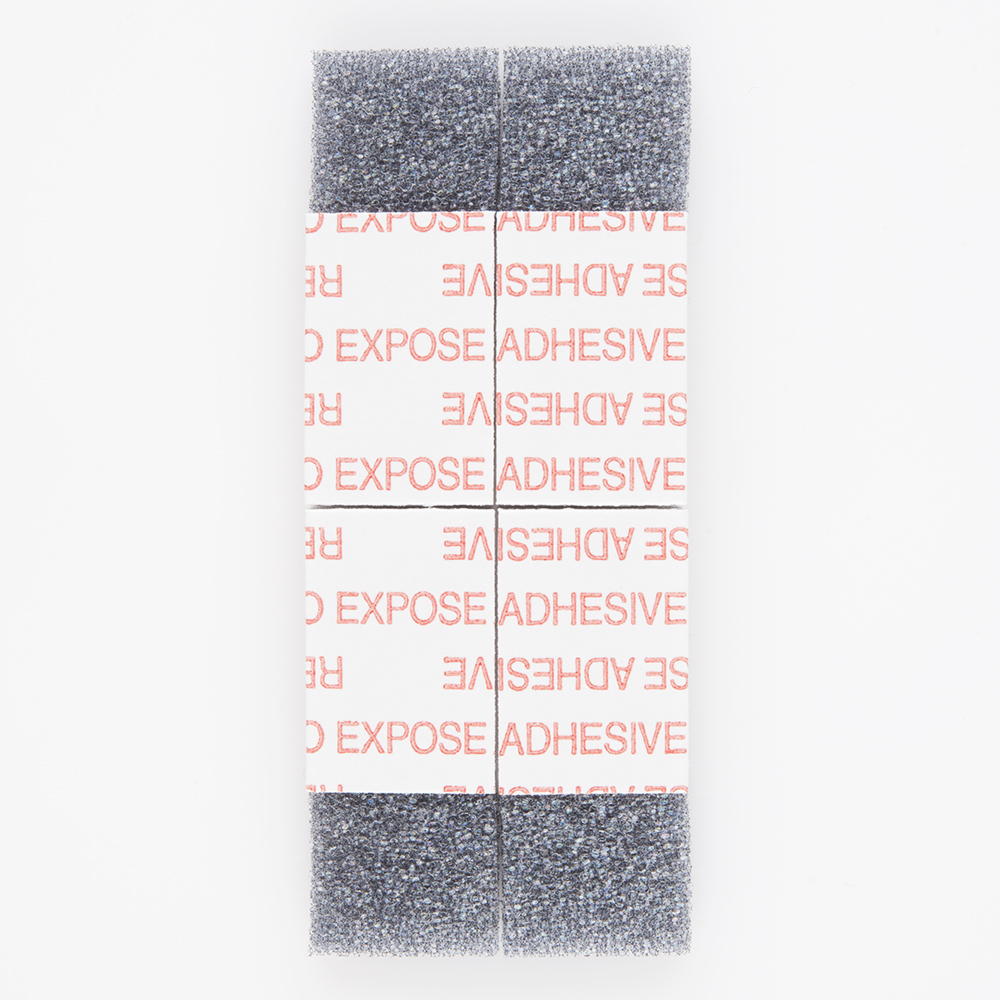
Secure the Digital Sandbox board to the baseplate with the included Phillips-head screws.

baseplate assembly

Finger-tighten the screws for easy removal later.

Setup

If this is your first time using the Sandbox, we highly recommend checking out the parallel Digital Sandbox Guide for ArduBlock. That tutorial serves as a great introduction to programming – it eases you into the programming world with a more simple, graphical language: ArduBlock. With ArduBlock you don’t have to worry about misplacing semi-colons or making spelling mistakes, just drag and drop blocks to create your program.

If you’re ready for the big show, though, follow along from here. On this page we’ll get you set up with Arduino (or Codebender), from there it’s on to the experiments.

Sandbox Setup & Driver Installation

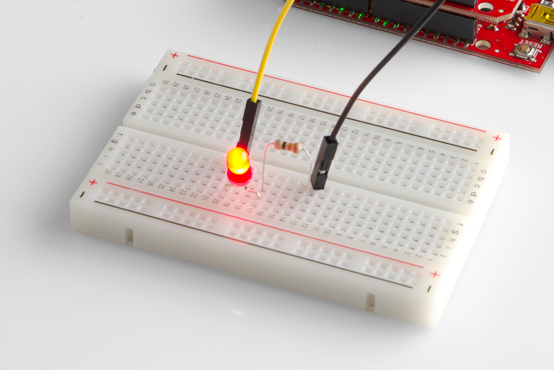
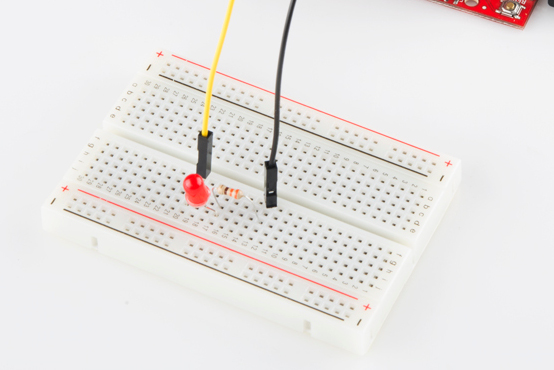
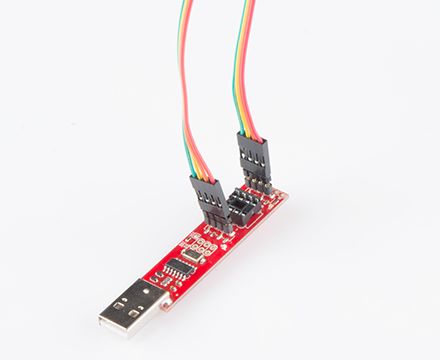
If you haven’t already, you’ll need to install the driver for your Digital Sandbox. Begin by connecting the Digital Sandbox to your computer.

Sandbox connected to computer

Once the board is connected, you will need to install drivers. Please go to www.sparkfun.com/ftdi for instructions specific to your operating system.

Choose Your Arduino Adventure

There are two options when it comes to programming your Sandbox via Arduino: the Arduino IDE and Codebender. Together, they give you a choice between a local code editor or a web-browser-based “cloud” editor. You’re free to choose either one, here’s how to set them up:

Codebender Setup

Browsing with Firefox or Chrome? We highly suggest giving Codebender a try. All of the example code in this tutorial is displayed using Codebender. Using their plugins for Firefox or Chrome, you can directly upload the code to your Sandbox without ever installing the Arduino software!

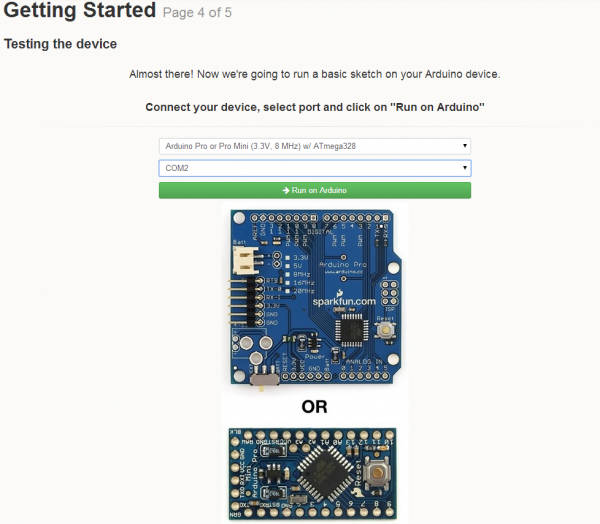
If you want to give Codebender a try, visit their webpage, create an account, and follow the Getting Started guide.

alt text

If you follow along with the Getting Started guide, set your board type as Arduino Pro or Pro Mini 3.3V/8MHz– it uses the same definitions as the Digital Sandbox.

Arduino Setup

You certainly don’t have to use Codebender, though. If you’d rather use the standard Arduino IDE, please read through our Installing Arduino tutorial, which will guide you through every step required to get your Arduino IDE all set up.

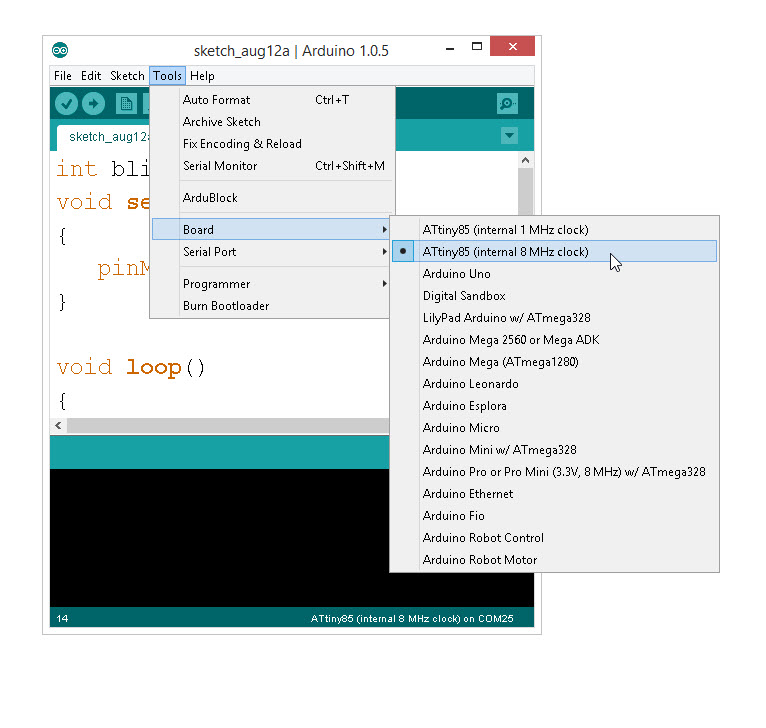
After you’ve installed Arduino, when you get to the board selection step, set your Board type to Arduino Pro or Pro Mini 3.3V/8MHz.

alt text

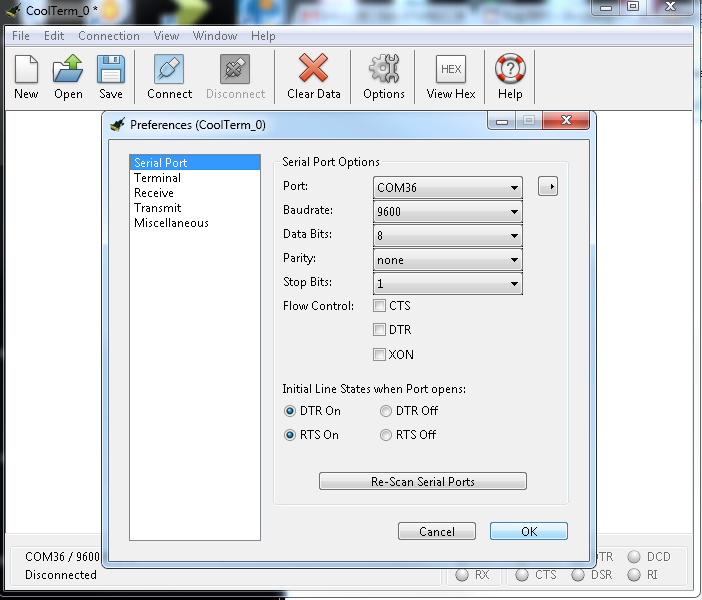
And don’t forget to set your Serial Port as well, under the “Tools > Serial Port” menu.

In addition, you may want to download all of the example sketches ahead of time. Click here to download a ZIP folder with every experiment sketch in this tutorial. Unzip it and store it somewhere memorable.

0. Setup and Loop

We’ll start off as basic as possible. This experiment introduces the Arduino bare bones – the least amount of code required to create any Arduino sketch. Every Arduino sketch is different, but they all include these few lines of code. Time to setup and loop!

Active Parts

Experiment 0 active parts

Code Components

In each experiment we’ll introduce one or two new Arduino-language concepts, and provide a brief overview of how and why we use them. This time, we’re introducing setup(), loop(), comments, and some syntax.

Setup: void setup() { }

This is a declaration for a function called “setup”. This exact line is required in every Arduino sketch ever.

Any code that lives inside setup()’s curly brackets ({ and }) runs once at the very beginning of your program and then never again – at least not until you reset the Arduino, or upload new code.

The setup() function is useful for … setting up your Arduino for the rest of the program. You’ll discover it’s power in future experiments. Learn more about setup() in Arduino’s reference guide.

Loop: void loop() { }

Like the setup line before it, this is another required Arduino-sketch function. While the setup() function sets your Arduino up, the loop() function…loops!

This is where the bulk of your Arduino sketch is executed. The program starts directly after the opening curly bracket (}), runs until it sees the closing curly bracket (}), and jumps back up to the first line in loop() and starts all over.

The loop() function will run over-and-over-and-over until the Arduino is reset.

You can learn more about loop in Arduino’s reference guide.

Comments

You’ll get used to these – and tired of reading them – by the time you’re done experimenting. Comments are lines or blocks of text in your code that are there solely for you or anyone reading your code. Comments have no effect on the operation of your Arduino sketch, but they can be immensely helpful in deciphering what you or someone else was thinking when that line of code was written.

Comments come in two flavors: single-line and multi-line. A single-line comment is any line in your code preceded by two forward slashes (//). For example:

language:c
// This is a single-line comment.
code_goes_here();

A multi-line comment can be used to comment out one or more lines. Multi-line comments are initialized with a slash-asterisk (/*) and they’re completed with an asterisk-slash (*/). For example:

language:c
/* This
        is
            a
                multi-line
                    comment */
code_goes_here();

Comments have no effect on your code’s operation – they’re completely ignored by the Arduino itself – but they are very useful to you and anyone else reading your code. Always comment your cod!

Syntax: Semicolons (;), Parenthesis (()), Curly Brackets ({}), Oh My.

The syntax of a programming language is analogous to the grammar rules that define our sentence structure. Just as every sentence you write requires a punctuation mark (., ?, !), (almost) every line of code your write in Arduino must end with a semicolon (;). We’ll see those soon, don’t worry!

More apparent in this example is the parenthesis and curly brackets. Whenever you open a parenthesis or bracket (( or {) you have to close it as well () and }).

You’ll discover where parenthesis and brackets are required in your code as you gain more experience. Brackets can be used to contain the entirety of loops, functions, and conditional statements. Parenthesis can be used to define a conditional test, function parameter, or mathematical order of operations. That’s probably all gobeldy-gook right now, but take comfort in knowing that you’ll understand what all of that means by the time you’ve explored all of these experiments.

One last thing you’ll have to get used to is case-sensitivity. Everything in Arduino is case sensitive: function, variable, library names, you name it. If the first letter is capitalized in the example code, make sure you capitalize it in your code! If you accidentally capitalize something the program editor will let you know with an error.

alt text

Example of Codebender’s error output.

Fortunately, those errors are usually pretty easy to trace, just look at the line it’s pointing you to.

The Sketch and Experiment

Here’s the sketch for this experiment. It’s about as simple as it gets, and introduces some of the most fundamental components of any Arduino sketch.

If you have the Codebender addon installed, you can simply select your Arduino’s COM port and click “Run on Arduino.” The board type, “Arduino Pro or Pro Mini (3.3V/8MHz)” should already be selected, but if not, make that change as well.

If you’re using the Arduino IDE on your computer, click the “Download” button in the Codebender window. Then unzip the downloaded ZIP file, and open “Sandbox_0_Setup_Loop_Blink.ino” in Arduino.

alt text

Then, select your Serial Port and Board, and click Upload (the right-facing arrow up top).

It turns out, this code doesn’t do very much. After uploading it to your Sandbox, you won’t actually see anything happen. That’s OK, there’s still a lot to learn!

Well, that last experiment was certainly boring. Let’s make the Sandbox actually do something. When faced with a new platform, a coder’s first task is to write a “Hello, world” program. Usually a “Hello, world” program actually prints those comforting words on a screen. The Digital Sandbox doesn’t give us a screen to print words on, but we do have LEDs! Wonderful, blinky, bright, shiny LEDs. Instead of printing words, let’s blink an LED to say “Hello, world.”

Background Information

This experiment digs into the anatomy of the blinking an LED. We can customize an LED blink with a combination of two Arduino functions – digitalWrite([pin], [HIGH/LOW]) and delay([milliseconds]).

This experiment introduces the concept of digital output. We call the Sandbox’s LEDs “outputs,” because it’s an effect that the board produces.

The term “digital” means that the output can only take one of two states: ON or OFF. We may also refer to those two opposing states as HIGH/LOW or 1/0. When an output connected to an LED is HIGH, the LED turns on. When the output is LOW, the LED turns off.

Active Parts

alt text

Code Components

This time we introduce two functions required to turn an LED on and off.

Digital Output: digitalWrite([pin], [HIGH/LOW])

The digitalWrite() function is used to set the digital state of a pin to either HIGH or LOW.

We’ll learn more about the first parameter – pin– in the next experiment. For now, we’re simplying toying around with the second parameter – the digital value of the pin.

When a pin goes HIGH, it outputs a voltage of about 5V. That’s enough energy to push current through an LED and illuminate it. When a pin goes LOW, it outputs 0V. In this configuration, that doesn’t allow any power to run through the LED, so it turns off.

Millisecond Delay: delay([ms])

The Digital Sandbox runs code so fast that sometimes we need to slow it down with a delay. This function will halt the Sandbox from doing anything for a specified number of milliseconds. There are 1000 milliseconds (ms) in a second, so delaying for 1000ms will stop for one second.

Sketch and Experiment

Here’s the sketch. Check out the comments in the sketch to gain a more thorough understanding of what’s happening.

Upload the sketch to your Sandbox, and take note of the small, yellow-ish LED labeled “D13”. Is it blinking? How fast is it blinking?

Your Turn!

Now it’s time to modify the code to create your own riff on the experiment. If you’re using Codebender, click “Clone & Edit” to create a copy of the code for yourself (you’ll need to create and be logged into a Codebender account). Then you can add, remove, or modify code and bend the sketch to your will.

If you’re using the Arduino IDE, click “Download” in the Codebender window above. Then unzip the downloaded file archive and open the .ino file using Arduino. If you want to save some time in the future click here to download the example sketches for all 17 experiments.

alt text

Here are some changes we recommend trying this time around. Feel free to explore the code on your own. Make some errors and debug them using the error output window.

  • Try modifying the value in the delay() funciton. Make it lower than 1000. How short can you make the delays and still notice a blink? Ten milliseconds? One millisecond?
  • What happens if you take the delay() functions out of the sketch? You can quickly remove a function by commenting it out. Try this for your loop():
        void loop()
        {
          digitalWrite(13, HIGH);
          //delay(1000);
          digitalWrite(13, LOW);
          //delay(1000);
        }
    Comments are a great tool for deleting a line of code without actually deleting it.

Background Information

In this experiment we explore the subject of pins– the manipulators of the Sandbox. Each LED (as well as the other inputs and outputs on the Digital Sandbox) is connected to a specific pin on the Sandbox’s microcontroller.

Pins are all uniquely numbered, and each input or output component on the Sandbox is labeled with the pin number it’s connected to – that’s the D2, D4, D11, A1, etc. lettering next to each LED, switch and sensor.

Every pin can be separately controlled; for instance pin 4 can be set HIGH at the same time pin 5 is set LOW. Some pins (as we’ll later discover) have special powers, but every pin is at least able to accomplish digital input and output.

Active Parts

alt text

Code Components

Just one new function to introduce here. We kind of cheated last time by not using it, so we’ll use it five times in this experiment.

Pin Mode: pinMode([pin], [INPUT/OUTPUT])

Every pin on an Arduino can be used as either an input or output, and one of your jobs is telling it which pin is which. To tell an Arduino what a pin’s job is, you use the pinMode() function.

pinMode() takes two parameters inside its parenthesis. The first value is the pin that you want to set as an input or output. The second parameter is the mode, which can be either INPUT or OUTPUT. That’s case-sensitive, those mode values need to be all caps!

Usually you’ll stick your pinMode() declarations at the top of your sketch, in the setup() function. It only needs to run once, at the very start of your program, the pin will be set up that way for the rest of the sketch’s run.

Sketch and Experiment

Here’s our sketch, upload away!

Notice how each of our pinMode() declarations occur in the setup() function. Then the loop() is used to write each of those LEDs either HIGH or LOW.

Your Turn!

  • Try adding more blocks of code to create slicker patterns. Can you make a Larson scanner (ask an old person about Cylons or Knight Rider)? A chaser? Flip from odds to evens?
  • Try turning on more than one LED at a time. Turn them all on (and shield your eyes)!

3. Dimming (the Hard Way)

Yikes! Those white LEDs are blindingly bright! Is there any way to dim them? (Unless one of your hobbies is staring into the sun, we recommend putting a piece of paper over the LEDs in this experiment…or wear sunglasses.)

Background Information

Remember that the Digital Sandbox is fast. It can flick an LED on and off millions of times per second. What if we blinked the LED super fast, but also make it so the length of time the LED is off is more than the length of time it’s on? This is called pulse-width modulation(PWM), a tool with a variety of applications, including dimming the LEDs.

In this experiment we’ll explore PWM the hard way, by coding it in manually.

Active Parts

alt text

The Sketch and Experiment

Here’s our sketch! Upload away. Check out the comments for a line-by-line overview of what’s going on.

After uploading the sketch, keep an eye on the D5 and D6 LEDs. Do you notice a difference in their intensity? Which one is brighter?

Our sketch runs through the loop really fast– it takes about 10ms to get through the whole thing, so it’s running about 100 times per second. Nine times out of ten, the LED on pin 5 is off and the D6 LED is on. Because it’s looping so fast you can’t see any blinking, but you can sense a dimness in the D5 LED.

Your Turn!

  • How long can you make the delays before you start noticing a blink?
  • Try comparing both LEDs to a fully-on LED. Add pinMode(4, OUTPUT) and digitalWrite(4, HIGH) to the setup(), so the D4 LED turns on. Can you tell a difference between D4, D5, and D6?
  • What happens if you add something else to the loop section, like your animation from experiment two?

4. Dimming (the Easy Way)

Manual PWM is hard, and it doesn’t leave room for anything else in the program. Why can’t we offload that chore to the Digital Sandbox’s microcontroller? It’s smart enough for that…right?

Background Information

PWM is such a popular tool many microcontrollers implement special hardware so they can mindlessly toggle the pin while doing something else. We call this PWM-based output analog output.

Unlike digital outputs, which only have two possible values, analog outputs have a huge range of possible values. On the Sandbox we can analog-ly output 256 different values. If we set an analog output to zero, that’s like setting a pin LOW, and 255 is like setting a pin HIGH, but all of the values in between produce an output that’s neither HIGH or LOW – it’s somewhere in between.

Analog output seems great – why wouldn’t you use it all the time? Unfortunately, not all pins have special PWM powers. Only pins 3, 5, 6, 9, 10 and 11 are able to produce analog outputs.

Active Parts

alt text

Code Components

It’s time to introduce digitalWrite()’s analog analogue: analogWrite().

Analog Output: analogWrite([pin], [0-255])

The analogWrite() function looks a lot like digitalWrite(). We still tell it which pin to control, but instead of a restrictive, digital output option, we get to choose any number between zero and 255 for the output.

There are two parameters to analogWrite(). The first is our pin, and the second is any value between 0 and 255. A 0 will output 0V, 255 will output 5V, 128 will do about 2.5V, and so on.

Unfortunately, not every pin is capable of analog output. You can only use analogWrite() on pins 3, 5, 6, 9, 10, and 11.

Sketch and Experiment

Here’s our sketch, check out the code comments for help deciphering it. Upload away!

After uploading, keep an eye on the D5 LED. Can you identify 5 different levels of brightness (including off)? Don’t stare at the LEDs for too long.

Your Turn!

  • What’s the dimmest value you can set the LED and still see it on?
  • Can you add more brightness levels to the sketch to make it ramp up more smoothly? Get your copy/paste engines roaring!
  • Why do you think there are 256 possible analog output values? That doesn’t seem like a very round number (hint: 28).

5. Color Mixing

Bleh…white. So boring. Let’s add some color to this Sandbox. By combining analog output with an RGB LED, we can mix varying levels of red, green and blue to create a rainbow of colors!

Background Information

In art class you probably learned about primary colors and how you can mix them to produce any other color. While the artsy primary colors you might be familiar with are red, yellow and blue, in electronics (and programming in general) our primary colors are red, green and blue.

By selecting different analog levels for our primary colors, we can mix them to create any other color we want. Need yellow? Mix green and red. Purple? Red and blue. In this experiment we’ll combine everything we’ve learned about analog output to add custom color to the Digital Sandbox.

Active Parts

alt text

Sketch and Experiment

Here’s our sketch, nothing new to introduce this time. Check out the values in the three analogWrite() functions. What color do you expect will be made? Upload and finde out.

If it’s hard to tell what the color is, put a piece of paper over the RGB LED.

Your Turn!

  • Play with the analog values to make your own colors. How about purple, or orange, or salmon? You can take it even further by adding delays, and blinking different colors to make animations. If you need help designing an RGB color code, try picking one out from this color picker website.
  • Make a stop light blink from green, to yellow, to red and repeat. You’ll need some delay()’s and a handful of analogWrite() trio’s.

6. Number Storage with Variables

The herky-jerky fading from experiment four accomplished the task, but just think of all the values we were missing! How do we make the LED fade smoothly? You can whip out 256 minutely different analogWrite() blocks, or you can reduce it to one, using variables.

Background Information

Variables are like storage containers for numbers. We can put any number in a variable, and either recall it and put it to use, or manipulate it to change the value it stores. Anywhere you stick a literal number (like “0” or “255”) you can instead use a variable.

There are a few rules when it comes to creating a variable. They can be any word, but they must begin with a letter, and they can’t have spaces (use “_” instead). They are case sensitive, so a variable named “fade” isn’t the same variable as “Fade.” Try to keep variables short, but use descriptive words to keep your code legible.

Active Parts

alt text

Code Components

We’ve been slacking off on introducing new functions and syntax, so it’s time to throw some new stuff at you! As you’ll discover, there’s a lot that goes into creating and using a variable.

Declaring Variables

In order to use a variable, you first have to declare it. There are two parts to a variable declaration: a name and a type.

There are a few hard-coded rules to variable naming: a name can’t start with a number and it can’t contain spaces or special characters. Variables can only be composed of 0-9, a-z, A-Z, and _. When you’re picking out a name for a variable try to make it descriptive, that’ll help to make your code easier to read and write.

A variable type determines the minimum and maximum values a variable can be. There’s no such thing as infinity in an Arduino – there are limits to how big a number can be. In this example we’ll be using one of the more fundamental variable types out there: int. An int variable can be anywhere from -32768 to 32767 – plenty of room for us to play with. (Those seemingly random numbers come from the fact that an int is a 16-bit signed value, which means the range is from 215 to 215-1.)

Once you’ve picked out your variable type and name, you can declare it like this:

language:c
int example_variable;  // Declare a variable of type int, named example_variable

That’s it! Now you can store numbers in the example_variable variable, and even manipulate it with some math.

Variable Scope

You can declare a variable anywhere in your code, but exactly where you declare it is actually really important, because every variable has scope. A variable’s scope determines where it can be used and recalled. As a general rule of thumb, a variable can only be used within the curly bracket’s ({ and }) that is was declared in – that’s its scope.

You can create a global variable by declaring your variable abovesetup(). Global variables can be used in both the setup() and loop() functions.

But, on the other hand, if you create a variable inside setup() that variable’s scope is limited to the setup() function. So we can’t create a variable in setup() and use it inside loop()– it’s out of scope!

Using Variables

To assign a value to a variable, you use the assignment operator=. The assignment operator takes the value on the right-side of the equals-sign, and stores it into the value on the left side.

So, for example, if we want to assign the value 5 to our example_variable variable, this line of code will do:

language:c
example_variable = 5;

But you can do so much more with variables than static value assignments. Variables are awesome because we can do math on them. You can add, subtract, multiply, or divide a variable with any one of these symbols:

Math OperationCode symbol
Add+
Subtract-
Multiply*
Divide/
Remainder%

You can use the Sandbox as a calculator, make it do some hard math with lines like this:

language:c
example_variable = (1024 / 8) * 52 - 163;

Parenthesis can be used, as they are in the above example, to define an order of operations. The stuff inside the parenthesis happens first, then multiplications and divisions, then additions and subtractions.

You’re not limited to literal values on the right-hand side either! You can perform math on variables and store them into other variables. You can even perform math on a variable and store it in the same variable. For example, if I wanted to increase the value of example_variable by 1, this line of code would do:

language:c
example_variable = example_variable + 1;

In that case, if example_variable was 0, after running that line of code it would become 1.

Sketch and Experiment

Whew! That’s a lot to read about variables. As you begin to use them, though, all of that information will start to become ingrained in your brain. Here’s our sketch:

Upload away and keep an eye on the D5 LED. Much smoother!

Your Turn!

  • Can you make the LED fade from HIGH to LOW? (Hint: You may need to change the setup value of fade, and change the + to a -.)
  • Can you make other LEDs fade? How about more than one fading at the same time? Can you do the math to make the D6 LED fade in the direction opposite of our D5 LED? (Hint: try adding an analogWrite(6, 255-fade) function call somewhere.)

7. If This Then That

Fading from the last experiment was working just fine until we got to the maximum brightness level of 255. What happens then is a mystery known only to the compiler (and you, once you learn a little something more about data types). What if we added “catch” to force that fade variable to reset when it hits a certain value?

Background Information

This experiment introduces the if statement, one of the most fundamental programming structures around. Not only are if statements important for computers, they also rule most of the decisions we make in our lives: If it’s cloudy outside, then pack your umbrella. If you’re hungry, then make a sandwich. Like us, computers use if statements to make choices.

An if statement requires two components to be complete: a condition and a consequence. A condition is a value or mathematical operation that evaluates to either true or false. If the condition evaluates to true, then the consequence is executed. The consequence can be a code block of any size - one block or hundreds of blocks.

If the condition in the if statement is false, then the consequence is skipped, and the program starts running the code following the if block.

Active Parts

alt text

Code Components

Time to introduce the if statement. Time to whip out some parenthesis and curly brackets.

If Statement: if ( [condition] ) { [consequence] };

An if statement requires two components: a condition and a consequence. The anatomy of an if always looks a little something like this:

language:c
if ( [condition] )
{
    [consequence]
}

Those parenthesis and curly-brackets are required (ignore the square brackets)!

The [condition] part of an if statement can be any statement that can evaluate to either true or false. To build those conditional statements, we usually use comparison operators. There are all sorts of comparison operators, including:

Comparison OperatorCode Symbol
Less than<
Greater than>
Less than or equal to<=
Greater than or equal to>=
Equal to==
Not equal to!=

You can use variables and/or literal numbers in conjunction with comparison operators. For example, if we want to test if example_varible is greater than or equal to 255, this statement will do:

language:c
if ( example_variable >= 255)
{
    // example_variable is greater than or equal to 255
    // do some stuff!
}

If the conditional statement turns out to be true, then the Sandbox executes each line in the if statement sequentially. If the statement is false, though, then the Sandbox jumps over the if statement’s curly brackets and runs the first line of code after the }.

You’re free to put any line of code inside the if statement’s [consequence] section. You can even modify the variable that you tested in the condition. Building off the last example, if we wanted to set example_variable to 0 when it rises above 254, we can do something like this:

language:c
if (example_variable >= 255)
{
    example_variable = 0;   // Reset example_variable to 0
}

Something like that might look familiar in our sketch for this experiment.

Sketch and Experiment

Here’s our sketch for this experiment. Just one if statement for now. Read through the comments to get an idea for what’s going to happen.

Run the code on your Sandbox and keep an eye on the blue LED. It should progressively go from super bright to off, and repeat that cycle endlessly.

We use a variable called fade to keep track of the analog output value. At the very beginning of each loop, we’ll subtract 1 from the fade variable. Then, after subtracting from fade, we need to use an if statement to make sure it’s not out of bounds. The if statement in this sketch states that iffade is less than 0 (that would mean it’s a negative number), then set fade to 255.

Your Turn!

  • Can you make the fade work the other way? Start at 0, fade up to 255, and then go back to 0. (Hint: You’ll need to flip the logical operator around.)
  • Make it even smoother! Can you make it fade smoothly up and smoothly down in the same sketch? From 0 to 255, then 255 to 0, then 0 to 255, then back again.

8. The Reaction Tester

Computers are great at doing math and automating boring tasks, but everyone knows that their true purpose is to play games. Let’s create a game on the Digital Sandbox! But in order to control the game we need to add input.

Background Information

Up to this point, our Digital Sandbox experience has been very one-sided. Output to tiny yellow LEDs. Output to larger white LEDs. Output to RGB LEDs. Change the fade value of the output. Output, output, output. Let’s flip the tables on the Sandbox, and send some input to the board!

Inputs are signals or values sent into a system. Some of the most common inputting components are buttons or switches. Buttons on a keyboard are an input to your computer because they send data into that system.

if statements are critical when assessing the status of an input and taking an action based on it - if button A is pressed, then print an “a.” We can take the if statement a step further by adding an else condition, which allows us to control what happens if the if statement evaluates to false. So now we can say something like “if the egg floats, throw it away, otherwise (else) fry it and eat it!”

Active Parts

alt text

Code Components

This time we introduce a new function, plus a riff on the if statement.

Digital Input: digitalRead([pin])

The digitalRead([pin]) function is used to read the voltage of a pin. It can tell you if a pin is HIGH (~5V) or LOW (~0V).

There’s just one parameter to the digitalRead() function – a pin that you want to read. Make sure to set the pin as an INPUT, using the pinMode() function, before you read it!

This function is different from the others because it returns a value. Instead of just writing out the function call and skipping to the next line, we actually have to use the digitalRead() function in conjunction with other bits of code.

The digitalRead() function will come back with one of two values: HIGH or LOW. You can use that return value as part of a conditional test in an if statement, for example:

language:c
if (digitalRead(2) == HIGH)
{
    // Do something, because the button is pressed
}

Or, if you so pleased, you could store the value of the digitalRead() function inside a variable, like this:

language:c
example_variable = digitalRead(2);

If/Else: if( [condition] ){ [true consequence] } else { [false consequence] }

We’ll use an extension of the if statement this time: the if…else statement. if/else allows us to take one action if the condition is true and a different action if it’s false.

Here’s the anatomy of an if/else:

language:c
if ( [consequence] )
{
    // Do something because the consequence is true
}
else
{
    // Do something because the consequence is false
}

if/else is really handy when you’re dealing with digital outputs which can only be in one of two states. If a button is pressed, do something, otherwise do something else.

Equivalence Test

In this experiment we’ll be using the equivalence test (==) in our if statement conditional. That’s right, there are a pair of = signs. That’s to differentiate the equivalence test from the assignment operator (=). While the single equal-sign assignment sets one value to another, the equivalence test is asking if two values are equal and producing either a true or false response.

If you’re ever creating a conditional statement, make sure you use the equivalence operator if you’re asking if two values are equal.

Sketch and Experiment

Here’s the sketch. It’s a big one! Check out the comments for a line-by-line explanation.

There are two important if/else statements in this program, which each test the status of an input. The top if/else tests pin 2, which is connected to the switch. If the switch is set to one (e.g. HIGH), then we set a variable called speed to 50. If the switch is set to zero (LOW), then speed becomes 150.

The second if/else tests pin 12, which is tied to the small button. When the button is pressed, then the input is set to one (HIGH), and it’s zero when released. This means that, when the button is being pressed, the code in the then will execute. When the button is not being pressed, the else code will run.

Can you guess what will happen in each of the pin 12 test cases? Upload the sketch to your board to find out!

This is a very simple game. Pick a number between four and eight, and try to make the LED stop on that number by pressing the button. To switch between easy and hard mode, move the switch from 0 to 1. Can you make it stop in the middle on hard mode?

Your Turn!

  • Trick your friend and swap which direction of the switch sets it to easy mode – make zero hard and one easy.
  • Swap the function of the switch and the button, so you have to press the button to set the difficulty and flick the switch to stop the LEDs.

9. Serial Calculator

While you probably can’t have a very stimulating conversation with the Digital Sandbox, it can send you some very interesting information. It’s great at math, so let’s have the Sandbox do some calculating for us! Trouble is, how do we get it to print numbers (without Morse code)? Enter serial communication!

Background Information

Serial communication is a form of data transmission where we can send a string of 1’s and 0’s between two devices and actually form a set of characters. So 01101000 01100101 01101100 01101100 01101111 00101100 00100000 01110111 01101111 01110010 01101100 01100100 becomes “Hello, world.”

With serial, we can send actual text from the Sandbox and display it on our computer using the Serial Monitor.

Active Parts

alt text

Code Components

This sketch introduces a pair of functions related to Serial communication. Plus, a new data type!

Serial Communication

In order to use serial communication, you first have to initialize it by calling Serial.begin([speed]). The begin function requires one parameter – the baud rate– which controls how fast data is transmitted. The baud rate is usually selected among a set of common speeds: 4800, 9600, 19200, 38400, 57600, or 115200. For example, to initialize Serial at 9600 baud, this line of code will do:

language:c
Serial.begin(9600);

9600 is a good, default speed for most applications. We’ll use it throughout our experiments. You’ll usually want to stick your Serial.begin() statement in the setup() function. Call it once, set it, and forget it.

After Serial has been initialized, you can start printing messages using either Serial.print([message]) and Serial.println([message]). Both functions work to print a message, but the Serial.println() function adds a new line after the message.

You can print all sorts of with Serial. You can print static, pre-coded messages, by surrounding them with quotes ("), like this:

language:c
Serial.print("This is a long message, which you can print with Serial!");

Or you can print a variable, like this:

language:c
Serial.println(example_variable);   // Print the value of example_variable

As you continue to explore with Serial, you’ll find it’s a powerful debugging tool. It gives you a window into the Sandbox’s mind – you can print out the values of your variables.

Long Data Type

We’ll be using a new variable data type in this experiment: long. A long variable stores 65536-times more values the the int! It can store numbers in the range of -2,147,483,648 to 2,147,483,647. Billions!

Why not always use long? Well it uses twice as much memory – 32-bits. The Sandbox doesn’t have unlimited memory, so it’s best to conserve it when you can.

Sketch and Experiment

Here’s our sketch. Check out the comments for a line-by-line overview.

After uploading the sketch, if you’re waiting for the Sandbox to do something visual, you’ll be waiting forever. Instead open the serial monitor. If you’re using Codebender, you can simply click “Open Serial Monitor” below. If you’re using the Arduino IDE, click the Serial Monitor button up in the top right.

After opening the Serial Monitor, press the D12 button. You should see multiples of 2 start to zoom by. Now you’re calculating!

Your Turn!

  • Something funny happens when the power of 2 gets past 1073741824, and then turns to -2147483648, and then turns to zero. This is because our variable has reached its maximum value and, in a sense, has gotten confused. Can you add an if statement to catch an out-of-bounds multiplier variable and reset it?
  • Try some of the other mathematical operators. Add with +, subtract with -, or divide with /. Can you figure out what the % (modulo) operator does?

10. Do the Analog Slide

Digital inputs, like the button, only allow for two input values: HIGH or LOW. But what about the in-betweens? When you turn the volume up on your stereo, you’re not forced to pick between mute and “OMG MY EARS.” For volume control and other “finely-tuned” settings, we need analog inputs.

Background Information

Analog inputs are components that put data into a system with a range of more than two values. On the Digital Sandbox, analog inputs can produce a value anywhere between zero and 1023 (1024 total values). The value produced by an analog input is proportional to the voltage it produces. If an analog component reads a value of zero, the voltage is 0V. If the output value is 1023, then the voltage is 5V. An analog reading of 512 is about 2.5V, and so on.

A special component inside the Sandbox’s microcontroller called an analog-to-digital converter(ADC) is able to convert that range of input voltages to a discrete number. This is a special circuit that most pins on the Sandbox don’t have. It’s so special that the ADC pins are labeled with a preceding ‘A’. The analog sensors on the board are labeled as “A0”, “A1”, “A2” and “A3.”

Many electronic components produce analog output, the most common of which is a potentiometer. “Pots” come in a variety of shapes and sizes. Rotary pots are very commonly used to adjust the volume on a stereo. Slide potentiometers, like that on the bottom of the Sandbox, are often seen adjusting sound levels on mixing boards.

Active Parts

alt text

Code Components

First there was digitalWrite() then analogWrite(). Then there was digitalRead()…can you guess what’s next?

Analog Input: analogRead( [analog pin] )

To read the value of an analog input we use the analogRead( [analog pin] ) function. Like digitalRead(), this function requires just a single parameter – a pin to read.

That’s where the similarities stop though. Unlike digitalRead() the only pins you can analogRead() on are those with a preceding ‘A’: A0, A1, A2, and A3.

Also, instead of simply returning HIGH or LOW, analogRead()returns a number between 0 and 1023– 1024 possible analog values! An output of 0 equates to 0V, and 1023 means the pin reads 5V. If you get 512, you’re somewhere in the middle ~ 2.5V.

You can store the return value of an analogRead() in a variable, and use it from there. For example, here’s how we store the analog input of A0 into a variable:

language:c
example_variable = analogRead(A0);

Or you can use it directly, like in a comparison for example:

language:c
if (analogRead(A0) > 512)
{
    Serial.println("The analog voltage is above 2.5V");
}

Don’t forget to set your analog pin as an INPUT some time before you read it!

Sketch and Experiment

Here’s the sketch. Upload away!

After uploading the sketch, open up the Serial Monitor. Numbers should begin to stream by. Try sliding the potentiometer, do the values change?

Can you make the output 0? 1023? 512? Take note of which slide pot position relates to which value.

Your Turn!

  • Can you make the slider control the LEDs? You could slide the white LEDs back and forth, or try controlling the brightness of the RGB LEDs with the slider.
  • Why are there only 1024 output values? Why not an even 1000? (Hint: 210.)

11. Automatic Night Light

We now have all the programming tools we need to make some totally awesome, interactive projects. Let’s incorporate the light sensor - another analog input component - to create an automatic night light that turns on when it’s dark.

Background Information

You may not see them, but light sensors are incorporated into all sorts of modern electronic devices. There are light sensors in smartphones, which measure how bright your environment is and adjust the screen brightness automatically. There are light sensors in smoke detectors that detect particles in the air. Photogates use a light sensor to determine when an object passes a certain point – critical for those photo finishes!

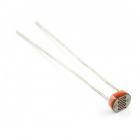
The light sensor on the Digital Sandbox is called a photo-transistor. It produces an analog voltage relative to the amount of light it sees. The lower the analog value, the darker the environment. If you cover the sensor completely, you might get the output all the way down to zero. Shine a flashlight on it and you might get a maximized reading of 1023.

Active Parts

alt text

Code Components

Nothing too major to introduce this time, but there is a new variable type!

Constant Variables & Initializing a Variable

The const keyword isn’t really a variable type. It’s a add-on to a variable type, which modifies how that variable works. const is short for constant. When you stick it in front of a variable declaration that variable becomes read-only.

It’s good practice to assign const to any variable you never want to change. In our example, we have a constant darkness threshold that will never change, but may need to be adjusted between code uploads.

When you declare a constant variable, you’re forced to assign it a variable right then-and-there. That means after the variable declaration, you have to add = something;. For example, here’s how we create a const int variable and assign it the value 0:

language:c
const int example_variable = 0; // Create a constant variable, with the value 0

You can initialize any variable, not just constants. Do it when you can. It can save you a line of code, or sometimes your sanity!

Sketch and Experiment

Here’s our sketch. Check through the comments, then go ahead and upload it.

After uploading the sketch, try to cover the light sensor. Do the LEDs turn on? Do they turn back off once you uncover the sensor?

If the LEDs don’t turn on as expected, check to see what value the photocell is reading by opening the Serial Monitor.

By default, we set the dark variable to 10. If the photocell is at or below that, the LEDs turn on, otherwise they’ll stay off. Does that value need to go higher or lower for your night light to switch?

Your Turn!

  • If the brightness is right on the border of on/off, the LEDs can blink unpleasantly. Try adding another if statement to catch if the light sensor is right in the middle range; from there you can dim the LEDs based on what the sensor reads.
  • Try incorporating the RGB LED into this project. If it’s super-bright, make it light up yellow. Kind of dim? Green. Totally dark? Blue.

12. Thermal Alert!

“Is it hot in here, or is it just me?” Using a temperature sensor, which is able to precisely measure the room temperature, we can answer that question once and for all!

Background Information

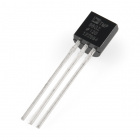
Temperature sensors are a critical component in many circuits, whether you’re controlling an A/C system or creating a safety mechanism for gas-powered appliances. Electronic temperature sensors come in many form-factors, from big thermocouples that can measure up to 1000 °C to that little black rectangle on the Digital Sandbox.

The temperature sensor on the Sandbox produces an analog voltage that represents the temperature around it. The voltage is actually linearly proportional to the Celsius temperature. If you know the output voltage of the sensor, you can calculate the temperature with this equation:

temperature = (voltage - 0.5) \times 100

We can have the microcontroller do all of that math for us as long as we find the right algorithm - an equation or set of instructions that accomplish a specified task.

Active Parts

alt text

Code Components

Time for another new variable type!

Variables with Decimals: float

Up to this point, every variable and value we’ve used has been an integer. Integers are whole numbers, which means they can’t have decimal points. If you need the precision of decimal points, you have to call up the floating-point variable type.

To declare a floating-point variable, simply use the float keyword and create a variable like you normally would:

language:c
float myPi = 3.1415;

float variables can be huge anywhere from 3.4028235×1038 to -3.4028235×1038.

Floating point numbers may seem great, but they do have their assortment of problems: they take up lots of space, and they take a large chunk of time for the processor to work with. Try to avoid them if you can.

Sketch and Experiment

Here’s our experiment. Take a peek at the comments and upload!

After uploading the sketch, open the Serial Monitor.

You’ll see the temperature in Celsius and Fahrenheit start to flow by. You should also see either the green or red LED illuminate, depending on that temperature reading. If the temperature is above 80 °F, there’ll be a red thermal alert!

Your Turn!

  • Can you add a third check to alert when it’s too cold, by turning on the blue LED? The real trick here is cooling the Sandbox off. One option is to power the board with a battery and stick it in the fridge.
  • Celsius and Fahrenheit are two of the most common temperature scales, but they’re not the only ones. Can you print the temperature in units of Kelvin or Rankine? You’ll need to find an algorithm to convert to them from Celsius.

13. Sound Detecting

<Pitchman voice> Introducing the fabulously groundbreaking SOUND (Sandbox’s Over/Under Nominal Decibels) System! Microphone check 1..2..1..2. With the SOUND you’ll always have an adjustable sound level detector handy! </Pitchman voice>

Background Information

In this experiment we’ll use the Sandbox’s on-board microphone to measure volume levels and display them on the LEDs. The microphone produces a sound wave, which is just another analog voltage that we can measure. The louder the sound, the higher the amplitude of the wave and the larger the voltage.

Without a lot of complicated math and filters, sound can be a difficult thing to measure and react to. Using the Sandbox for voice recognition isn’t quite possible, but it can be programmed pick out high volumes as long as it can sample the microphone input fast enough. We can use the slide potentiometer to set the sensitivity of the display.

Active Parts

alt text

Code Components

You’re probably getting used to this now: time for more variable types! This time it’s not so much a new variable type as a common storage space for variables.

Arrays

Arrays are a group of variables all housed under a single variable name. Array syntax makes heavy use of the square brackets [ and ]. Here’s an example of an array declaration:

language:c
int myArray[3]; // Create an array of 3 int's

You can also initialize your array, using curly brackets:

language:c
// Create and initialize an array containing 5 long variables
long myBigArray[5] = {0, 1000, -44321, 412355234, 42};

To reference a single variable in an array we use an index. Here’s where the most confusing array-related thing comes into play: arrays are 0-indexed. That means, to access the first value in an array you put a 0 inside those square brackets. To access the last variable, you use an index of length_of_array - 1. For example:

language:c
int example_array[4] = {10, 20, 30, 40}; // Declare an array with four values
...
Serial.print(example_array[0]);  // Prints 10 (first value in array)
Serial.print(example_array[2]);  // Prints 30 (third value in array)
Serial.print(example_array[3]);  // Prints 40 (fourth value in array)
// Illegal: Serial.print(example_array[5]); // No good, there's no such thing.

You can create an array of two variables, or you can create an array of hundreds of variables. The size of the array is determined when you declare it. Your array can be of any type you wish.

for Loops

Time to introduce your first real loop: the for loop. for loops are used to repeat a block of code for a specified set of repetitions. Instead of looping indefinitely, like the loop() function, the for loop can be controlled to repeat once, twice, thrice, or thousands of times. It’s up to you.

Here’s the anatomy of a for loop:

language:c
for ( [variable declaration] ; [conditional]; [increment])
{
    // For loop statements
}

There are three important aspects to a for loop declaration:

  1. Variable declaration– Each for loop allows you to declare and initialize a variable. That variable’s scope is limited to the for loop and anything inside that loop.
  2. Conditional test– This test determines when you break out of the for loop. As long as the result of the conditional is true, then the loop runs at least one more time. Once the result of the conditional test is false, we break out of the loop. This is kind of like an if statement inside the for loop. Traditionally you’ll test the variable from the declaration section here.
  3. Variable increment– The point of the for loop is to not loop indefinitely. Each time through, you want to get closer and closer to breaking that conditional statement. That’s what the variable increment section is for. Traditionally, you’ll increment the variable from the declaration section here.

Here’s an example for loop that should run exactly five times:

language:c
for (int i=0; i<5; i = i + 1)
{
    // Loop through here 5 times.
    // i starts at 0
    // each time through i increases by 1
    // once i increases to 5, we break
    // out of this loop.
}

The order of operations of this loop looks a little something like this:

  1. Create a variable called i and set it to 0.
  2. Test i. If i < 5 we run through the for loop. If i >= 5 break out of the loop, we’re done.
  3. After running through the loop, run the increment: add 1 to i.
  4. After the increment jump back up to step 2. And repeat until the condition becomes false (i >= 5).

In this case we’ll exit the for loop after i increases to 5. We’ll have run through it 5 times by then.

Arrays are the perfect partner for for loops. When you need to run through each variable in an array, you can place a variable in the index section, and for loop through each member of the array. We’ll be doing just that in this experiment…

Sketch and Experiment

Here’s the sketch. Read through the comments, they’ll help re-inforce what you’ve just learned about array’s and for loops.

Go ahead an upload the sketch, then make some noise at your Sandbox. Are the LEDs bouncing to your voice? If not, try tapping on the mic.

To adjust the sensitivity of the volume meter, move the slide pot up or down. With the slider set to the far right, it’ll take a really loud sound to make every LED turn on. But if you set the slider too low even the slightest noise will set the meter off.

Your Turn!

  • Can you rewrite the sketch to use the RGB LED instead of the white LEDs? Make it turn red when the volume is really loud, and blue and/or green otherwise. Bonus points for using analog outputs!

14. Opto-Theremin (Addon)

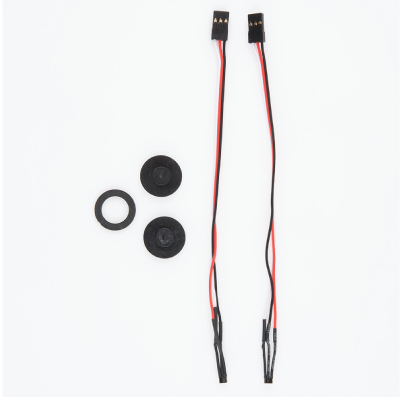
In this experiment we’ll attach a speaker to the Sandbox, and turn it into a musical instrument! By using the light sensor to control our speaker’s pitch, we can create a light-controlled theremin - a non-contact, electronic musical instrument.

Note: This experiment requires the Digital Sandbox Add-On Kit, purchased separately.

Background Information

By precisely modulating a pin, the Digital Sandbox can create electronic waves which, when routed through a loudspeaker, can produce a musical tone. We can program the Sandbox to control two characteristics of musical tone: pitch and duration.

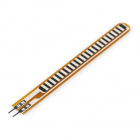
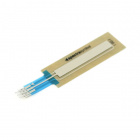
A tone’s pitch is what we perceive when we think of a note as being very high (screams, forks scratching plates, etc.) versus very low (like earth-rumbling bass). The pitch of a tone is very closely related to the frequency played through a speaker. If we toggle a pin from HIGH-to-LOW then LOW-to-HIGH 440 times per second, for example, it produces a 440 Hz (hertz) frequency - a “middle A” pitch. Humans can hear frequencies ranging from 20 (low-pitch, bass) to 20,000 Hz (high-pitch, “ow, my ears”).

We can also program the duration of a tone - the length of time a pitch is played. In our program we’ll use the delay function to set the duration. Playing a tone with the Sandbox is very easy. Just give it a pitch and it’ll start toggling the output pin for you. Much like analog output, you can set it and forget it; the tone won’t stop playing until you tell it to.
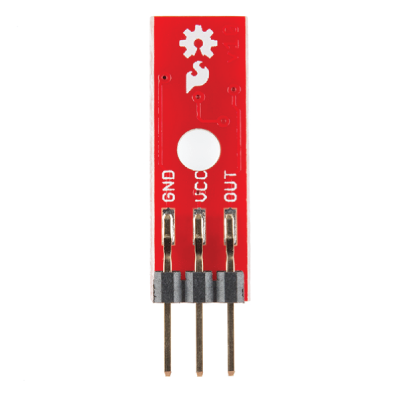
Active Parts

alt text

Code Components

This experiment introduces two functions related to sound-making, and another universally handy variable-altering function.

Playing (and Stopping) Tones

The tone function can be used to generate a sound wave and play it using an attached speaker or buzzer.

There are two parameters required to play a tone: a pin and a pitch. The pin should be set to whichever Arduino pin you have a buzzer connected to (don’t forget to set it as an OUTPUT). The pitch should be set to the frequency of the tone you want to play.

Want to play an A440 out of pin 3? Here’s the code:

language:c
tone(3, 440);   // Play a 440Hz wave on pin 3

As you’ll quickly discover, the Sandbox isn’t the most musical device out there. The tones it creates can be just a little-bit grating. If you ever need to halt a pin from playing a tone, use the noTone() function. You’ll just need to specify which pin you want to noTone(), like this:

language:c
noTone(3);  // Stop playing "music" on pin 3

Map: map([value], [fromLow], [fromHigh], [toLow], [toHigh])

Arduino comes with all sorts of handy functions for manipulating variables, one of which is the map function. map translates a value from one range of values to another.

In our experiment, we want to map the 0-1023 input value of the light sensor, and map it down to a scales-worth (440-880) of tones for the speaker. Here’s how we’ll do it:

language:c
int lightSensorValue = analogRead(A1);
int frequency = map(lightSensorValue, 0, 1023, 440, 880);

That maps our frequency from the 0-1023 range to a proportional value in the 440-880 range.

Sketch and Experiment

Here is the sketch for this experiment. Read through the comments and upload away!

Then you’ll need to attach the speaker to the expansion connector. Before you can do that, you will need to break off one group of three pins from the male breakaway headers. Now, you can connector the buzzer, with the top side facing down, to the expansion connector as shown in this image:

alt text

As fun as the opto-thermin may be, the sound is considered grating by some, so the code implements a simple ON/OFF function. Slide the switch over to the “1” position to turn the opto-theremin on.

Once the theremin is on, the speaker should start making noises. Try covering the light sensor; does the pitch change? We’ve turned the RGB LED white, so you can try to corral the light from that to control the light sensor.

You can adjust the duration of the tone by sliding the potentiometer. Slide the pot all the way to zero to get a really fast “zapper” sound, or slide to the right to create a soothing, slow sound.

Your Turn!

  • Try adding a “rest” function to your opto-theremin. Use the button to intermittently cut off the sound output.
  • Instead of using the Sandbox as a musical instrument, can you program it to play a written piece of music? Using a series of tones and delays, try reproducing the chorus of your favorite song!
  • Give yourself a hearing test! What’s the highest frequency you can hear? Can you hear tones others can’t? Can your pet hear pitches that you can’t?

15. Serial Motoring (Addon)

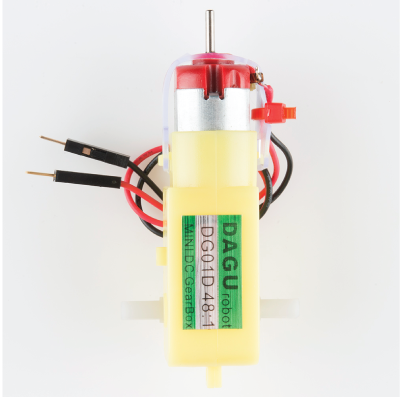
Motors make the world go round. Well, not literally, but they make a lot things we use every day spin and actuate. There are tiny vibration motors in cell phones, speedy motors that spin CDs and Blu-Ray discs, and of course, massive engine motors that help propel our cars. In this experiment we’ll explore one of the most fundamental motor types out there - DC motors - and we’ll tell the Sandbox precisely how fast we want the motor to spin.

Note: This experiment requires the Digital Sandbox Add-On Kit, purchased separately.

Background Information

A DC motor turns electrical energy into a rotational, mechanical energy. DC motors are popular because they’re very simple to control: Give them some voltage and they spin. You can control the speed of a motor much as you might control the intensity of an LED - with PWM - so in this experiment, we’ll be using the analog output block to control the motor’s speed.

This experiment also introduces serial input. Up to this point our conversations with the Sandbox have been very one-sided - the Sandbox has been outputting data to the serial monitor. Serial input allows us to send data to the Sandbox via the serial monitor.

Active Parts

alt text

Code Components

There are a couple new serial-related functions to discuss in this example. In addition to printing out to the Serial Monitor, we’ll be reading from it. Two-way communication!

Reading In Serial Data

To begin, we need to know if any data has been sent from the Serial Monitor. We can use the Serial.available() function to find out how many, if any, characters are waiting for us. There’s a good chance Serial.available() returns 0, which means there’s no data to be read, but it could also return 1, 2, 3, or more. Here’s how we usually use this function:

language:c
if (Serial.available() > 0)
{
    // do something with the Serial data,
    // like Serial.read() or Serial.parseInt();
}

There are a few functions that can be used to read data in from the Serial Monitor. Serial.read() is one of the more common functions – it reads in a single character at a time. In this experiment we’ll be using Serial.parseInt(), which can be used to read in an integer value. This will be handy for our experiment because we want to read in values containing anywhere between 1 and 3 digits.

Here’s an example using Serial.parseInt():

language:c
if (Serial.available() > 0)
{
    // Read a value in from Serial and store it in serial_in:
    int serial_in = Serial.parseInt();
}

When you do a Serial.parseInt() (or Serial.read()) the value of Serial.available() decreases by however many characters you read in. So you’ll only be able to read a serially-sent value once.

Sketch and Experiment

Here’s the sketch. You know the drill: read the comments and upload.

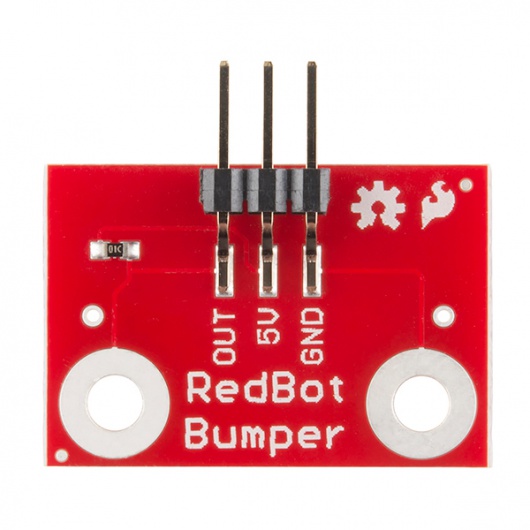
After uploading, connect the motor’s black wire (GND) to the GND pin on the Sandbox’s add-on header. Then, connect the motor’s red wire to the OUT pin on the Sandbox’s add-on header. Your motor should now be connected to the Sandbox as shown in this picture:

alt text

Now open the Serial Monitor, type a number between zero and 255 into the box next to “Send,” and then click that button. The Sandbox should respond with a message, and the motor should start spinning.

What happens when you send 255? How about zero? What happens when you send a number greater than 255 or less than zero (a negative)? Can you spot a block in the code that is restricting those values?

As a “safety mechanism,” if you ever need to stop the motor from spinning, press the button to bring it to a halt.

Your Turn!

  • Try connecting something mechanical to the motor. Perhaps tape a narrow piece of paper to create a spinner and play Twister. Or add a few pieces of paper to create a fan. What else can you connect to the axle to take advantage of the rotational motion?
  • As a programming challenge, can you make the motor smoothly speed up or down when a new serial value is received?

16. Servo Sweeper (Addon)

DC motors are great for spinning an object at high speed with no regard for where it starts or stops. For many applications, though, it’s important to precisely control the position of a motor. Wing flaps in a plane, steering mechanisms in RC cars, and robotic arm platforms are applications that benefit from motorized position control. For those applications we ditch the DC motor and whip out the servo!

Note: This experiment requires the Digital Sandbox Add-On Kit, purchased separately.

Background Information

A servo motor is like a DC motor with an internal controller and built-in sensors that help keep track of its shaft position. A servo motor knows, for example, if it’s pointing at 15° or 115°.

Servos all have three wires that need connecting to: supply voltage, ground, and a signal. The voltage and ground connections supply the motor with power, and the control signal - a PWM output (surprise, surprise) - sets the position of the motor. Once the motor reaches the desired position, it stops until it is commanded to move to a new position.

Servo motors vary in their range of motion - the minimum and maximum angles they can point to. Only specialized, continuous rotation servos can rotate a full 360°; most have a stated range of motion between 90° and 180°. The servo we’ll be using in this experiment has a 180° range of motion.

Active Parts

alt text

Code Components

In the final experiment, we’re introducing you to one of the most powerful aspects of Arduino: importing libraries. Libraries are code written by Arduino or members of the Arduino community which go beyond the basic Arduino core to add unique features.

Using the Servo Library

In this case, we’ll be using the Servo library, which includes all sorts of functions and data types to make controlling servo motors super-easy. To be able to use the Servo library, you first need to include it. That can be acheived with this statement, which should go at the very top of your code:

language:c
#include <Servo.h>  // Include the servo library.

Once you’ve included the library, the next step is to create a Servo variable– an object you’ll refer to throughout your sketch to control the servo. Here’s how we create a Servo object named myServo:

language:c
Servo myServo;  // Create a servo object, which we'll use from here on out.

You’ll usually want this line to go above the setup() function as well – making it a global object. That way we can use it in both the setup() and loop() functions.

So far, so good. As with most everything, we need to initialize the servo. In this case, we need to attach a pin to it. Here’s how we attach a servo to pin 3:

language:c
myServo.attach(3); // Attach myServo to pin 3

Notice how we’re using the myServo object declared earlier. This line of code will usually go in the setup() function. Run it once, then it’s attached for the rest of the program.

Finally, to set your servo to a specific position, you use the write() function. For example, to set your servo to a 55° angle, here’s the code you’ll need:

language:c
myServo.write(55);  // Set the servo to 55 degrees.

After executing that line, your Servo should immediately start spinning till it finds its position.

Sketch and Experiment

Here we go one more time! Upload away.

After the code has been uploaded, connect the servo with the three pin male breakaway header to the Sandbox. Make sure the servo’s black wire (GND) is lined up to the GND pin on the Sandbox, as shown here:

alt text

This program allows you to control the position of the servo motor with the sliding potentiometer. Slide all the way to the right to set the servo to 180°, and all the way to the left sets it to 0°.

The servo will only move if the switch (connected to pin 2) is set to ON. If you leave the switch in the ON position, you can see how fast the motor responds to the servo block. If you move the switch to OFF, set the position of the slide pot, and set the switch to ON, you can see the speed and control mechanisms of the motor.

Your Turn!

  • What happens if you try to rotate the servo beyond 180° (change the last value in the map function)?
  • Think of something to attach to the servo! You could add a clock hand to make a weird, half-circle clock. Or add a papercraft hand, and have your Sandbox give you a high-five!

Resources & Going Further

Congratulations on completing the Digital Sandbox Experiment Guide! If you’re looking for more resources devoted to the Digital Sandbox, Arduino, or ArduBlock, check out these links:

Going Further

Now that you’ve introduced yourself to the world of electronics, hardware, programming, and Arduino, check out some of these tutorials and products to continue your learning.

  • What is An Arduino?– If you’re ready to step into a more open-ended development platform, we encourage you to continue working with Arduinos. This tutorial will help get you started.
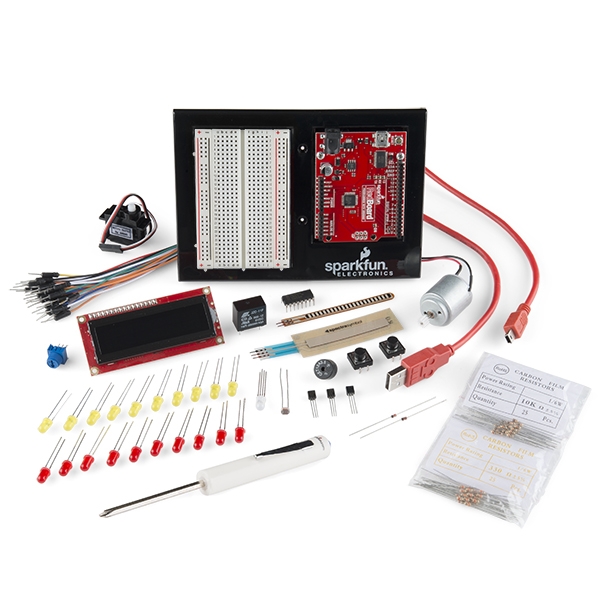
  • SparkFun Inventor’s Kit– If you’re looking for more hardware to continue your learning journey, the SIK is the next logical step.

SIK product shot

This kit includes an Arduino, breadboard, and tons of wires, buttons, LEDs, and more components. It also includes a guide with a series of experiments that introduce you to the Arduino programming language (no more blocks!) and electronics.


learn.sparkfun.com |CC BY-SA 3.0 | SparkFun Electronics | Niwot, Colorado

CP2102 USB to Serial Converter Hook-Up Guide

$
0
0

CP2102 USB to Serial Converter Hook-Up Guide a learn.sparkfun.com tutorial

Available online at: http://sfe.io/t273

Overview

The CP2102 Breakout Board is a great tool for embedded systems that require a serial connection to a computer. The board attaches to the USB bus via a standard type B female connector, and appears as a standard COM port.

CP2102 Breakout Board

This IC doesn’t require any external oscillator, has an on-board voltage regulator, and uses reprogrammable internal EEPROM for the device description. The full hardware UART has flow control for baud rates from 300bps to 921600bps. This breakout also allows you to connect the TX/RX pins of your favorite microcontroller or serial application to the RX/TX pins of the breakout, creating a simple serial cable replacement.

Required Materials

You will need the following materials to complete this hookup guide.

You will also need standard soldering tools to complete the circuit.

Suggested Reading

If you are not comfortable with the following concepts, you should review them before moving ahead with the CP2102 breaout board.

Hardware Layout

This breakout gives access to all 9 serial interface pins in easy-to-use 0.1" spaced footprints.

UART Interface

All of the serial interface pins are 5V tolerant.

  • TX: Transmits from the board. A.K.A. Serial Output
  • RX: Receives into the board. A.K.A. Serial Input
  • DTR: Data Terminal Ready
  • DSR: Data Set Ready
  • RTS: Ready to Send
  • CTS: Clear to Send
  • RI: Ring Indicator
  • DCD: Data Carrier Detect

These pins are labeled on the bottom of the board, as seen here.

Bottom View

Power Interface

There are two power pins available on the breakout board. VCC, which is connected directly to the USB 5V bus. This can show 4.6-5.2V depending on the regulation of the given USB port. If attached to a USB 2.0 port, then this pin can source up to 500mA, according to USB 2.0 specification.

A 3.3V pin is also available. This pin connects directly to the CP2102’s internal regulator and can only source up to 100mA. This pin is broken out to the 4-pin basic serial connection at the board’s edge.

Board Top View

Driver Installation

You will need to download the appropriate drivers for your system. Currently, drivers are available for the following systems:

  • Windows
  • MacOS
  • Linux
  • Android

You can find the most up-to-date drivers for your system here, from Silicon Labs.

Installing Windows USB Drivers

Download and unzip the drivers. Plug in the breakout board to your computer via a USB A-to-B cable. Windows will attempt to install the driver software, but you may need to guide it the proper driver location of the unzipped files.

If for whatever reason you don’t get the option to choose the driver location, you can manually install the drivers using the following steps.

Navigate to your Device Manager window. You should see something like the following:

Driver Warning

Device Driver Warning

This means that the device is functioning, but Windows doesn’t know how to communicate with the board. Right-click on the CP2102 device.

Update Drivers

A drop-down menu will appear; select the “Update Drivers” option. You will then need to direct the computer to the location of the driver file you previously downloaded and unzipped.

Once the drivers have been properly installed, you should see the following in your Device Manager.

COM Port

Note: The number associated with the CP2102 COM port will likely be different on your machine. This is not an error.

Once the breakout board is successfully installed, you can then connect to the board via your favorite terminal program.

Hardware Hook-Up

Soldering Connections

Solder header pins to the four pins labeled as 3.3V, TXO, RXI and GND on the edge of the board. You can also use bare wires for this, but for the ease of attaching and detaching the breakout board from differing systems, male to female jumper wires and header pins work well for this particular circuit.

Hooking It All Up

Make the following connections between your CP2102 breakout board and your 3.3V LCD screen.

CP2102 Breakout → Serial Enabled LCD

  • 3.3V → VCC
  • TXO → RX
  • GND → GND

Operation

Once you have everything connected, plug in your CP2102 board over USB and open up your favorite terminal program. Make sure you have the correct settings for the port in your terminal at 9600bps, 8-N-1, and are connecting to the correct COM port.

Cool Term Connections

CoolTerm Settings for Serial Communication with CP2102 Breakout

Once you have the proper settings for your COM port, start the connection. You should be able to type into your serial monitor on your screen, and have the values appear on the LCD.

Resources and Going Further

Going Further

Now that you’ve mastered the basics of working with the CP2102 breakout, you can begin integrating it into other projects. You could incorporate this with a single board computer, or create an easy-to-access sensor monitoring system. Check out some of the tutorials below to spark some other ideas.

We’d also love to get your feedback on this hookup guide and product in general. Let us know what you think in the comments!

Additional Resources


learn.sparkfun.com |CC BY-SA 3.0 | SparkFun Electronics | Niwot, Colorado

Re-Programming the LilyTiny / LilyTwinkle

$
0
0

Re-Programming the LilyTiny / LilyTwinkle a learn.sparkfun.com tutorial

Available online at: http://sfe.io/t272

Introduction

The LilyTiny (and LilyTwinkle) are both great, low-cost, sew-able microcontrollers for eTextile projects. For most projects that only need to interface to a small number of LEDs or sensors, the LilyTiny is a great option.

alt text

The LilyTiny has 6 petals. Two are reserved for power(+) and ground(-). The other four are general purpose I/O pins (GPIOs). The LilyTiny is pre-loaded with a sample sketch which shows a variety of LED patterns on each of the pins:

  • “breathing” pattern (pin 0)
  • heartbeat pattern (pin 1)
  • simple on-off blink (pin 2)
  • random fade (pin 3)

This is a great place to start, but the only way to re-program one of these boards is to use an AVR Programmer and an ISP Pogo Pin Adapter to connect to the 6 exposed pins on the bottom of the LilyTiny board.

This is okay if you haven’t already sewn your board into your project. If you have, we can still re-program your board. This tutorial will show you exactly how to accomplish this.

Things you will need

There are a couple of ways to re-program your board. We will focus on one of the easiest methods here – using the Tiny AVR Programming stick.

alt text

Tiny AVR Programming Stick with Pomona 5250 SOIC Clip used to re-rogram the ATtiny85 on the LilyTwinkle.

ATTiny Board Files

Before we start, we need to setup the Arduino programming environment to handle the ATTiny hardware. The ATTiny is not part of the “default” board files that comes with Arduino 1.x. You will need to “install” these board files to your Arduino environment in order to re-program your LilyTiny.

The High-Low Tech Lab at MIT has a really nice tutorial on this process here.

Install the ATTiny hardware files

We will first need to install the ATTiny hardware board files.

Create a folder under your Arduino sketchbook called “hardware.”

  • Locate your Arduino sketchbook folder (you can find its location in the preferences dialog in the Arduino software) - this is typically under Documents > Arduino

  • Create a new sub-folder called “hardware” in the sketchbook folder, if it doesn’t exist already.

  • Open (unzip) the ATTiny-master.zip file and copy the “attiny” folder (not the attiny-master folder) from the unzipped ATtiny master.zip file to your new “hardware” folder.

You should end up with folder structure like Documents > Arduino > hardware > attiny that contains the file boards.txt and another folder called variants.

  • Restart the Arduino development environment.

  • You should see ATtiny entries in the Tools > Board menu.

Tiny AVR Programmer

Follow the hook-up guide for the Tiny AVR programmer. For Windows / PC users, there are a few driver files that you’ll need. For Mac / OS X users, the Tiny AVR Programmer should be plug-and-play ready.

Tiny AVR Programmer Hookup Guide

October 28, 2013

A how-to on the Tiny AVR Programmer. How to install drivers, hook it up, and program your favorite Tiny AVRs using AVRDUDE!

Use the 4-wire ribbon cables and the straight pin break-away headers to connect the SOIC clip to the Tiny AVR Programmer. Make sure that the left side pins are wired to the left side of the SOIC clip and the right side pins are wired to the right side of the SOIC clip.

I also recommend using a USB extension cable with the Tiny AVR Programmer so you have a little more movement from your computer when re-programming.

alt text

Tiny AVR Programmer with 4-wire ribbon cables and straight pin break-away headers.

Test Code - "Hello World!"

As with nearly every introductory Arduino project, we test our system with a “blink” program – the equivalent to “Hello World!” in most other programming environments. First, we need to make sure the configuration is set properly in the Arduino IDE.

Step 0 - Open up the Arduino IDE

Step 1 - Setting the Board Type

The LilyTiny has an ATtiny85 microcontroller on it. Change the board type in the Arduino IDE to correspond with this. The ATtiny85 can be set with either a 1 MHz internal clock or an 8 MHz internal clock. Be sure to select 8 MHz. Select: Tools –> Board –> ATtiny85 (internal 8 MHz clock)

alt text

Step 2 - Setting the Programmer

Because we are using the Tiny AVR as our programmer, we need the change the default programmer. This settings is also under the Tools menu.

alt text

Step 3 - Upload Code

Copy the code below and paste this into your Arduino window.

int blinkPin = 0;
void setup()
{
   pinMode(blinkPin, OUTPUT);
}

void loop()
{
    digitalWrite(blinkPin, HIGH);
    delay(500);
    digitalWrite(blinkPin, LOW);
    delay(500);
}

Click the upload button. You may see a few warning messages such as:

avrdude: please define PAGEL and BS2 signals in the configuration file for part ATtiny85

You can ignore this one. If everything is working, you should be seeing a blink on GPIO 0 (pin 5 of the ATtiny).

Notes on Programming the ATtiny85

alt text

The ATtiny85 isn’t your everyday Arduino microcontroller. It packs a lot of punch for its small size. The following Arduino commands should be supported:

All 5 pins are general purpose digital I/Os (GPIO). This means that they can be used with both digitalWrite() and digitalRead().

Pins 0 and 1 support PWM output (analogWrite).

Pins 2, 3, & 4 are tied to A/D on the chip (analogRead).

While the ATtiny85 supports most of the things you need, there are some things it can’t do.

No Hardware Serial (UART)

The ATtiny85 does not have a built in hardware UART. If you try to compile any Arduino code with Serial.begin() or Serial.print() you’ll get an error. However, there is a work around for this – using Software Serial. This tutorial shows an example of how to do this.

Resources and Going Further

For more information regarding the ATtiny85, LinyTiny/Twinkle or AVR programming, check out the following links:

alt text

Going Further

  • H2OhNo!– The H2OhNo! water alarm and development board uses an ATtiny85 to sense the presence of water. This tutorial goes deep into getting the ATtiny85 into a very low power mode.
  • Shift Registers– If you’re feeling restrained by the ATtiny’s lack of pins, you may be able to use a shift register to expand on that I/O count.
  • Using the Arduino Pro Mini 3.3V– If you’re looking for small, but need more pins and functionality check out the Arduino Pro Mini.

learn.sparkfun.com |CC BY-SA 3.0 | SparkFun Electronics | Niwot, Colorado

MCP4725 Digital to Analog Converter Hookup Guide

$
0
0

MCP4725 Digital to Analog Converter Hookup Guide a learn.sparkfun.com tutorial

Available online at: http://sfe.io/t29

To DAC, or Not to DAC...

When learning about the world of microcontrollers, you will come across analog-to-digital converters quite frequently. These allows us to read in signals from analog sensors and convert them into a digital language our microcontrollers and other computational devices can understand. However, what if you need to do the opposite? What if you need your Arduino to speak the language of analog signals? Enter the MCP4725 Digital-toAnalog Converter Breakout.

alt text

This tiny IC allows you to do just that. By using the Arduino’s I2C lines, you can create a wide variety of analog waveforms on the other end.

Covered in This Tutorial

In this tutorial, we will overview the breakout and discuss additional hardware details. Then an assembly section will discuss how to connect this breakout to a microcontroller. Last, the firmware will be broken down to help you understand how the digital to analog conversion happens.

Suggested Reading

Board Overview

Before we discuss hooking up the breakout, let’s go over some of the features of this board.

Pinout

The first thing to point out is the pinout on this breakout now conforms to the standard I2C pinout we’ve started using on most devices that use the two-wire interface. Thus, it is easy to solder some headers on the breakout and plug it directly into an Arduino with the same pinout for the I2C pins. There is also the signal out and a GND pin grouped together to connect to an oscilloscope or whatever other device you’re hooking up to the breakout.

alt text

Power

The breakout can be powered anywhere between 2.7V to 5.5V, making it great for both 5V and 3.3V microcontrollers.

I2C Communication

A few features have been added to this breakout to give the user more flexibility with the IC, particularly when it comes to adding multiple DACs to one bus. First, we’ve broken out the address selection pin (A0) to a jumper pad. By default, this pin is pulled LOW to GND. To change the address of your other device, simply de-solder the jumper and add a blob of solder to the middle pad and the Vcc pad.

address selection

If you’re going to have more than one MCP4725 on a bus, you’ll also want to disable the pull-up resistors on all but one breakout. To make this easier, we’ve added another jumper on the back of the board. The pull-ups are enabled by default. If you need to disable them, you’ll need to cut the traces on the jumper pad with an Xacto knife. If you ever need to re-enable the pull-ups, simply solder the three pads back together.

pullup enable

Last, there are two mounting holes to mount this board inside the enclosure of your choice.

Hooking it Up

To use the MCP4725, all you’ll need is some male headers, a SparkFun RedBoard or other microcontroller, and a means to see your signal. Using an oscilloscope will be the easiest way to get started.

First, solder the headers onto your breakout. We recommend using a 4-pin header facing downward for the power and communication connections and using a 2-pin header facing up for the Out and GND pins. See the below image for an example.

alt text

Most Arduino boards have the I2C on the A4 and A5 pins. Then, in the firmware we’ll uplaod in the next section, we can set pins A2 and A3 as GND and Vcc respectively to power the breakout. If you prefer to wire everything to a breadboard, you can solder a 6-pin header and connect everything with some jumper wires.

alt text

Last, it’s time to connect the MCP4725 to whatever device you’ll be sending analog signals. In this tutorial, we’ll be visualizing the signal with an oscilloscope. Using the o-scope probes, you could connect to the headers directly, or you could use some jumper wires. Make sure to not mix up the Out and GND pins.

alt text

Firmware

With everything hooked up, it’s time to upload some code to the Arduino that will allow the breakout to send analog signals. In this example, the code will generate a simple sine wave.

Open up the Arduino IDE, and copy in this snippet of code:

language:c
/******************************************************************************
MCP4725 Example Waveform Sketch
Joel Bartlett
SparkFun Electronics
Sept. 11, 2014
https://github.com/sparkfun/MCP4725_Breakout

This sketch takes data from a lookup table to provide
waveforms to be generated by the MCP4725 DAC.

Development environment specifics:
Arduino 1.0+
Hardware Version V14

This code is beerware; if you see me (or any other SparkFun employee) at the local,
and you've found our code helpful, please buy us a round!

Distributed as-is; no warranty is given.

This code builds off the sketch written by Mark VandeWettering, which can be found here:
http://brainwagon.org/2011/02/24/arduino-mcp4725-breakout-board/
*/

#include <Wire.h>//Include the Wire library to talk I2C

//This is the I2C Address of the MCP4725, by default (A0 pulled to GND).
//Please note that this breakout is for the MCP4725A0.
#define MCP4725_ADDR 0x60
//For devices with A0 pulled HIGH, use 0x61

//Sinewave Tables were generated using this calculator:
//http://www.daycounter.com/Calculators/Sine-Generator-Calculator.phtml


int lookup = 0;//varaible for navigating through the tables

int sintab2[512] =
{
  2048, 2073, 2098, 2123, 2148, 2174, 2199, 2224,
  2249, 2274, 2299, 2324, 2349, 2373, 2398, 2423,
  2448, 2472, 2497, 2521, 2546, 2570, 2594, 2618,
  2643, 2667, 2690, 2714, 2738, 2762, 2785, 2808,
  2832, 2855, 2878, 2901, 2924, 2946, 2969, 2991,
  3013, 3036, 3057, 3079, 3101, 3122, 3144, 3165,
  3186, 3207, 3227, 3248, 3268, 3288, 3308, 3328,
  3347, 3367, 3386, 3405, 3423, 3442, 3460, 3478,
  3496, 3514, 3531, 3548, 3565, 3582, 3599, 3615,
  3631, 3647, 3663, 3678, 3693, 3708, 3722, 3737,
  3751, 3765, 3778, 3792, 3805, 3817, 3830, 3842,
  3854, 3866, 3877, 3888, 3899, 3910, 3920, 3930,
  3940, 3950, 3959, 3968, 3976, 3985, 3993, 4000,
  4008, 4015, 4022, 4028, 4035, 4041, 4046, 4052,
  4057, 4061, 4066, 4070, 4074, 4077, 4081, 4084,
  4086, 4088, 4090, 4092, 4094, 4095, 4095, 4095,
  4095, 4095, 4095, 4095, 4094, 4092, 4090, 4088,
  4086, 4084, 4081, 4077, 4074, 4070, 4066, 4061,
  4057, 4052, 4046, 4041, 4035, 4028, 4022, 4015,
  4008, 4000, 3993, 3985, 3976, 3968, 3959, 3950,
  3940, 3930, 3920, 3910, 3899, 3888, 3877, 3866,
  3854, 3842, 3830, 3817, 3805, 3792, 3778, 3765,
  3751, 3737, 3722, 3708, 3693, 3678, 3663, 3647,
  3631, 3615, 3599, 3582, 3565, 3548, 3531, 3514,
  3496, 3478, 3460, 3442, 3423, 3405, 3386, 3367,
  3347, 3328, 3308, 3288, 3268, 3248, 3227, 3207,
  3186, 3165, 3144, 3122, 3101, 3079, 3057, 3036,
  3013, 2991, 2969, 2946, 2924, 2901, 2878, 2855,
  2832, 2808, 2785, 2762, 2738, 2714, 2690, 2667,
  2643, 2618, 2594, 2570, 2546, 2521, 2497, 2472,
  2448, 2423, 2398, 2373, 2349, 2324, 2299, 2274,
  2249, 2224, 2199, 2174, 2148, 2123, 2098, 2073,
  2048, 2023, 1998, 1973, 1948, 1922, 1897, 1872,
  1847, 1822, 1797, 1772, 1747, 1723, 1698, 1673,
  1648, 1624, 1599, 1575, 1550, 1526, 1502, 1478,
  1453, 1429, 1406, 1382, 1358, 1334, 1311, 1288,
  1264, 1241, 1218, 1195, 1172, 1150, 1127, 1105,
  1083, 1060, 1039, 1017,  995,  974,  952,  931,
   910,  889,  869,  848,  828,  808,  788,  768,
   749,  729,  710,  691,  673,  654,  636,  618,
   600,  582,  565,  548,  531,  514,  497,  481,
   465,  449,  433,  418,  403,  388,  374,  359,
   345,  331,  318,  304,  291,  279,  266,  254,
   242,  230,  219,  208,  197,  186,  176,  166,
   156,  146,  137,  128,  120,  111,  103,   96,
    88,   81,   74,   68,   61,   55,   50,   44,
    39,   35,   30,   26,   22,   19,   15,   12,
    10,    8,    6,    4,    2,    1,    1,    0,
     0,    0,    1,    1,    2,    4,    6,    8,
    10,   12,   15,   19,   22,   26,   30,   35,
    39,   44,   50,   55,   61,   68,   74,   81,
    88,   96,  103,  111,  120,  128,  137,  146,
   156,  166,  176,  186,  197,  208,  219,  230,
   242,  254,  266,  279,  291,  304,  318,  331,
   345,  359,  374,  388,  403,  418,  433,  449,
   465,  481,  497,  514,  531,  548,  565,  582,
   600,  618,  636,  654,  673,  691,  710,  729,
   749,  768,  788,  808,  828,  848,  869,  889,
   910,  931,  952,  974,  995, 1017, 1039, 1060,
  1083, 1105, 1127, 1150, 1172, 1195, 1218, 1241,
  1264, 1288, 1311, 1334, 1358, 1382, 1406, 1429,
  1453, 1478, 1502, 1526, 1550, 1575, 1599, 1624,
  1648, 1673, 1698, 1723, 1747, 1772, 1797, 1822,
  1847, 1872, 1897, 1922, 1948, 1973, 1998, 2023
};


void setup()
{
  Wire.begin();

  // Set A2 and A3 as Outputs to make them our GND and Vcc,
  //which will power the MCP4725
  pinMode(A2, OUTPUT);
  pinMode(A3, OUTPUT);

  digitalWrite(A2, LOW);//Set A2 as GND
  digitalWrite(A3, HIGH);//Set A3 as Vcc
}
//---------------------------------------------------
void loop()
{
  Wire.beginTransmission(MCP4725_ADDR);
  Wire.write(64);                     // cmd to update the DAC
  Wire.write(sintab2[lookup] >> 4);        // the 8 most significant bits...
  Wire.write((sintab2[lookup] & 15) << 4); // the 4 least significant bits...
  Wire.endTransmission();
  lookup = (lookup + 1) & 511;
}

Once the sketch is uploaded, fire up the o-scope, connect the probe, if you haven’t yet, and you should be greeted with a nice looking sine wave.

alt text

Resources and Going Further

With that, you should be able to get your MCP4725 working the way you’d like and integrated into your next project. For more information on the MCP4725, please visit the links below.

Need more? Check out these other SparkFun tutorials:


learn.sparkfun.com |CC BY-SA 3.0 | SparkFun Electronics | Niwot, Colorado

SIK Galileo - Part 6: Reading a Photoresistor

$
0
0

SIK Galileo - Part 6: Reading a Photoresistor a learn.sparkfun.com tutorial

Available online at: http://sfe.io/t280

Introduction

In Circuit 2, you got to use a potentiometer, which varies resistance based on the twisting of a knob. In this circuit, you’ll be using a photoresistor, which changes resistance based on how much light the sensor receives. Since the Galileo can’t directly interpret resistance (rather, it reads voltage), we need to use a voltage divider to use our photoresistor. This voltage divider will output a high voltage when it is getting a lot of light and a low voltage when little or no light is present.

Parts Needed

You will need 1x photoresistor, 1x LED, 1x 330Ω resistor, 1x 10k resistor, and 6x jumper wires. If you are following through all of the SIK Galileo tutorials we suggest getting these parts:

Mini Photocell

Mini Photocell

In stock SEN-09088

This is a very small light sensor. A photocell changes (also called a [photodetector](http://en.wikipedia.org/wiki/Photodetec…

1.5
Jumper Wires Standard 7" M/M Pack of 30

Jumper Wires Standard 7" M/M Pack of 30

In stock PRT-11026

If you need to knock up a quick prototype there's nothing like having a pile of jumper wires to speed things up, and let's fa…

4.95
Resistor 330 Ohm 1/6 Watt PTH - 20 pack

Resistor 330 Ohm 1/6 Watt PTH - 20 pack

In stock COM-11507

1/6 Watt, +/- 5% tolerance PTH resistors. Commonly used in breadboards and perf boards, these 330Ohm resistors make excellent…

0.95
LED - Assorted (20 pack)

LED - Assorted (20 pack)

Out of stock COM-12062

We all know that you can never get too many LEDs. Don't worry, we've got you covered. This is a pack of basic red, yellow, bl…

2.95
Resistor 10K Ohm 1/6th Watt PTH - 20 pack

Resistor 10K Ohm 1/6th Watt PTH - 20 pack

In stock COM-11508

1/6th Watt, +/- 5% tolerance PTH resistors. Commonly used in breadboards and perf boards, these 10K resistors make excellent …

0.95

Suggested Reading

Before continuing on with this tutorial, we recommend you be somewhat familiar with the concepts in these tutorials:

How to Use a Breadboard

May 14, 2013

Welcome to the wonderful world of breadboards. Here we will learn what a breadboard is and how to use one to build your very first circuit.

Galileo Getting Started Guide

January 23, 2014

An introduction to the Arduino/Intel Galileo, and how to begin using the nifty x86, 400MHz Arduino.

If you are following along with the SIK Galileo tutorials, it is helpful to view the tutorials before this one:

Hardware Hookup

Ready to start hooking everything up? Check out the Fritzing diagram below, to see how everything is connected. Pay special attention to the component’s markings indicating how to place it on the breadboard. Polarized components can only be connected to a circuit in one direction.

Fritzing Diagram

Fritzing image

Having a hard time seeing the circuit? Click on the Fritzing diagram to see a bigger image.

Code To Note

lightLevel = map(lightLevel, 0, 1023, 0, 255);

Parameters

map(value, fromLow, fromHigh, toLow, toHigh)

value: the number to map

fromLow: the lower bound of the value’s current range

fromHigh: the upper bound of the value’s current range

toLow: the lower bound of the value’s target range

toHigh: the upper bound of the value’s target range

When we read an analog signal using analogRead(), it will be a number from 0 to 1023. But when we want to drive a PWM pin using analogWrite(), it wants a number from 0 to 255. We can “squeeze” the larger range into the smaller range using the map() function. See Arduino’s map reference page for more info.

lightLevel = constrain(lightLevel, 0, 255);

Parameters

constrain(x, a, b)

x: the number to constrain, all data types

a: the lower end of the range, all data types

b: the upper end of the range, all data types

Because map() could still return numbers outside the “to” range, we’ll also use a function called constrain() that will “clip” numbers into a range. If the number is outside the range, it will make it the largest or smallest number. If it is within the range, it will stay the same. See Arduino’s constrain reference page for more info.

Copy and paste the following code into the Arduino IDE. Hit upload and see what happens!

language:cpp
/*
SparkFun Inventor's Kit Galileo
Example sketch 06

PHOTO RESISTOR

  Use a photoresistor (light sensor) to control the brightness
  of a LED.

Hardware connections:

  Photo resistor:

    Connect one side of the photoresistor to 5 Volts (5V).
    Connect the other side of the photoresistor to ANALOG pin 0.
    Connect a 10K resistor between ANALOG pin 0 and GND.

    This creates a voltage divider, with the photoresistor one
    of the two resistors. The output of the voltage divider
    (connected to A0) will vary with the light level.

  LED:

    Connect the positive side (long leg) of the LED to
    digital pin 9. (To vary the brightness, this pin must
    support PWM, which is indicated by "~" or "PWM" on the
    Arduino itself.)

    Connect the negative side of the LED (short leg) to a
    330 Ohm resistor.

    Connect the other side of the resistor to GND.

This sketch was written by SparkFun Electronics,
with lots of help from the Arduino community.
This code is completely free for any use.
Visit http://learn.sparkfun.com/products/2 for SIK information.
Visit http://www.arduino.cc to learn about the Arduino.

Version 2.0 6/2012 MDG
*/


// As usual, we'll create constants to name the pins we're using.
// This will make it easier to follow the code below.

const int sensorPin = 0;
const int ledPin = 9;

// We'll also set up some global variables for the light level:

int lightLevel, high = 0, low = 1023;


void setup()
{
  // We'll set up the LED pin to be an output.
  // (We don't need to do anything special to use the analog input.)

  pinMode(ledPin, OUTPUT);
}


void loop()
{
  // Just as we've done in the past, we'll use the analogRead()
  // function to measure the voltage coming from the photoresistor
  // resistor pair. This number can range between 0 (0 Volts) and
  // 1023 (5 Volts), but this circuit will have a smaller range
  // between dark and light.

  lightLevel = analogRead(sensorPin);

  // We now want to use this number to control the brightness of
  // the LED. But we have a problem: the analogRead() function
  // returns values between 0 and 1023, and the analogWrite()
  // function wants values from 0 to 255.

  // We can solve this by using two handy functions called map()
  // and constrain(). Map will change one range of values into
  // another range. If we tell map() our "from" range is 0-1023,
  // and our "to" range is 0-255, map() will squeeze the larger
  // range into the smaller. (It can do this for any two ranges.)

  // lightLevel = map(lightLevel, 0, 1023, 0, 255);

  // Because map() could still return numbers outside the "to"
  // range, (if they're outside the "from" range), we'll also use
  // a function called constrain() that will "clip" numbers into
  // a given range. If the number is above the range, it will reset
  // it to be the highest number in the range. If the number is
  // below the range, it will reset it to the lowest number.
  // If the number is within the range, it will stay the same.

  // lightLevel = constrain(lightLevel, 0, 255);

  // Here's one last thing to think about. The circuit we made
  // won't have a range all the way from 0 to 5 Volts. It will
  // be a smaller range, such as 300 (dark) to 800 (light).
  // If we just pass this number directly to map(), the LED will
  // change brightness, but it will never be completely off or
  // completely on.

  // You can fix this two ways, each of which we'll show
  // in the functions below. Uncomment ONE of them to
  // try it out:

  manualTune();  // manually change the range from light to dark

  //autoTune();  // have the Arduino do the work for us!

  // The above functions will alter lightLevel to be cover the
  // range from full-on to full-off. Now we can adjust the
  // brightness of the LED:

  analogWrite(ledPin, lightLevel);

  // The above statement will brighten the LED along with the
  // light level. To do the opposite, replace "lightLevel" in the
  // above analogWrite() statement with "255-lightLevel".
  // Now you've created a night-light!
}


void manualTune()
{
  // As we mentioned above, the light-sensing circuit we built
  // won't have a range all the way from 0 to 1023. It will likely
  // be more like 300 (dark) to 800 (light). If you run this sketch
  // as-is, the LED won't fully turn off, even in the dark.

  // You can accommodate the reduced range by manually
  // tweaking the "from" range numbers in the map() function.
  // Here we're using the full range of 0 to 1023.
  // Try manually changing this to a smaller range (300 to 800
  // is a good guess), and try it out again. If the LED doesn't
  // go completely out, make the low number larger. If the LED
  // is always too bright, make the high number smaller.

  // Remember you're JUST changing the 0, 1023 in the line below!

  lightLevel = map(lightLevel, 0, 1023, 0, 255);
  lightLevel = constrain(lightLevel, 0, 255);

  // Now we'll return to the main loop(), and send lightLevel
  // to the LED.
}


void autoTune()
{
  // As we mentioned above, the light-sensing circuit we built
  // won't have a range all the way from 0 to 1023. It will likely
  // be more like 300 (dark) to 800 (light).

  // In the manualTune() function above, you need to repeatedly
  // change the values and try the program again until it works.
  // But why should you have to do that work? You've got a
  // computer in your hands that can figure things out for itself!

  // In this function, the Arduino will keep track of the highest
  // and lowest values that we're reading from analogRead().

  // If you look at the top of the sketch, you'll see that we've
  // initialized "low" to be 1023. We'll save anything we read
  // that's lower than that:

  if (lightLevel < low)
  {
    low = lightLevel;
  }

  // We also initialized "high" to be 0. We'll save anything
  // we read that's higher than that:

  if (lightLevel > high)
  {
    high = lightLevel;
  }

  // Once we have the highest and lowest values, we can stick them
  // directly into the map() function. No manual tweaking needed!

  // One trick we'll do is to add a small offset to low and high,
  // to ensure that the LED is fully-off and fully-on at the limits
  // (otherwise it might flicker a little bit).

  lightLevel = map(lightLevel, low+30, high-30, 0, 255);
  lightLevel = constrain(lightLevel, 0, 255);

  // Now we'll return to the main loop(), and send lightLevel
  // to the LED.
}

What You Should See

You should see the LED grow brighter or dimmer in accordance with how much light your photoresistor is reading. If it isn’t working, make sure you have assembled the circuit correctly and verified and uploaded the code to your board or see the troubleshooting section.

Galileo Photoresistor

Real World Application:

Some street lamps as well as solar walkway lights use photoresistors to detect the absence of the sun and turn on the lights.

Troubleshooting

LED Remains Dark

This is a mistake we continue to make time and time again, if only they could make an LED that worked both ways. Pull it up and give it a twist.

It Isn’t Responding to Changes in Light

Given that the spacing of the wires on the photoresistor is not standard, it is easy to misplace it. Double check it’s in the right place.

Still Not Quite Working

You may be in a room which is either too bright or dark. Try turning the lights on or off to see if this helps. Or if you have a flashlight near by give that a try.

Resources and Going Further

Ready to continue? Have fun learning about the Galileo and continue along through all the SIK Galileo tutorials.


learn.sparkfun.com |CC BY-SA 3.0 | SparkFun Electronics | Niwot, Colorado

SIK Galileo - Part 7: Reading a Temperature Sensor

$
0
0

SIK Galileo - Part 7: Reading a Temperature Sensor a learn.sparkfun.com tutorial

Available online at: http://sfe.io/t281

Introduction

A temperature sensor is exactly what it sounds like – a sensor used to measure ambient temperature. This particular sensor has three pins – a positive, a ground, and a signal. This is a linear temperature sensor. A change in temperature of one degree centigrade is equal to a change of 10 millivolts at the sensor output.

The TMP36 sensor has a nominal 750 mV at 25°C (about room temperature). In this circuit, you’ll learn how to integrate the temperature sensor with your Galileo, and use the Arduino IDE’s serial monitor to display the temperature.

Parts Needed

You will need 1x temperature sensor and 5x jumper wires. If you are following through all of the SIK Galileo tutorials we suggest getting these parts:

Jumper Wires Standard 7" M/M Pack of 30

Jumper Wires Standard 7" M/M Pack of 30

In stock PRT-11026

If you need to knock up a quick prototype there's nothing like having a pile of jumper wires to speed things up, and let's fa…

4.95
Temperature Sensor - TMP36

Temperature Sensor - TMP36

Out of stock SEN-10988

This is the same temperature sensor that is included in our [SparkFun Inventor's Kit](http://www.sparkfun.com/products/10173)…

1.5

Suggested Reading

Before continuing on with this tutorial, we recommend you be somewhat familiar with the concepts in these tutorials:

How to Use a Breadboard

May 14, 2013

Welcome to the wonderful world of breadboards. Here we will learn what a breadboard is and how to use one to build your very first circuit.

Galileo Getting Started Guide

January 23, 2014

An introduction to the Arduino/Intel Galileo, and how to begin using the nifty x86, 400MHz Arduino.

If you are following along with the SIK Galileo tutorials, it is helpful to view the tutorials before this one:

Hardware Hookup

Ready to start hooking everything up? Check out the Fritzing diagram below, to see how everything is connected. Pay special attention to the component’s markings indicating how to place it on the breadboard. Polarized components can only be connected to a circuit in one direction.

Please note: The temperature sensor can only be connected to a circuit in one direction. See below for the pin outs of the temperature sensor - TMP36

Temperature sensor

Fritzing Diagram

Fritzing image

Having a hard time seeing the circuit? Click on the Fritzing diagram to see a bigger image.

Code To Note

Serial.begin(9600);

Before using the serial monitor, you must call Serial.begin() to initialize it. 9600 is the “baud rate”, or communications speed. When two devices are communicating with each other, both must be set to the same speed.

Serial.print(degreesC);

The Serial.print() command is very smart. It can print out almost anything you can throw at it, including variables of all types, quoted text (AKA “strings”), etc. See http://arduino.cc/en/serial/print for more info.

Serial.println(degreesF);

Serial.print() will print everything on the same line.

Serial.println() will move to the next line. By using both of these commands together, you can create easy-to-read printouts of text and data.

Copy and paste the following code into the Arduino IDE. Hit upload and see what happens!

language:cpp
/*
SparkFun Inventor's Kit Galileo
Example sketch 07

TEMPERATURE SENSOR

  Use the "serial monitor" window to read a temperature sensor.

  The TMP36 is an easy-to-use temperature sensor that outputs
  a voltage that's proportional to the ambient temperature.
  You can use it for all kinds of automation tasks where you'd
  like to know or control the temperature of something.

  More information on the sensor is available in the datasheet:
  http://dlnmh9ip6v2uc.cloudfront.net/datasheets/Sensors/Temp/TMP35_36_37.pdf

  Even more exciting, we'll start using the Arduino's serial port
  to send data back to your main computer! Up until now, we've
  been limited to using simple LEDs for output. We'll see that
  the Arduino can also easily output all kinds of text and data.

Hardware connections:

  Be careful when installing the temperature sensor, as it is
  almost identical to the transistors! The one you want has
  a triangle logo and "TMP" in very tiny letters. The
  ones you DON'T want will have "222" on them.

  When looking at the flat side of the temperature sensor
  with the pins down, from left to right the pins are:
  5V, SIGNAL, and GND.

  Connect the 5V pin to 5 Volts (5V).
  Connect the SIGNAL pin to ANALOG pin 0.
  Connect the GND pin to ground (GND).

This sketch was written by SparkFun Electronics,
with lots of help from the Arduino community.
This code is completely free for any use.
Visit http://learn.sparkfun.com/products/2 for SIK information.
Visit http://www.arduino.cc to learn about the Arduino.

Version 2.0 6/2012 MDG
*/

// We'll use analog input 0 to measure the temperature sensor's
// signal pin.

const int temperaturePin = 0;


void setup()
{
  // In this sketch, we'll use the Arduino's serial port
  // to send text back to the main computer. For both sides to
  // communicate properly, they need to be set to the same speed.
  // We use the Serial.begin() function to initialize the port
  // and set the communications speed.

  // The speed is measured in bits per second, also known as
  // "baud rate". 9600 is a very commonly used baud rate,
  // and will transfer about 10 characters per second.

  Serial.begin(9600);
}


void loop()
{
  // Up to now we've only used integer ("int") values in our
  // sketches. Integers are always whole numbers (0, 1, 23, etc.).
  // In this sketch, we'll use floating-point values ("float").
  // Floats can be fractional numbers such as 1.42, 2523.43121, etc.

  // We'll declare three floating-point variables
  // (We can declare multiple variables of the same type on one line:)

  float voltage, degreesC, degreesF;

  // First we'll measure the voltage at the analog pin. Normally
  // we'd use analogRead(), which returns a number from 0 to 1023.
  // Here we've written a function (further down) called
  // getVoltage() that returns the true voltage (0 to 5 Volts)
  // present on an analog input pin.

  voltage = getVoltage(temperaturePin);

  // Now we'll convert the voltage to degrees Celsius.
  // This formula comes from the temperature sensor datasheet:

  degreesC = (voltage - 0.5) * 100.0;

  // While we're at it, let's convert degrees Celsius to Fahrenheit.
  // This is the classic C to F conversion formula:

  degreesF = degreesC * (9.0/5.0) + 32.0;

  // Now we'll use the serial port to print these values
  // to the serial monitor!

  // To open the serial monitor window, upload your code,
  // then click the "magnifying glass" button at the right edge
  // of the Arduino IDE toolbar. The serial monitor window
  // will open.

  // (NOTE: remember we said that the communication speed
  // must be the same on both sides. Ensure that the baud rate
  // control at the bottom of the window is set to 9600. If it
  // isn't, change it to 9600.)

  // Also note that every time you upload a new sketch to the
  // Arduino, the serial monitor window will close. It does this
  // because the serial port is also used to upload code!
  // When the upload is complete, you can re-open the serial
  // monitor window.

  // To send data from the Arduino to the serial monitor window,
  // we use the Serial.print() function. You can print variables
  // or text (within quotes).

  Serial.print("voltage: ");
  Serial.print(voltage);
  Serial.print("  deg C: ");
  Serial.print(degreesC);
  Serial.print("  deg F: ");
  Serial.println(degreesF);

  // These statements will print lines of data like this:
  // "voltage: 0.73 deg C: 22.75 deg F: 72.96"

  // Note that all of the above statements are "print", except
  // for the last one, which is "println". "Print" will output
  // text to the SAME LINE, similar to building a sentence
  // out of words. "Println" will insert a "carriage return"
  // character at the end of whatever it prints, moving down
  // to the NEXT line.

  delay(1000); // repeat once per second (change as you wish!)
}


float getVoltage(int pin)
{
  // This function has one input parameter, the analog pin number
  // to read. You might notice that this function does not have
  // "void" in front of it; this is because it returns a floating-
  // point value, which is the true voltage on that pin (0 to 5V).

  // You can write your own functions that take in parameters
  // and return values. Here's how:

    // To take in parameters, put their type and name in the
    // parenthesis after the function name (see above). You can
    // have multiple parameters, separated with commas.

    // To return a value, put the type BEFORE the function name
    // (see "float", above), and use a return() statement in your code
    // to actually return the value (see below).

    // If you don't need to get any parameters, you can just put
    // "()" after the function name.

    // If you don't need to return a value, just write "void" before
    // the function name.

  // Here's the return statement for this function. We're doing
  // all the math we need to do within this statement:

  return (analogRead(pin) * 0.004882814);

  // This equation converts the 0 to 1023 value that analogRead()
  // returns, into a 0.0 to 5.0 value that is the true voltage
  // being read at that pin.
}

// Other things to try with this code:

//   Turn on an LED if the temperature is above or below a value.

//   Read that threshold value from a potentiometer - now you've
//   created a thermostat!

What You Should See

You should be able to read the temperature your temperature sensor is detecting on the serial monitor in the Arduino IDE. If it isn’t working, make sure you have assembled the circuit correctly and verified and uploaded the code to your board or see the troubleshooting section.

Galileo Temperature Sensor

Example of what you should see in the Arduino IDE’s serial monitor:

voltage: 0.73 deg C: 23.24 deg F: 73.84

voltage: 0.73 deg C: 23.24 deg F: 73.84

voltage: 0.73 deg C: 22.75 deg F: 72.96

voltage: 0.73 deg C: 23.24 deg F: 73.84

voltage: 0.73 deg C: 23.24 deg F: 73.84

voltage: 0.73 deg C: 23.24 deg F: 73.84

voltage: 0.73 deg C: 22.75 deg F: 72.96

voltage: 0.73 deg C: 23.24 deg F: 73.84

voltage: 0.73 deg C: 22.75 deg F: 72.96

voltage: 0.73 deg C: 22.75 deg F: 72.96

voltage: 0.73 deg C: 23.24 deg F: 73.84

voltage: 0.73 deg C: 22.75 deg F: 72.96

voltage: 0.73 deg C: 23.24 deg F: 73.84

Real World Application:

Building climate control systems use a temperature sensor to monitor and maintain their settings.

Troubleshooting

Nothing Seems to Happen

This program has no outward indication it is working. To see the results you must open the Arduino IDE’s serial monitor (instructions on previous page).

Gibberish is Displayed

This happens because the serial monitor is receiving data at a different speed than expected. To fix this, click the pull-down box that reads “*** baud” and change it to “9600 baud”.

Temperature Value is Unchanging

Try pinching the sensor with your fingers to heat it up or pressing a bag of ice against it to cool it down.

Resources and Going Further

Ready to continue? Have fun learning about the Galileo and continue along through all the SIK Galileo tutorials.


learn.sparkfun.com |CC BY-SA 3.0 | SparkFun Electronics | Niwot, Colorado


SIK Galileo - Part 8: Driving a Servo Motor

$
0
0

SIK Galileo - Part 8: Driving a Servo Motor a learn.sparkfun.com tutorial

Available online at: http://sfe.io/t282

Introduction

Servos are ideal for embedded electronics applications because they do one thing very well that motors cannot – they can move to a position accurately. By varying the pulse width of the output voltage to a servo, you can move a servo to a specific position. For example, a pulse of 1.5 milliseconds will move the servo 90 degrees. In this circuit, you’ll learn how to use PWM (pulse width modulation) to control and rotate a servo.

Parts Needed

You will need 1x servo and 8x jumper wires. If you are following through all of the SIK Galileo tutorials we suggest getting these parts:

Servo - Generic (Sub-Micro Size)

Servo - Generic (Sub-Micro Size)

In stock ROB-09065

Here is a simple, low-cost, high quality servo for all your mechatronic needs. This servo is very similar in size and specifi…

8.95
Jumper Wires Standard 7" M/M Pack of 30

Jumper Wires Standard 7" M/M Pack of 30

In stock PRT-11026

If you need to knock up a quick prototype there's nothing like having a pile of jumper wires to speed things up, and let's fa…

4.95

Suggested Reading

Before continuing on with this tutorial, we recommend you be somewhat familiar with the concepts in these tutorials:

How to Use a Breadboard

May 14, 2013

Welcome to the wonderful world of breadboards. Here we will learn what a breadboard is and how to use one to build your very first circuit.

Pulse-width Modulation

February 27, 2013

An introduction to the concept of pulse width modulation.

Galileo Getting Started Guide

January 23, 2014

An introduction to the Arduino/Intel Galileo, and how to begin using the nifty x86, 400MHz Arduino.

If you are following along with the SIK Galileo tutorials, it is helpful to view the tutorials before this one:

Hardware Hookup

Ready to start hooking everything up? Check out the Fritzing diagram below, to see how everything is connected. Pay special attention to the component’s markings indicating how to place it on the breadboard. Polarized components can only be connected to a circuit in one direction.

Connect 3x jumper wires to the female 3 pin header on the servo. This will make it easier to breadboard the servo.

Servo Jumpers

Fritzing Diagram

Fritzing Image Motor

Having a hard time seeing the circuit? Click on the Fritzing diagram to see a bigger image. Please kept in mind your servo will have a white wire instead of yellow.

Code To Note

#include <Servo.h>

#include is a special “preprocessor” command that inserts a library (or any other file) into your sketch. You can type this command yourself, or choose an installed library from the “sketch / import library” menu.

Servo servo1;

servo1.attach(9);

The servo library adds new commands that let you control a servo. To prepare the Galileo to control a servo, you must first create a Servo “object” for each servo (here we’ve named it “servo1”), and then “attach” it to a digital pin (here we’re using pin 9).

servo1.write(180);

The servos in this kit don’t spin all the way around, but they can be commanded to move to a specific position. We use the servo library’s write() command to move a servo to a specified number of degrees(0 to 180). Remember that the servo requires time to move, so give it a short delay() if necessary.

Copy and paste the following code into the Arduino IDE. Hit upload and see what happens!

language:cpp
/*
SparkFun Inventor's Kit Galileo
Example sketch 08

SINGLE SERVO

  Sweep a servo back and forth through its full range of motion.

  A "servo", short for servomotor, is a motor that includes
  feedback circuitry that allows it to be commanded to move to
  specific positions. This one is very small, but larger servos
  are used extensively in robotics to control mechanical arms,
  hands, etc. You could use it to make a (tiny) robot arm,
  aircraft control surface, or anywhere something needs to be
  moved to specific positions.

Hardware connections:

  The servo has a cable attached to it with three wires.
  Because the cable ends in a socket, you can use jumper wires
  to connect between the Arduino and the servo. Just plug the
  jumper wires directly into the socket.

  Connect the RED wire (power) to 5 Volts (5V)
  Connect the WHITE wire (signal) to digital pin 9
  Connect the BLACK wire (ground) to ground (GND)

  Note that servos can use a lot of power, which can cause your
  Arduino to reset or behave erratically. If you're using large
  servos or many of them, it's best to provide them with their
  own separate 5V supply. See this Arduino Forum thread for info:
  http://www.arduino.cc/cgi-bin/yabb2/YaBB.pl?num=1239464763

This sketch was written by SparkFun Electronics,
with lots of help from the Arduino community.
This code is completely free for any use.
Visit http://learn.sparkfun.com/products/2 for SIK information.
Visit http://www.arduino.cc to learn about the Arduino.

Version 2.0 6/2012 MDG
*/


// If we had to write a sketch to control a servo from scratch,
// it would be a lot of work. Fortunately, others have done the
// hard work for you. We're going to include a "library"
// that has the functions needed to drive servos.

// A library is an set of additional functions you can add to
// your sketch. Numerous libraries are available for many uses,
// see http://arduino.cc/en/Reference/Libraries for information
// on the standard libraries, and Google for others. When you're
// using a new part, chances are someone has written a library
// for it.

#include <Servo.h>  // servo library

// Once you "include" a library, you'll have access to those
// functions. You can find a list of the functions in the servo
// library at: http://arduino.cc/en/Reference/Servo
// Most libraries also have example sketches you can load from
// the "file/examples" menu.

// Now we'll create a servo "object", called myservo. You should
// create one of these for each servo you want to control.
// You can control a maximum of twelve servos on the Uno
// using this library. (Other servo libraries may let you
// control more). Note that this library disables PWM on
// pins 9 and 10!

Servo servo1;  // servo control object


void setup()
{
  // We'll now "attach" the servo1 object to digital pin 9.
  // If you want to control more than one servo, attach more
  // servo objects to the desired pins (must be digital).

  // Attach tells the Arduino to begin sending control signals
  // to the servo. Servos require a continuous stream of control
  // signals, even if you're not currently moving them.
  // While the servo is being controlled, it will hold its
  // current position with some force. If you ever want to
  // release the servo (allowing it to be turned by hand),
  // you can call servo1.detach().

  servo1.attach(9);
}


void loop()
{
  int position;

  // To control a servo, you give it the angle you'd like it
  // to turn to. Servos cannot turn a full 360 degrees, but you
  // can tell it to move anywhere between 0 and 180 degrees.

  // Change position at full speed:

  servo1.write(90);    // Tell servo to go to 90 degrees

  delay(1000);         // Pause to get it time to move

  servo1.write(180);   // Tell servo to go to 180 degrees

  delay(1000);         // Pause to get it time to move

  servo1.write(0);     // Tell servo to go to 0 degrees

  delay(1000);         // Pause to get it time to move

  // Change position at a slower speed:

  // To slow down the servo's motion, we'll use a for() loop
  // to give it a bunch of intermediate positions, with 20ms
  // delays between them. You can change the step size to make
  // the servo slow down or speed up. Note that the servo can't
  // move faster than its full speed, and you won't be able
  // to update it any faster than every 20ms.

  // Tell servo to go to 180 degrees, stepping by two degrees

  for(position = 0; position < 180; position += 2)
  {
    servo1.write(position);  // Move to next position
    delay(20);               // Short pause to allow it to move
  }

  // Tell servo to go to 0 degrees, stepping by one degree

  for(position = 180; position >= 0; position -= 1)
  {
    servo1.write(position);  // Move to next position
    delay(20);               // Short pause to allow it to move
  }
}

What You Should See

You should see your servo motor move to various locations at several speeds. If the motor doesn’t move, check your connections and make sure you have verified and uploaded the code, or see the troubleshooting section.

Galileo Servo Motor

Real World Application:

Robotic arms you might see in an assembly line or sci-fi movie probably have servos in them.

Troubleshooting

Servo Not Twisting

Even with colored wires it is still shockingly easy to plug a servo in backward. This might be the case.

Still Not Working

A mistake we made a time or two was simply forgetting to connect the power (red and brown wires) to +5 volts and ground.

Fits and Starts

If the servo begins moving then twitches, and there’s a flashing light on your Galileo, the power supply you are using is not quite up to the challenge. Using a wall adapter instead of USB should solve this problem.

Resources and Going Further

Ready to continue? Have fun learning about the Galileo and follow along through all the SIK Galileo tutorials.


learn.sparkfun.com |CC BY-SA 3.0 | SparkFun Electronics | Niwot, Colorado

SIK Galileo - Part 9: Using a Flex Sensor

$
0
0

SIK Galileo - Part 9: Using a Flex Sensor a learn.sparkfun.com tutorial

Available online at: http://sfe.io/t283

Introduction

In this circuit, we will use a flex sensor to measure, well, flex! A flex sensor uses carbon on a strip of plastic to act like a variable resistor, but instead of changing the resistance by turning a knob, you change it by flexing (bending) the component. We use a “voltage divider” again to detect this change in resistance.

The sensor bends in one direction and the more it bends, the higher the resistance gets; it has a range from about 10K ohm to 35K ohm. In this circuit we will use the amount of bend of the flex sensor to control the position of a servo.

Parts Needed

You will need 1x flex sensor, 1x servo, 1x 10k resistor, and 11x jumper wires. If you are following through all of the SIK Galileo tutorials we suggest getting these parts:

Flex Sensor 2.2"

Flex Sensor 2.2"

In stock SEN-10264

A simple flex sensor 2.2" in length. As the sensor is flexed, the resistance across the sensor increases. Patented technology…

7.95
Servo - Generic (Sub-Micro Size)

Servo - Generic (Sub-Micro Size)

In stock ROB-09065

Here is a simple, low-cost, high quality servo for all your mechatronic needs. This servo is very similar in size and specifi…

8.95
Jumper Wires Standard 7" M/M Pack of 30

Jumper Wires Standard 7" M/M Pack of 30

In stock PRT-11026

If you need to knock up a quick prototype there's nothing like having a pile of jumper wires to speed things up, and let's fa…

4.95
Resistor 10K Ohm 1/6th Watt PTH - 20 pack

Resistor 10K Ohm 1/6th Watt PTH - 20 pack

In stock COM-11508

1/6th Watt, +/- 5% tolerance PTH resistors. Commonly used in breadboards and perf boards, these 10K resistors make excellent …

0.95

Suggested Reading

Before continuing on with this tutorial, we recommend you be somewhat familiar with the concepts in these tutorials:

Voltage Dividers

February 8, 2013

Turn a large voltage into a smaller one with voltage dividers.

How to Use a Breadboard

May 14, 2013

Welcome to the wonderful world of breadboards. Here we will learn what a breadboard is and how to use one to build your very first circuit.

Galileo Getting Started Guide

January 23, 2014

An introduction to the Arduino/Intel Galileo, and how to begin using the nifty x86, 400MHz Arduino.

If you are following along with the SIK Galileo tutorials, it is helpful to view the tutorials before this one:

Hardware Hookup

Ready to start hooking everything up? Check out the Fritzing diagram below, to see how everything is connected. Pay special attention to the component’s markings indicating how to place it on the breadboard. Polarized components can only be connected to a circuit in one direction.

Connect 3x jumper wires to the female 3 pin header on the servo. This will make it easier to breadboard the servo.

Fritzing image Flex Sensor an servo

Having a hard time seeing the circuit? Click on the Fritzing diagram to see a bigger image. Please kept in mind your servo will have a white wire instead of yellow.

Code To Note

servoposition = map(flexposition, 600, 900, 0, 180);

map(value, fromLow, fromHigh, toLow, toHigh)

Because the flex sensor / resistor combination won’t give us a full 0 to 5 volt range, we’re using the map() function as a handy way to reduce that range. Here we’ve told it to only expect values from 600 to 900, rather than 0 to 1023.

servoposition = constrain(servoposition, 0, 180);

constrain(x, a, b)

Because map() could still return numbers outside the “to” range, we’ll also use a function called constrain() that will “clip” numbers into a range. If the number is outside the range, it will make it the largest or smallest number. If it is within the range, it will stay the same.

Copy and paste the following code into the Arduino IDE. Hit upload and see what happens!

language:cpp
/*
SparkFun Inventor's Kit Galileo
Example sketch 09

FLEX SENSOR

  Use the "flex sensor" to change the position of a servo

  In the previous sketch, we learned how to command a servo to
  mode to different positions. In this sketch, we'll introduce
  a new sensor, and use it to control the servo.

  A flex sensor is a plastic strip with a conductive coating.
  When the strip is straight, the coating will be a certain
  resistance. When the strip is bent, the particles in the coating
  get further apart, increasing the resistance. You can use this
  sensor to sense finger movement in gloves, door hinges, stuffed
  animals, etc. See http://www.sparkfun.com/tutorials/270 for
  more information.

Hardware connections:

  Flex sensor:

    The flex sensor is the plastic strip with black stripes.
    It senses bending away from the striped side.

    The flex sensor has two pins, and since it's a resistor,
    the pins are interchangable.

    Connect one of the pins to ANALOG IN pin 0 on the Arduino.
    Connect the same pin, through a 10K Ohm resistor (brown
    black orange) to GND.
    Connect the other pin to 5V.

  Servo:

    The servo has a cable attached to it with three wires.
    Because the cable ends in a socket, you can use jumper wires
    to connect between the Arduino and the servo. Just plug the
    jumper wires directly into the socket.

    Connect the RED wire (power) to 5 Volts (5V)
    Connect the WHITE wire (signal) to digital pin 9
    Connect the BLACK wire (ground) to ground (GND)

    Note that servos can use a lot of power, which can cause your
    Arduino to reset or behave erratically. If you're using large
    servos or many of them, it's best to provide them with their
    own separate 5V supply. See this Arduino Forum thread for info:
    http://www.arduino.cc/cgi-bin/yabb2/YaBB.pl?num=1239464763

This sketch was written by SparkFun Electronics,
with lots of help from the Arduino community.
This code is completely free for any use.
Visit http://learn.sparkfun.com/products/2 for SIK information.
Visit http://www.arduino.cc to learn about the Arduino.

Version 2.0 6/2012 MDG
*/


// Include the servo library to add servo-control functions:

#include <Servo.h>

// Create a servo "object", called servo1. Each servo object
// controls one servo (you can have a maximum of 12):

Servo servo1;

// Define the analog input pin to measure flex sensor position:

const int flexpin = 0;


void setup()
{
  // Use the serial monitor window to help debug our sketch:

  Serial.begin(9600);

  // Enable control of a servo on pin 9:

  servo1.attach(9);
}


void loop()
{
  int flexposition;    // Input value from the analog pin.
  int servoposition;   // Output value to the servo.

  // Read the position of the flex sensor (0 to 1023):

  flexposition = analogRead(flexpin);

  // Because the voltage divider circuit only returns a portion
  // of the 0-1023 range of analogRead(), we'll map() that range
  // to the servo's range of 0 to 180 degrees. The flex sensors
  // we use are usually in the 600-900 range:

  servoposition = map(flexposition, 600, 900, 0, 180);
  servoposition = constrain(servoposition, 0, 180);

  // Now we'll command the servo to move to that position:

  servo1.write(servoposition);

  // Because every flex sensor has a slightly different resistance,
  // the 600-900 range may not exactly cover the flex sensor's
  // output. To help tune our program, we'll use the serial port to
  // print out our values to the serial monitor window:

  Serial.print("sensor: ");
  Serial.print(flexposition);
  Serial.print("  servo: ");
  Serial.println(servoposition);

  // Note that all of the above lines are "print" except for the
  // last line which is "println". This puts everything on the
  // same line, then sends a final carriage return to move to
  // the next line.

  // After you upload the sketch, turn on the serial monitor
  // (the magnifying-glass icon to the right of the icon bar).
  // You'll be able to see the sensor values. Bend the flex sensor
  // and note its minimum and maximum values. If you replace the
  // 600 and 900 in the map() function above, you'll exactly match
  // the flex sensor's range with the servo's range.

  delay(20);  // wait 20ms between servo updates
}

What You Should See

You should see the servo motor move in accordance with how much you are flexing the flex sensor. If it isn’t working, make sure you have assembled the circuit correctly and verified and uploaded the code to your board or see the troubleshooting section.

Galileo Flex Sensor

Real World Application:

Controller accessories for video game consoles like Nintendo’s “Power Glove” use flex-sensing technology. It was the first video game controller attempting to mimic hand movement on a screen in real time.

Troubleshooting

Servo Not Twisting

Even with colored wires it is still shockingly easy to plug a servo in backwards. This might be the case.

Servo Not Moving as Expected

The sensor is only designed to work in one direction. Try flexing it the other way (where the striped side faces out on a convex curve).

Servo Doesn’t Move very Far

You need to modify the range of values in the call to the map() function.

Resources and Going Further

Ready to continue? Have fun learning about the Galileo and continue along through all the SIK Galileo tutorials.


learn.sparkfun.com |CC BY-SA 3.0 | SparkFun Electronics | Niwot, Colorado

SIK Galileo - Part 10: Reading a Soft Potentiometer

$
0
0

SIK Galileo - Part 10: Reading a Soft Potentiometer a learn.sparkfun.com tutorial

Available online at: http://sfe.io/t284

Introduction

In this circuit, we are going to use yet another kind of variable resistor – this time, a soft potentiometer (or soft pot). This is a thin and flexible strip that can detect where pressure is being applied. By pressing down on various parts of the strip, you can vary the resistance from 100 to 10k ohms. You can use this ability to track movement on the soft pot, or simply as a button. In this circuit, we’ll get the soft pot up and running to control an RGB LED.

Parts Needed

You will need 1x soft potentiometer, 1x 10k resistor, 3x 330Ω resistors, 1x RGB LED, and 9x jumper wires. If you are following through all of the SIK Galileo tutorials we suggest getting these parts:

LED - RGB Clear Common Cathode

LED - RGB Clear Common Cathode

In stock COM-00105

Ever hear of a thing called RGB? Red, Green, Blue? How about an RGB LED? These 5mm units have four pins - Cathode is the long…

1.95
Jumper Wires Standard 7" M/M Pack of 30

Jumper Wires Standard 7" M/M Pack of 30

In stock PRT-11026

If you need to knock up a quick prototype there's nothing like having a pile of jumper wires to speed things up, and let's fa…

4.95
Resistor 330 Ohm 1/6 Watt PTH - 20 pack

Resistor 330 Ohm 1/6 Watt PTH - 20 pack

In stock COM-11507

1/6 Watt, +/- 5% tolerance PTH resistors. Commonly used in breadboards and perf boards, these 330Ohm resistors make excellent…

0.95
Resistor 10K Ohm 1/6th Watt PTH - 20 pack

Resistor 10K Ohm 1/6th Watt PTH - 20 pack

In stock COM-11508

1/6th Watt, +/- 5% tolerance PTH resistors. Commonly used in breadboards and perf boards, these 10K resistors make excellent …

0.95
SoftPot Membrane Potentiometer - 50mm

SoftPot Membrane Potentiometer - 50mm

In stock SEN-08680

These are very thin variable potentiometers. By pressing down on various parts of the strip, the resistance linearly changes …

4.95

Suggested Reading

Before continuing on with this tutorial, we recommend you be somewhat familiar with the concepts in these tutorials:

How to Use a Breadboard

May 14, 2013

Welcome to the wonderful world of breadboards. Here we will learn what a breadboard is and how to use one to build your very first circuit.

Galileo Getting Started Guide

January 23, 2014

An introduction to the Arduino/Intel Galileo, and how to begin using the nifty x86, 400MHz Arduino.

If you are following along with the SIK Galileo tutorials, it is helpful to view the tutorials before this one:

Hardware Hookup

Ready to start hooking everything up? Check out the Fritzing diagram below, to see how everything is connected. Pay special attention to the component’s markings indicating how to place it on the breadboard. Polarized components can only be connected to a circuit in one direction.

Fritzing Diagram

Fritzing SoftPot image

Having a hard time seeing the circuit? Click on the Fritzing diagram to see a bigger image.

Code To Note

language:cpp
redValue = constrain(map(RGBposition, 0, 341, 255, 0), 0, 255)
 + constrain(map(RGBposition, 682, 1023, 0, 255), 0, 255);


greenValue = constrain(map(RGBposition, 0, 341, 0, 255), 0, 255)
 - constrain(map(RGBposition, 341, 682, 0,255), 0, 255);


blueValue = constrain(map(RGBposition, 341, 682, 0, 255), 0, 255)
- constrain(map(RGBposition, 682, 1023, 0, 255), 0, 255);

These big, scary functions take a single Value (RGBposition) and calculate the three RGB values necessary to create a rainbow of color. The functions create three “peaks” for the red, green, and blue values, which overlap to mix and create new colors. See the code for more information! Even if you’re not 100% clear how it works, you can copy and paste this (or any) function into your own code and use it yourself.

Copy and paste the following code into the Arduino IDE. Hit upload and see what happens!

language:cpp
/*
SparkFun Inventor's Kit Galileo
Example sketch 10

SOFT POTENTIOMETER

  Use the soft potentiometer to change the color
  of the RGB LED

  The soft potentiometer is a neat input device that detects
  pressure along its length. When you press it down with a finger
  (it works best on a flat surface), it will change resistance
  depending on where you're pressing it. You might use it to make
  a piano or light dimmer; here we're going to use it to control
  the color of an RGB LED.

Hardware connections:

  Soft potentiometer:

    The soft potentiometer is the large plastic strip with three
    pins. We'll be connecting it as a voltage divider, just like
    we did with the knob-type potentiometer back in circuit #2.

    Connect the middle pin to ANALOG IN pin 0 on the Arduino.
    Connect one side to 5V.
    Connect the other side to GND.
    Also connect a 10K resistor from the middle pin to GND.

    TIP: the soft pot will only work while you're actively
    pressing on it; at other times it will "float" to random
    values. To prevent this, we've added a 10K pull-down resistor
    to the middle pin (output voltage). This will keep the output
    at zero volts when the pot is not being pressed.

  RGB LED:

    An RGB LED is actually three LEDs (red, green, and blue)
    in one package. When we run them at different brightnesses,
    they mix to form new colors.

    Starting at the flattened edge of the flange on the LED,
    the pins are ordered RED, COMMON, GREEN, BLUE.

    Connect RED to a 330 Ohm resistor.
    Connect the other end of the resistor to Arduino digital pin 9.

    Connect COMMON to GND.

    Connect GREEN through a 330 Ohm resistor.
    Connect the other end of the resistor to Arduino digital pin 10.

    Connect BLUE through a 330 Ohm resistor.
    Connect the other end of the resistor to Arduino digital pin 11.

This sketch was written by SparkFun Electronics,
with lots of help from the Arduino community.
This code is completely free for any use.
Visit http://learn.sparkfun.com/products/2 for SIK information.
Visit http://www.arduino.cc to learn about the Arduino.

Version 2.0 6/2012 MDG
*/


// Constants for LED connections (note that these must be
// PWM pins, which are marked with "PWM" or have a "~" symbol
// next to them on the board).

const int RED_LED_PIN = 9;    // Red LED Pin
const int GREEN_LED_PIN = 10; // Green LED Pin
const int BLUE_LED_PIN = 11;  // Blue LED Pin

const int SENSOR_PIN = 0;      // Analog input pin

// Global PWM brightness values for the RGB LED.
// These are global so both loop() and setRGB() can see them.

int redValue, greenValue, blueValue;


void setup()
{
  // No need for any code here
  // analogWrite() sets up the pins as outputs
}


void loop()
{
  int sensorValue;

  // Read the voltage from the softpot (0-1023)

  sensorValue = analogRead(0);

  // We've written a new function called setRGB() (further down
  // in the sketch) that decodes sensorValue into a position
  // on the RGB "rainbow", and sets the RGB LED to that color.

  setRGB(sensorValue);
}


// setRGB()
// Set a RGB LED to a position on the "rainbow" of all colors.
// RGBposition should be in the range of 0 to 1023 (such as
// from an analog input).

void setRGB(int RGBposition)
{
  int mapRGB1, mapRGB2, constrained1, constrained2;

  // Here we take RGBposition and turn it into three RGB values.

  // The three values are computed so that the colors mix and
  // produce a rainbow of colors across the 0-1023 input range.

  // For each channel (red green blue), we're creating a "peak"
  // a third of the way along the 0-1023 range. By overlapping
  // these peaks with each other, the colors are mixed together.
  // This is most easily shown with a diagram:
  // http://sfecdn.s3.amazonaws.com/education/SIK/SchematicImages/Misc/RGB_function.jpg

  // Create the red peak, which is centered at 0.
  // (Because it's centered at 0, half is after 0, and half
  // is before 1023):

  mapRGB1 = map(RGBposition, 0, 341, 255, 0);
  constrained1 = constrain(mapRGB1, 0, 255);

  mapRGB2 = map(RGBposition, 682, 1023, 0, 255);
  constrained2 = constrain(mapRGB2, 0, 255);

  redValue = constrained1 + constrained2;

  // Create the green peak, which is centered at 341
  // (one-third of the way to 1023):

  // Note that we've nested the functions by putting the map()
  // function inside the constrain() function. This can make your
  // code more compact, and requires fewer variabls:

  greenValue = constrain(map(RGBposition, 0, 341, 0, 255), 0, 255)
             - constrain(map(RGBposition, 341, 682, 0,255), 0, 255);

  // Create the blue peak, which is centered at 682
  // (two-thirds of the way to 1023):

  blueValue = constrain(map(RGBposition, 341, 682, 0, 255), 0, 255)
            - constrain(map(RGBposition, 682, 1023, 0, 255), 0, 255);

  // Now we have all three brightnesses,
  // we just need to display the computed color:

  analogWrite(RED_LED_PIN, redValue);
  analogWrite(GREEN_LED_PIN, greenValue);
  analogWrite(BLUE_LED_PIN, blueValue);

  // Feel free to use this function in your own code!
}

What You Should See

You should see the RGB LED change colors in accordance with how you interact with the soft potentiometer. If it isn’t working, make sure you have assembled the circuit correctly and verified and uploaded the code to your board, or see the troubleshooting section.

Galileo Soft Potentiometer

Real World Application:

The knobs found on many objects, like a radio for instance, are using similar concepts to the one you just completed for this circuit.

Troubleshooting

LED Remains Dark or Shows Incorrect Color

With the four pins of the LED so close together, it’s sometimes easy to misplace one. Try double checking each pin is where it should be.

Bizarre Results

The most likely cause of this is if you’re pressing the potentiometer in more than one position. This is normal and can actually be used to create some neat results.

Resources and Going Further

Ready to continue? Have fun learning about the Galileo and continue along through all the SIK Galileo tutorials.


learn.sparkfun.com |CC BY-SA 3.0 | SparkFun Electronics | Niwot, Colorado

SIK Galileo - Part 11: Using a Piezo Buzzer

$
0
0

SIK Galileo - Part 11: Using a Piezo Buzzer a learn.sparkfun.com tutorial

Available online at: http://sfe.io/t285

Introduction

In this circuit, we’ll again bridge the gap between the digital world and the analog world. We’ll be using a piezo buzzer that makes a small “click” when you apply voltage to it (try it!). By itself that isn’t terribly exciting, but if you turn the voltage on and off hundreds of times a second, the piezo buzzer will produce a tone. And if you string a bunch of tones together, you’ve got music! This circuit and sketch will play a classic tune. We’ll never let you down!

Parts Needed

You will need 1x piezo buzzer and 3x jumper wires. If you are following through all of the SIK Galileo tutorials we suggest getting these parts:

Jumper Wires Standard 7" M/M Pack of 30

Jumper Wires Standard 7" M/M Pack of 30

In stock PRT-11026

If you need to knock up a quick prototype there's nothing like having a pile of jumper wires to speed things up, and let's fa…

4.95
Piezo Speaker - PC Mount 12mm 2.048kHz

Piezo Speaker - PC Mount 12mm 2.048kHz

In stock COM-07950

This is a small 12mm round speaker that operates around the audible 2kHz range. You can use these speakers to create simple m…

1.95

Suggested Reading

Before continuing on with this tutorial, we recommend you be somewhat familiar with the concepts in these tutorials:

How to Use a Breadboard

May 14, 2013

Welcome to the wonderful world of breadboards. Here we will learn what a breadboard is and how to use one to build your very first circuit.

Galileo Getting Started Guide

January 23, 2014

An introduction to the Arduino/Intel Galileo, and how to begin using the nifty x86, 400MHz Arduino.

If you are following along with the SIK Galileo tutorials, it is helpful to view the tutorials before this one:

Hardware Hookup

Ready to start hooking everything up? Check out the Fritzing diagram below, to see how everything is connected. Pay special attention to the component’s markings indicating how to place it on the breadboard. Polarized components can only be connected to a circuit in one direction.

Fritzing Diagram

Fritzing Buzzer image

Having a hard time seeing the circuit? Click on the Fritzing diagram to see a bigger image.

Code To Note

char notes[] = "cdfda ag cdfdg gf ";

char names[] = {'c','d','e','f','g','a','b','C'};

Up until now we’ve been working solely with numerical data, but the Arduino can also work with text. Characters (single, printable, letters, numbers and other symbols) have their own type, called “char”. When you have an array of characters, it can be defined between double-quotes (also called a “string”), OR as a list of single-quoted characters.

tone(pin, frequency, duration);

One of Arduino’s many useful built-in commands is the tone() function. This function drives an output pin at a certain frequency, making it perfect for driving buzzers and speakers. If you give it a duration (in milliseconds), it will play the tone then stop. If you don’t give it a duration, it will keep playing the tone forever (but you can stop it with another function, noTone() ).

Copy and paste the following code into the Arduino IDE. Hit upload and see what happens!

/*
SparkFun Inventor's Kit Galileo
Example sketch 11

BUZZER

  Use the buzzer to play a song!

  The buzzer in your Inventor's Kit is an electromechanical
  component you can use to make noise. Inside the buzzer is a
  coil of wire and a small magnet. When current flows through
  the coil, it becomes magnetized and pulls towards the magnet,
  creating a tiny "click". When you do this thousands of times
  per second, you create tones.

  The Arduino has a built-in command called tone() which clicks
  the buzzer at a certain frequency. This sketch knows the
  frequencies of the common notes, allowing you to create songs.
  We're never going to let you down!

Hardware connections:

  The buzzer has two pins. One is positive and one is negative.
  The postitive pin is marked by a "+" symbol on both the top
  and bottom of the buzzer.

  Connect the positive pin to Arduino digital pin 9.
  (Note that this must be a PWM pin.)
  Connect the negative pin to GND.

  Tip: if the buzzer doesn't fit into the breadboard easily,
  try rotating it slightly to fit into diagonal holes.

This sketch was written by SparkFun Electronics,
with lots of help from the Arduino community.
(This sketch was originally developed by D. Cuartielles for K3)
This code is completely free for any use.
Visit http://learn.sparkfun.com/products/2 for SIK information.
Visit http://www.arduino.cc to learn about the Arduino.

Version 2.0 6/2012 MDG
*/

/*
This sketch uses the buzzer to play songs.
The Arduino's tone() command will play notes of a given frequency.
We'll provide a function that takes in note characters (a-g),
and returns the corresponding frequency from this table:

  note  frequency
  c     262 Hz
  d     294 Hz
  e     330 Hz
  f     349 Hz
  g     392 Hz
  a     440 Hz
  b     494 Hz
  C     523 Hz

For more information, see http://arduino.cc/en/Tutorial/Tone
*/

const int buzzerPin = 9;

// We'll set up an array with the notes we want to play
// change these values to make different songs!

// Length must equal the total number of notes and spaces

const int songLength = 18;

// Notes is an array of text characters corresponding to the notes
// in your song. A space represents a rest (no tone)

char notes[] = "cdfda ag cdfdg gf "; // a space represents a rest

// Beats is an array of values for each note and rest.
// A "1" represents a quarter-note, 2 a half-note, etc.
// Don't forget that the rests (spaces) need a length as well.

int beats[] = {1,1,1,1,1,1,4,4,2,1,1,1,1,1,1,4,4,2};

// The tempo is how fast to play the song.
// To make the song play faster, decrease this value.

int tempo = 150;


void setup()
{
  pinMode(buzzerPin, OUTPUT);
}


void loop()
{
  int i, duration;

  for (i = 0; i < songLength; i++) // step through the song arrays
  {
    duration = beats[i] * tempo;  // length of note/rest in ms

    if (notes[i] == ' ')          // is this a rest?
    {
      delay(duration);            // then pause for a moment
    }
    else                          // otherwise, play the note
    {
      tone(buzzerPin, frequency(notes[i]), duration);
      delay(duration);            // wait for tone to finish
    }
    delay(tempo/10);              // brief pause between notes
  }

  // We only want to play the song once, so we'll pause forever:
  while(true){}
  // If you'd like your song to play over and over,
  // remove the above statement
}


int frequency(char note)
{
  // This function takes a note character (a-g), and returns the
  // corresponding frequency in Hz for the tone() function.

  int i;
  const int numNotes = 8;  // number of notes we're storing

  // The following arrays hold the note characters and their
  // corresponding frequencies. The last "C" note is uppercase
  // to separate it from the first lowercase "c". If you want to
  // add more notes, you'll need to use unique characters.

  // For the "char" (character) type, we put single characters
  // in single quotes.

  char names[] = { 'c', 'd', 'e', 'f', 'g', 'a', 'b', 'C' };
  int frequencies[] = {262, 294, 330, 349, 392, 440, 494, 523};

  // Now we'll search through the letters in the array, and if
  // we find it, we'll return the frequency for that note.

  for (i = 0; i < numNotes; i++)  // Step through the notes
  {
    if (names[i] == note)         // Is this the one?
    {
      return(frequencies[i]);     // Yes! Return the frequency
    }
  }
  return(0);  // We looked through everything and didn't find it,
              // but we still need to return a value, so return 0.
}

What You Should See

You should see - well, nothing! But you should be able to hear a song. If it isn’t working, make sure you have assembled the circuit correctly and verified and uploaded the code to your board or see the troubleshooting section.

Galileo Piezo Buzzer

Real World Application:

Many modern megaphones have settings that use a loud amplified buzzer. They are usually very loud and quite good at getting people’s attention.

Troubleshooting

No Sound

Given the size and shape of the piezo buzzer it is easy to miss the right holes on the breadboard. Try double checking its placement.

Can’t Think While the Melody is Playing

Just pull up the piezo buzzer whilst you think, upload your program then plug it back in.

Feeling Let Down and Deserted

The code is written so you can easily add your own songs.

Resources and Going Further

Ready to continue? Have fun learning about the Galileo and continue along through all the SIK Galileo tutorials.


learn.sparkfun.com |CC BY-SA 3.0 | SparkFun Electronics | Niwot, Colorado

SIK Galileo - Part 12: Driving a Motor

$
0
0

SIK Galileo - Part 12: Driving a Motor a learn.sparkfun.com tutorial

Available online at: http://sfe.io/t286

Introduction

Back in Circuit 8, you got to work with a servo motor. Now, we are going to tackle spinning a motor. This requires the use of a transistor, which can switch a larger amount of current than the Galileo can.

When using a transistor, you just need to make sure its maximum specs are high enough for your use case. The transistor we are using for this circuit is rated at 40V max and 200 milliamps max – perfect for our toy motor! When the motor is spinning and suddenly turned off, the magnetic field inside it collapses, generating a voltage spike. This can damage the transistor. To prevent this, we use a “flyback diode”, which diverts the voltage spike around the transistor.

Parts Needed

You will need 1x motor, 1x NPN transistor, 1x diode 1N4148, 1x 330Ω resistor, and 6x jumper wires. If you are following through all of the SIK Galileo tutorials we suggest getting these parts:

Transistor - NPN (P2N2222A)

Transistor - NPN (P2N2222A)

In stock COM-12852

This is the P2N2222A, an NPN silicon BJT (Bipolar Junction Transistor). This little transistor can help in your project by be…

0.5
Jumper Wires Standard 7" M/M Pack of 30

Jumper Wires Standard 7" M/M Pack of 30

In stock PRT-11026

If you need to knock up a quick prototype there's nothing like having a pile of jumper wires to speed things up, and let's fa…

4.95
Resistor 330 Ohm 1/6 Watt PTH - 20 pack

Resistor 330 Ohm 1/6 Watt PTH - 20 pack

In stock COM-11507

1/6 Watt, +/- 5% tolerance PTH resistors. Commonly used in breadboards and perf boards, these 330Ohm resistors make excellent…

0.95
Diode Small Signal - 1N4148

Diode Small Signal - 1N4148

In stock COM-08588

This is a very common signal diode - 1N4148. Use this for signals up to 200mA of current. If you need a bunch of these, you…

0.15
Hobby Motor - Gear

Hobby Motor - Gear

In stock ROB-11696

This is our new Hobby Motor now with a 6mm, 10 tooth, gear to make your basic projects a little simpler to manage. It works w…

1.95

Suggested Reading

Before continuing on with this tutorial, we recommend you be somewhat familiar with the concepts in these tutorials:

How to Use a Breadboard

May 14, 2013

Welcome to the wonderful world of breadboards. Here we will learn what a breadboard is and how to use one to build your very first circuit.

Diodes

May 9, 2013

A diode primer! Diode properties, types of diodes, and diode applications.

Galileo Getting Started Guide

January 23, 2014

An introduction to the Arduino/Intel Galileo, and how to begin using the nifty x86, 400MHz Arduino.

Transistors

July 1, 2014

A crash course in bi-polar junction transistors. Learn how transistors work and in which circuits we use them.

If you are following along with the SIK Galileo tutorials, it is helpful to view the tutorials before this one:

Hardware Hookup

Ready to start hooking everything up? Check out the Fritzing diagram below, to see how everything is connected. Pay special attention to the component’s markings indicating how to place it on the breadboard. Polarized components can only be connected to a circuit in one direction.

Please note: When you’re building the circuit be careful not to mix up the transistor and the temperature sensor, they’re almost identical. Look for “P2N2222A” on the body of the transistor.

Fritzing Diagram

Fritzing Motor Image

Having a hard time seeing the circuit? Click on the Fritzing diagram to see a bigger image.

Code To Note

while (Serial.available() > 0)

The Galileo’s serial port can be used to receive as well as send data. Because data could arrive at any time, the Galileostores, or “buffers” data coming into the port until you’re ready to use it. The Serial.available() command returns the number of characters that the port has received, but haven’t been used by your sketch yet. Zero means no data has arrived.

speed = Serial.parseInt();

If the port has data waiting for you, there are a number of ways for you to use it. Since we’re typing numbers into the port, we can use the handy Serial.parseInt() command to extract, or “parse” integer numbers from the characters it’s received. If you type “1” “0” “0” to the port, this function will return the number 100.

Copy and paste the following code into the Arduino IDE. Hit upload and see what happens!

language:cpp
/*
SparkFun Inventor's Kit Galileo
Example sketch 12

SPINNING A MOTOR

  Use a transistor to spin a motor at different speeds.
  We'll also show you how to input data from the serial port
  (see the serialSpeed() function below).

  Motors are the basis for thousands of things in our daily lives,
  and the Arduino can control them. Here we'll use pulse-width
  modulation (PWM) to vary the speed of a motor.

  The Arduino pins are strong enough to light small LEDs (up to
  40 milliAmps), but they're not strong enough to run motors and
  other power-hungry parts. (This motor needs 50-100mA).
  Because the motor needs more current than an Arduino pin can
  provide, we'll use a transistor to do the heavy lifting.
  A transistor is a solid-state switch. When we give it a small
  amount of current, it can switch a much larger current.
  The transistors in your kit (2N2222) can switch up to 200mA.

  You can turn a transistor on and off using the digitalWrite()
  function, but you can also use the analogWrite() function to
  vary the speed of the motor. The analogWrite() function pulses
  a pin, varying the width of the pulse from 0% to 100%. We call
  this technique "PWM", for "Pulse-Width Modulation".

  One thing to keep in mind is that when you lower the speed of
  a motor using PWM, you're also reducing the torque (strength)
  of the motor. For PWM values below 50 or so, the motor won't have
  enough torque to start spinning. It will start spinning when you
  raise the speed a bit.

Hardware connections:

  Transistor:

    The transistor has three pins. Looking at the flat side with the
    pins down, the order is COLLECTOR, BASE, EMITTER.

    Connect the black wire on the motor to the
    COLLECTOR pin on the transistor.

    Connect the BASE pin through a 330 Ohm resistor to
    digital pin 9.

    Connect the EMITTER pin to GND.

  Motor:

    You've already connected the black wire on the motor to the
    COLLECTOR pin on the transistor.

    Connect the other (red) wire on the motor to 5V.

  Flyback diode:

    When the motor is spinning and suddenly turned off, the
    magnetic field inside it collapses, generating a voltage spike.
    This can damage the transistor. To prevent this, we use a
    "flyback diode", which diverts the voltage spike "around" the
    transistor.

    Connect the side of the diode with the band (cathode) to 5V
    Connect the other side of the diode (anode) to the black wire
    on the motor.

This sketch was written by SparkFun Electronics,
with lots of help from the Arduino community.
This code is completely free for any use.
Visit http://learn.sparkfun.com/products/2 for SIK information.
Visit http://www.arduino.cc to learn about the Arduino.

Version 2.0 6/2012 MDG
*/

// We'll be controlling the motor from pin 9.
// This must be one of the PWM-capable pins.

const int motorPin = 9;


void setup()
{
  // Set up the motor pin to be an output:

  pinMode(motorPin, OUTPUT);

  // Set up the serial port:

  Serial.begin(9600);
}


void loop()
{
  // Here we've used comments to disable some of the examples.
  // To try different things, uncomment one of the following lines
  // and comment the other ones. See the functions below to learn
  // what they do and how they work.

  // motorOnThenOff();
  // motorOnThenOffWithSpeed();
  // motorAcceleration();
     serialSpeed();
}


// This function turns the motor on and off like the blinking LED.
// Try different values to affect the timing.

void motorOnThenOff()
{
  int onTime = 3000;  // milliseconds to turn the motor on
  int offTime = 3000; // milliseconds to turn the motor off

  digitalWrite(motorPin, HIGH); // turn the motor on (full speed)
  delay(onTime);                // delay for onTime milliseconds
  digitalWrite(motorPin, LOW);  // turn the motor off
  delay(offTime);               // delay for offTime milliseconds
}


// This function alternates between two speeds.
// Try different values to affect the timing and speed.

void motorOnThenOffWithSpeed()
{
  int Speed1 = 200;  // between 0 (stopped) and 255 (full speed)
  int Time1 = 3000;  // milliseconds for speed 1

  int Speed2 = 50;   // between 0 (stopped) and 255 (full speed)
  int Time2 = 3000;  // milliseconds to turn the motor off

  analogWrite(motorPin, Speed1);  // turns the motor On
  delay(Time1);                   // delay for onTime milliseconds
  analogWrite(motorPin, Speed2);  // turns the motor Off
  delay(Time2);                   // delay for offTime milliseconds
}


// This function slowly accelerates the motor to full speed,
// then back down to zero.

void motorAcceleration()
{
  int speed;
  int delayTime = 20; // milliseconds between each speed step

  // accelerate the motor

  for(speed = 0; speed <= 255; speed++)
  {
    analogWrite(motorPin,speed);    // set the new speed
    delay(delayTime);               // delay between speed steps
  }

  // decelerate the motor

  for(speed = 255; speed >= 0; speed--)
  {
    analogWrite(motorPin,speed);    // set the new speed
    delay(delayTime);               // delay between speed steps
  }
}


// This function will let you type a speed into the serial
// monitor window. Open the serial monitor using the magnifying-
// glass icon at the top right of the Arduino window. Then
// type your desired speed into the small text entry bar at the
// top of the window and click "Send" or press return. The motor
// will then operate at that speed. The valid range is 0 to 255.

void serialSpeed()
{
  int speed;

  Serial.println("Type a speed (0-255) into the box above,");
  Serial.println("then click [send] or press [return]");
  Serial.println();  // Print a blank line

  // In order to type out the above message only once,
  // we'll run the rest of this function in an infinite loop:

  while(true)  // "true" is always true, so this will loop forever.
  {
    // First we check to see if incoming data is available:

    while (Serial.available() > 0)
    {
      // If it is, we'll use parseInt() to pull out any numbers:

      speed = Serial.parseInt();

      // Because analogWrite() only works with numbers from
      // 0 to 255, we'll be sure the input is in that range:

      speed = constrain(speed, 0, 255);

      // We'll print out a message to let you know that the
      // number was received:

      Serial.print("Setting speed to ");
      Serial.println(speed);

      // And finally, we'll set the speed of the motor!

      analogWrite(motorPin, speed);
    }
  }
}

What You Should See

The DC Motor should spin if you have assembled the circuit’s components correctly, and also verified/uploaded the correct code. If your circuit is not working check the troubleshooting section.

Galileo Driving Motor

Real World Application:

Radio Controlled (RC) cars use Direct Current (DC) motors to turn the wheels for propulsion.

Troubleshooting

Motor Not Spinning

If you sourced your own transistor, double check with the data sheet that the pinout is compatible with a P2N2222AG (many are reversed).

Still No Luck

If you sourced your own motor, double check that it will work with 5 volts and that it does not draw too much power.

Still Not Working

Sometimes the Galileo will disconnect from the computer. Try un-plugging and then re-plugging it into your USB port.

Resources and Going Further

Ready to continue? Have fun learning about the Galileo and continue along through all the SIK Galileo tutorials.


learn.sparkfun.com |CC BY-SA 3.0 | SparkFun Electronics | Niwot, Colorado

SIK Galileo - Part 13: Using Relays

$
0
0

SIK Galileo - Part 13: Using Relays a learn.sparkfun.com tutorial

Available online at: http://sfe.io/t287

Introduction

In this circuit, we are going to use some of the lessons we learned in Circuit 12 to control a relay. A relay is basically an electrically controlled mechanical switch. Inside that harmless looking plastic box is an electromagnet that, when it gets a jolt of energy, causes a switch to trip. In this circuit, you’ll learn how to control a relay like a pro – giving your Galileo even more powerful abilities!

Parts Needed

You will need 1x relay (SPDT), 2x LED, 2x 330Ω resistor, 1x diode 1N4148, 1x NPN transistor, and 14x jumper wires. If you are following through all of the SIK Galileo tutorials we suggest getting these parts:

Transistor - NPN (P2N2222A)

Transistor - NPN (P2N2222A)

In stock COM-12852

This is the P2N2222A, an NPN silicon BJT (Bipolar Junction Transistor). This little transistor can help in your project by be…

0.5
Jumper Wires Standard 7" M/M Pack of 30

Jumper Wires Standard 7" M/M Pack of 30

In stock PRT-11026

If you need to knock up a quick prototype there's nothing like having a pile of jumper wires to speed things up, and let's fa…

4.95
Resistor 330 Ohm 1/6 Watt PTH - 20 pack

Resistor 330 Ohm 1/6 Watt PTH - 20 pack

In stock COM-11507

1/6 Watt, +/- 5% tolerance PTH resistors. Commonly used in breadboards and perf boards, these 330Ohm resistors make excellent…

0.95
LED - Assorted (20 pack)

LED - Assorted (20 pack)

Out of stock COM-12062

We all know that you can never get too many LEDs. Don't worry, we've got you covered. This is a pack of basic red, yellow, bl…

2.95
Diode Small Signal - 1N4148

Diode Small Signal - 1N4148

In stock COM-08588

This is a very common signal diode - 1N4148. Use this for signals up to 200mA of current. If you need a bunch of these, you…

0.15
Relay SPDT Sealed

Relay SPDT Sealed

In stock COM-00100

These are high quality Single Pole - Double Throw (SPDT) sealed relays. Use them to switch high voltage, and/or high current …

1.95

Suggested Reading

Before continuing on with this tutorial, we recommend you be somewhat familiar with the concepts in these tutorials:

How to Use a Breadboard

May 14, 2013

Welcome to the wonderful world of breadboards. Here we will learn what a breadboard is and how to use one to build your very first circuit.

Switch Basics

May 7, 2013

A tutorial on electronics most over-looked and under-appreciated component. The switch! Explaining the difference between momentary and maintained switches. And what all those acronyms (NO, NC, SPDT, SPST, ...) stand for.

Galileo Getting Started Guide

January 23, 2014

An introduction to the Arduino/Intel Galileo, and how to begin using the nifty x86, 400MHz Arduino.

If you are following along with the SIK Galileo tutorials, it is helpful to view the tutorials before this one:

Hardware Hookup

Ready to start hooking everything up? Check out the Fritzing diagram below, to see how everything is connected. Pay special attention to the component’s markings indicating how to place it on the breadboard. Polarized components can only be connected to a circuit in one direction.

Fritzing Diagram

Fritzing Relay image Galileo

Having a hard time seeing the circuit? Click on the Fritzing diagram to see a bigger image.

Code To Note

digitalWrite(relayPin, HIGH);

When we turn on the transistor, which in turn energizes the relay’s coil, the relay’s switch contacts are closed. This connects the relay’s COM pin to the NO (Normally Open) pin. Whatever you’ve connected using these pins will turn on. (Here we’re using LEDs, but this could be almost anything.)

digitalWrite(relayPin, LOW);

The relay has an additional contact called NC (Normally Closed). The NC pin is connected to the COM pin when the relay is OFF. You can use either pin depending on whether something should be normally on or normally off. You can also use both pins to alternate power to two devices, much like railroad crossing warning lights.

Copy and paste the following code into the Arduino IDE. Hit upload and see what happens!

language:cpp
/*
SparkFun Inventor's Kit Galileo
Example sketch 13

RELAYS

  Use a transistor to drive a relay

  A relay is a electrically-controlled mechanical switch.
  It can control much more voltage and current than an Arduino pin
  (or the transistor included in your kit) can. If you want to use
  the Arduino to control a 120V bulb, coffee maker, or other high-
  power device, a relay is an excellent way to do that. Because
  the relay needs more power to switch than an Arduino pin can
  provide, we'll use a transistor to drive the relay in exactly
  the same way we used a transistor to drive a motor in circuit 12.

  A relay consists of a coil of wire, and switch contacts. When
  you apply power to the coil, it becomes magnetized, and pulls
  the switch contacts closed. Since the switch contacts are
  completely isolated from the Arduino, you can safely use a
  relay to control normally dangerous voltages (but please only do
  this if you already know how to safely work with high voltage!).

  The relay has three contact pins, COM (common), NC (Normally
  Closed), and NO (Normally Open). When the relay is turned off,
  the COM pin is connected to the NC (Normally Closed) pin. When
  the relay is turned on, the COM pin is connected to the NO
  (Normally Open) pin.

  This code is very simple - it turns the relay on for one second,
  and off for one second, the same as the blink sketch!

Hardware connections:

  Transistor:

    The transistor has three pins. Looking at the flat side with
    the pins down, the order is COLLECTOR, BASE, EMITTER.

    Connect the BASE pin through a 1K resistor to digital pin 2.

    Connect the EMITTER pin to GND.

  Relay coil:

    The relay has pins for a coil (which you use to control the
    relay), and contacts (which you connect to the device you'd
    like to switch). The top or bottom of the relay should have
    a symbol indicating the coil pins.

    Connect one side of the coil to the COLLECTOR pin
    on the transistor.

    Connect other side of the coil to 5V.

  Diode:

    The relay has a coil that you energize to close the switch.
    When you disconnect power from a coil, the coil will generate
    a voltage spike that can damage the transistor. This diode
    protects the transistor from the voltage spike.

    Connect the side of the diode with the band (cathode) to 5V

    Connect the other side of the diode (anode) to the COLLECTOR
    pin of the transistor.

  Relay contacts and LEDs:

    We'll use the relay contacts to turn LEDs on and off, but you
    can use them to switch almost anything on and off.

    Connect the COMMON side of the switch to a 330 Ohm resistor.
    Connect the other side of the above resistor to 5V.

    Connect the NC (Normally Closed) side of the switch to the
    positive (longer) leg of LED 1.

    Connect the NO (Normally Open) side of the switch to the
    positive (longer) leg of LED 2.

    Connect the negative sides (shorter leg) of both LEDs to GND.

This sketch was written by SparkFun Electronics,
with lots of help from the Arduino community.
This code is completely free for any use.
Visit http://learn.sparkfun.com/products/2 for SIK information.
Visit http://www.arduino.cc to learn about the Arduino.

Version 2.0 6/2012 MDG
*/


const int relayPin = 2;     // use this pin to drive the transistor
const int timeDelay = 1000; // delay in ms for on and off phases

// You can make timeDelay shorter, but note that relays, being
// mechanical devices, will wear out quickly if you try to drive
// them too fast.


void setup()
{
  pinMode(relayPin, OUTPUT);  // set pin as an output
}


void loop()
{
  digitalWrite(relayPin, HIGH);  // turn the relay on

  delay(timeDelay);              // wait for one second

  digitalWrite(relayPin, LOW);   // turn the relay off

  delay(timeDelay);              // wait for one second
}

What You Should See

You should be able to hear the relay contacts click, and see the two LEDs alternate illuminating at 1-second intervals. If you don’t, double-check that you have assembled the circuit correctly, and uploaded the correct sketch to the board. Also, see the troubleshooting section.

Galileo Relay

Real World Application:

Garage door openers use relays to operate. You might be able to hear the clicking if you listen closely.

Troubleshooting

LEDs Not Lighting

Double-check that you’ve plugged them in correctly. The longer lead (and non-flat edge of the plastic flange) is the positive lead.

No Clicking Sound

The transistor or coil portion of the circuit isn’t quite working. Check the transistor is plugged in the right way.

Not Quite Working

The included relays are designed to be soldered rather than used in a breadboard. As such you may need to press it in to ensure it works (and it may pop out occasionally).

When you’re building the circuit be careful not to mix up the temperature sensor and the transistor, they’re almost identical.

Resources and Going Further

Ready to continue? Have fun learning about the Galileo and continue along through all the SIK Galileo tutorials.


learn.sparkfun.com |CC BY-SA 3.0 | SparkFun Electronics | Niwot, Colorado

SIK Galileo - Part 14: Using a Shift Register

$
0
0

SIK Galileo - Part 14: Using a Shift Register a learn.sparkfun.com tutorial

Available online at: http://sfe.io/t288

Introduction

Now we are going to step into the world of ICs (integrated circuits). In this circuit, you’ll learn all about using a shift register (also called a serial-to-parallel converter). The shift register will give your Galileo an additional eight outputs, using only three pins on your board. For this circuit, you’ll practice by using the shift register to control eight LEDs.

Parts Needed

You will need 1x shift register 8-Bit - 74HC595, 8x LED, 8x 330Ω resistor, and 19x jumper wires. If you are following through all of the SIK Galileo tutorials we suggest getting these parts:

Jumper Wires Standard 7" M/M Pack of 30

Jumper Wires Standard 7" M/M Pack of 30

In stock PRT-11026

If you need to knock up a quick prototype there's nothing like having a pile of jumper wires to speed things up, and let's fa…

4.95
Resistor 330 Ohm 1/6 Watt PTH - 20 pack

Resistor 330 Ohm 1/6 Watt PTH - 20 pack

In stock COM-11507

1/6 Watt, +/- 5% tolerance PTH resistors. Commonly used in breadboards and perf boards, these 330Ohm resistors make excellent…

0.95
LED - Assorted (20 pack)

LED - Assorted (20 pack)

Out of stock COM-12062

We all know that you can never get too many LEDs. Don't worry, we've got you covered. This is a pack of basic red, yellow, bl…

2.95
Shift Register 8-Bit - 74HC595

Shift Register 8-Bit - 74HC595

In stock COM-00733

Simple shift register IC. Clock in data and latch it to free up IO pins on your micro. Check out this [tutorial](http://dln…

1.5

Suggested Reading

Before continuing on with this tutorial, we recommend you be somewhat familiar with the concepts in these tutorials:

How to Use a Breadboard

May 14, 2013

Welcome to the wonderful world of breadboards. Here we will learn what a breadboard is and how to use one to build your very first circuit.

Shift Registers

August 23, 2013

An introduction to shift registers and potential uses.

Integrated Circuits

July 15, 2013

An introduction to integrated circuits (ICs). Electronics' ubiquitous black chips. Includes a focus on the variety of IC packages.

Galileo Getting Started Guide

January 23, 2014

An introduction to the Arduino/Intel Galileo, and how to begin using the nifty x86, 400MHz Arduino.

If you are following along with the SIK Galileo tutorials, it is helpful to view the tutorials before this one:

Hardware Hookup

Ready to start hooking everything up? Check out the Fritzing diagram below, to see how everything is connected. Pay special attention to the component’s markings indicating how to place it on the breadboard. Polarized components can only be connected to a circuit in one direction.

For the shift register, align notch on top, in-between “e1” and “f1” on the breadboard. The notch indicates where pin 1 is.

Fritzing Diagram

Fritzing Shift Register Galileo

Having a hard time seeing the circuit? Click on the Fritzing diagram to see a bigger image.

Code To Note

shiftOut(datapin, clockpin, MSBFIRST, data);

You’ll communicate with the shift register (and a lot of other parts) using an interface called SPI, or Serial Peripheral Interface. This interface uses a data line and a separate clock line that work together to move data in or out of the Galileo at high speed. The MSBFIRST parameter specifies the order in which to send the individual bits, in this case we’re sending the Most Significant Bit first.

bitWrite(data, desiredPin, desiredState);

Bits are the smallest possible piece of memory in a computer; each one can store either a “1” or a “0”. Larger numbers are stored as arrays of bits. Sometimes we want to manipulate these bits directly, for example now when we’re sending eight bits to the shift register and we want to make them 1 or 0 to turn the LEDs on or off. The Galileo has several commands, such as bitWrite(), that make this easy to do.

Copy and paste the following code into the Arduino IDE. Hit upload and see what happens!

language:cpp
/*
SparkFun Inventor's Kit Galileo
Example sketch 13

SHIFT REGISTER

  Use a shift register to turn three pins into eight (or more!)
  outputs

  An integrated circuit ("IC"), or "chip", is a self-contained
  circuit built into a small plastic package. (If you look closely
  at your Arduino board you'll see a number of ICs.) There are
  thousands of different types of ICs available that you can use
  to perform many useful functions.

  The 74HC595 shift register in your kit is an IC that has eight
  digital outputs. To use these outputs, we'll use a new interface
  called SPI (Serial Peripheral Interface). It's like the TX and
  RX you're used to, but has an additional "clock" line that
  controls the speed of the data transfer. Many parts use SPI
  for communications, so the Arduino offers simple commands called
  shiftIn() and shiftOut() to access these parts.

  This IC lets you use three digital pins on your Arduino to
  control eight digital outputs on the chip. And if you need
  even more outputs, you can daisy-chain multiple shift registers
  together, allowing an almost unlimited number of outputs from
  the same three Arduino pins! See the shift register datasheet
  for details:

  http://www.sparkfun.com/datasheets/IC/SN74HC595.pdf

Hardware connections:

  Shift register:

    Plug in the chip so it bridges the center "canyon"
    on the breadboard.

    The shift register has 16 pins. They are numbered
    counterclockwise starting at the pin 1 mark (notch
    in the end of the chip). See the datasheet above
    for a diagram.

    74HC595 pin     LED pin     Arduino pin

    1  (QB)     LED 2 +
    2  (QC)     LED 3 +
    3  (QD)     LED 4 +
    4  (QE)     LED 5 +
    5  (QF)     LED 6 +
    6  (QG)     LED 7 +
    7  (QH)     LED 8 +
    8  (GND)                GND

    9  (QH*)
    10 (SRCLR*)             5V
    11 (SRCLK)              Digital 3
    12 (RCLK)               Digital 4
    13 (OE*)                GND
    14 (SER)                Digital 2
    15 (QA)     LED 1 +
    16 (VCC)                5V

  LEDs:

    After making the above connections to the positive (longer)
    legs of the LEDs, connect the negative side (short lead) of
    each LED to a 330 Ohm resistor, and connect the other side
    of each resistor to GND.

This sketch was written by SparkFun Electronics,
with lots of help from the Arduino community.
This code is completely free for any use.
Visit http://learn.sparkfun.com/products/2 for SIK information.
Visit http://www.arduino.cc to learn about the Arduino.

Version 2.0 6/2012 MDG
*/


// Pin definitions:
// The 74HC595 uses a type of serial connection called SPI
// (Serial Peripheral Interface) that requires three pins:

int datapin = 2;
int clockpin = 3;
int latchpin = 4;

// We'll also declare a global variable for the data we're
// sending to the shift register:

byte data = 0;


void setup()
{
  // Set the three SPI pins to be outputs:

  pinMode(datapin, OUTPUT);
  pinMode(clockpin, OUTPUT);
  pinMode(latchpin, OUTPUT);
}


void loop()
{
  // We're going to use the same functions we played with back
  // in circuit 04, "Multiple LEDs", we've just replaced
  // digitalWrite() with a new function called shiftWrite()
  // (see below). We also have a new function that demonstrates
  // binary counting.

  // To try the different functions below, uncomment the one
  // you want to run, and comment out the remaining ones to
  // disable them from running.

  oneAfterAnother();      // All on, all off

  //oneOnAtATime();       // Scroll down the line

  //pingPong();           // Like above, but back and forth

  //randomLED();          // Blink random LEDs

  //marquee();

  //binaryCount();        // Bit patterns from 0 to 255
}


void shiftWrite(int desiredPin, boolean desiredState)

// This function lets you make the shift register outputs
// HIGH or LOW in exactly the same way that you use digitalWrite().

// Like digitalWrite(), this function takes two parameters:

//    "desiredPin" is the shift register output pin
//    you want to affect (0-7)

//    "desiredState" is whether you want that output
//    to be HIGH or LOW

// Inside the Arduino, numbers are stored as arrays of "bits",
// each of which is a single 1 or 0 value. Because a "byte" type
// is also eight bits, we'll use a byte (which we named "data"
// at the top of this sketch) to send data to the shift register.
// If a bit in the byte is "1", the output will be HIGH. If the bit
// is "0", the output will be LOW.

// To turn the individual bits in "data" on and off, we'll use
// a new Arduino commands called bitWrite(), which can make
// individual bits in a number 1 or 0.
{
  // First we'll alter the global variable "data", changing the
  // desired bit to 1 or 0:

  bitWrite(data,desiredPin,desiredState);

  // Now we'll actually send that data to the shift register.
  // The shiftOut() function does all the hard work of
  // manipulating the data and clock pins to move the data
  // into the shift register:

  shiftOut(datapin, clockpin, MSBFIRST, data);

  // Once the data is in the shift register, we still need to
  // make it appear at the outputs. We'll toggle the state of
  // the latchPin, which will signal the shift register to "latch"
  // the data to the outputs. (Latch activates on the high-to
  // -low transition).

  digitalWrite(latchpin, HIGH);
  digitalWrite(latchpin, LOW);
}


/*
oneAfterAnother()

This function will light one LED, delay for delayTime, then light
the next LED, and repeat until all the LEDs are on. It will then
turn them off in the reverse order.
*/

void oneAfterAnother()
{
  int index;
  int delayTime = 100; // Time (milliseconds) to pause between LEDs
                       // Make this smaller for faster switching

  // Turn all the LEDs on:

  // This for() loop will step index from 0 to 7
  // (putting "++" after a variable means add one to it)
  // and will then use digitalWrite() to turn that LED on.

  for(index = 0; index <= 7; index++)
  {
    shiftWrite(index, HIGH);
    delay(delayTime);
  }

  // Turn all the LEDs off:

  // This for() loop will step index from 7 to 0
  // (putting "--" after a variable means subtract one from it)
  // and will then use digitalWrite() to turn that LED off.

  for(index = 7; index >= 0; index--)
  {
    shiftWrite(index, LOW);
    delay(delayTime);
  }
}


/*
oneOnAtATime()

This function will step through the LEDs, lighting one at at time.
*/

void oneOnAtATime()
{
  int index;
  int delayTime = 100; // Time (milliseconds) to pause between LEDs
                       // Make this smaller for faster switching

  // step through the LEDs, from 0 to 7

  for(index = 0; index <= 7; index++)
  {
    shiftWrite(index, HIGH);    // turn LED on
    delay(delayTime);       // pause to slow down the sequence
    shiftWrite(index, LOW); // turn LED off
  }
}


/*
pingPong()

This function will step through the LEDs, lighting one at at time,
in both directions.
*/

void pingPong()
{
  int index;
  int delayTime = 100; // time (milliseconds) to pause between LEDs
                       // make this smaller for faster switching

  // step through the LEDs, from 0 to 7

  for(index = 0; index <= 7; index++)
  {
    shiftWrite(index, HIGH);    // turn LED on
    delay(delayTime);       // pause to slow down the sequence
    shiftWrite(index, LOW); // turn LED off
  }

  // step through the LEDs, from 7 to 0

  for(index = 7; index >= 0; index--)
  {
    shiftWrite(index, HIGH);    // turn LED on
    delay(delayTime);       // pause to slow down the sequence
    shiftWrite(index, LOW); // turn LED off
  }
}


/*
randomLED()

This function will turn on random LEDs. Can you modify it so it
also lights them for random times?
*/

void randomLED()
{
  int index;
  int delayTime = 100; // time (milliseconds) to pause between LEDs
                       // make this smaller for faster switching

  // The random() function will return a semi-random number each
  // time it is called. See http://arduino.cc/en/Reference/Random
  // for tips on how to make random() more random.

  index = random(8);    // pick a random number between 0 and 7

  shiftWrite(index, HIGH);  // turn LED on
  delay(delayTime);     // pause to slow down the sequence
  shiftWrite(index, LOW);   // turn LED off
}


/*
marquee()

This function will mimic "chase lights" like those around signs.
*/

void marquee()
{
  int index;
  int delayTime = 200; // Time (milliseconds) to pause between LEDs
                       // Make this smaller for faster switching

  // Step through the first four LEDs
  // (We'll light up one in the lower 4 and one in the upper 4)

  for(index = 0; index <= 3; index++)
  {
    shiftWrite(index, HIGH);    // Turn a LED on
    shiftWrite(index+4, HIGH);  // Skip four, and turn that LED on
    delay(delayTime);       // Pause to slow down the sequence
    shiftWrite(index, LOW); // Turn both LEDs off
    shiftWrite(index+4, LOW);
  }
}


/*
binaryCount()

Numbers are stored internally in the Arduino as arrays of "bits",
each of which is a 1 or 0. Just like the base-10 numbers we use
every day, The position of the bit affects the magnitude of its
contribution to the total number:

Bit position   Contribution
0              1
1              2
2              4
3              8
4              16
5              32
6              64
7              128

To build any number from 0 to 255 from the above 8 bits, just
select the contributions you need to make. The bits will then be
1 if you use that contribution, and 0 if you don't.

This function will increment the "data" variable from 0 to 255
and repeat. When we send this value to the shift register and LEDs,
you can see the on-off pattern of the eight bits that make up the
byte. See http://www.arduino.cc/playground/Code/BitMath for more
information on binary numbers.
*/

void binaryCount()
{
  int delayTime = 1000; // time (milliseconds) to pause between LEDs
                        // make this smaller for faster switching

  // Send the data byte to the shift register:

  shiftOut(datapin, clockpin, MSBFIRST, data);

  // Toggle the latch pin to make the data appear at the outputs:

  digitalWrite(latchpin, HIGH);
  digitalWrite(latchpin, LOW);

  // Add one to data, and repeat!
  // (Because a byte type can only store numbers from 0 to 255,
  // if we add more than that, it will "roll around" back to 0
  // and start over).

  data++;

  // Delay so you can see what's going on:

  delay(delayTime);
}

What You Should See

You should see the LEDs light up similarly to SIK Galileo - Part 4 (but this time, you’re using a shift register). If they aren’t, make sure you have assembled the circuit correctly and verified and uploaded the code to your board. See the troubleshooting section.

Galileo shift register

Real World Application:

Similar to SIK Galileo - Part 4, a scrolling marquee display delivers a message with multiple LEDs. Essentially the same task the shift register achieves here in SIK Galileo - Part 14.

Troubleshooting

The Galileo’s power LED goes out

This happened to us a couple of times, it happens when the chip is inserted backward. If you fix it quickly nothing will break.

Not Quite Working

Sorry to sound like a broken record but it is probably something as simple as a crossed wire.

Frustration

Shoot us an e-mail, this circuit is both simple and complex at the same time. We want to hear about problems you have so we can address them in future editions: techsupport@sparkfun.com

Resources and Going Further

Ready to continue? Have fun learning about the Galileo and continue along through all the SIK Galileo tutorials.


learn.sparkfun.com |CC BY-SA 3.0 | SparkFun Electronics | Niwot, Colorado


SIK Galileo - Part 15: Using an LCD

$
0
0

SIK Galileo - Part 15: Using an LCD a learn.sparkfun.com tutorial

Available online at: http://sfe.io/t289

Introduction

In this circuit, you’ll learn about how to use an LCD. An LCD, or liquid crystal display, is a simple screen that can display commands, bits of information, or readings from your sensor - all depending on how you program your board. In this circuit, you’ll learn the basics of incorporating an LCD into your project.

Parts Needed

You will need 1x potentiometer, 1x LCD, and 16x jumper wires. If you are following through all of the SIK Galileo tutorials we suggest getting these parts:

Trimpot 10K with Knob

Trimpot 10K with Knob

In stock COM-09806

There are lots of trimpots out there. Some are very large, some so small they require a screwdriver. Here at SparkFun, we jus…

0.95
Jumper Wires Standard 7" M/M Pack of 30

Jumper Wires Standard 7" M/M Pack of 30

In stock PRT-11026

If you need to knock up a quick prototype there's nothing like having a pile of jumper wires to speed things up, and let's fa…

4.95
Basic 16x2 Character LCD - White on Black 5V

Basic 16x2 Character LCD - White on Black 5V

In stock LCD-00709

This is a basic 16 character by 2 line display with a snazzy black background with white characters. Utilizes the extremely c…

15.95

Suggested Reading

Before continuing on with this tutorial, we recommend you be somewhat familiar with the concepts in these tutorials:

How to Use a Breadboard

May 14, 2013

Welcome to the wonderful world of breadboards. Here we will learn what a breadboard is and how to use one to build your very first circuit.

Galileo Getting Started Guide

January 23, 2014

An introduction to the Arduino/Intel Galileo, and how to begin using the nifty x86, 400MHz Arduino.

If you are following along with the SIK Galileo tutorials, it is helpful to view the tutorials before this one:

Hardware Hookup

Ready to start hooking everything up? Check out the Fritzing diagram below, to see how everything is connected. Pay special attention to the component’s markings indicating how to place it on the breadboard. Polarized components can only be connected to a circuit in one direction.

Fritzing Diagram

Fritzing LCD Galileo

Having a hard time seeing the circuit? Click on the Fritzing diagram to see a bigger image.

Code To Note

#include <LiquidCrystal.h>

This bit of code tells your Arduino IDE to include the library for a simple LCD display. Without it, none of the commands will work, so make sure you include it!

lcd.print(“hello, world!”);

This is the first time you’ll fire something up on your screen. You may need to adjust the contrast to make it visible. Twist the potentiometer until you can clearly see the text!

Copy and paste the following code into the Arduino IDE. Hit upload and see what happens!

language:cpp
/*
SparkFun Inventor's Kit Galileo
Example sketch 15

LIQUID CRYSTAL DISPLAY (LCD)

  A Liquid Crystal Display (LCD) is a sophisticated module
  that can be used to display text or numeric data. The display
  included in your SIK features two lines of 16 characters, and
  a backlight so it can be used at night.

  If you've been using the Serial Monitor to output data,
  you'll find that a LCD provides many of the same benefits
  without needing to drag a large computer around.

  This sketch will show you how to connect an LCD to your Arduino
  and display any data you wish.

Hardware connections:

  The LCD has a 16-pin male header attached to it along the top
  edge. Pin 1 is the pin closest to the corner of the LCD.
  Pin 16 is the pin closest to the center of the LCD.

  Plug the LCD into your breadboard.

  As usual, you will want to connect the + and - power rails
  on the side of the breadboard to 5V and GND on your Arduino.

  Plug your 10K potentiometer into three unused rows on your
  breadboard. Connect one side of the potentiometer to 5V,
  and the other side to GND (it doesn't matter which). When you
  run this sketch, you'll use the potentiometer to adjust the
  contrast of the LCD so you can see the display.

  Now connect the LCD pins. Remember that pin 1 on the LCD
  is the one closest to the corner. Start there and work your
  way up.

  1 to GND
  2 to 5V
  3 to the center pin on the potentiometer
  4 to Galileo digital pin 12
  5 to GND
  6 to Galileo  digital pin 11
  7 (no connection)
  8 (no connection)
  9 (no connection)
  10 (no connection)
  11 to Galileo  digital pin 5
  12 to Galileo  digital pin 4
  13 to Galileo  digital pin 3
  14 to Galileo  digital pin 2
  15 to 5V
  16 to GND

  Once everything is connected, load this sketch into the
  Galileo, and adjust the potentiometer until the display
  is clear.

Library

  The LCD has a chip built into it that controls all the
  individual dots that make up the display, and obeys commands
  sent to it by the the Arduino. The chip knows the dot patterns
  that make up all the text characters, saving you a lot of work.

  To communicate with this chip, we'll use the LiquidCrystal
  library, which is one of the standard libraries that comes
  with the Arduino. This library does most of the hard work
  of interfacing to the LCD; all you need to pick a location
  on the display and send your data!

Tips

  The LCD comes with a protective film over the display that
  you can peel off (but be careful of the display surface as
  it scratches easily).

  The LCD has a backlight that will light up when you turn on
  your Arduino. If the backlight doesn't turn on, check your
  connections.

  As we said above, the potentiometer adjusts the contrast of
  the display. If you can't see anything when you run the sketch,
  turn the potentiometer's knob until the text is clear.

This sketch was written by SparkFun Electronics,
with lots of help from the Arduino community.
This code is completely free for any use.
Visit http://learn.sparkfun.com/products/2 for SIK information.
Visit http://www.arduino.cc to learn about the Arduino.

Version 1.0 2/2013 MDG
*/

// Load the LiquidCrystal library, which will give us
// commands to interface to the LCD:

#include <LiquidCrystal.h>

// Initialize the library with the pins we're using.
// (Note that you can use different pins if needed.)
// See http://arduino.cc/en/Reference/LiquidCrystal
// for more information:

LiquidCrystal lcd(12,11,5,4,3,2);

void setup()
{
  // The LiquidCrystal library can be used with many different
  // LCD sizes. We're using one that's 2 lines of 16 characters,
  // so we'll inform the library of that:

  lcd.begin(16, 2);

  // Data sent to the display will stay there until it's
  // overwritten or power is removed. This can be a problem
  // when you upload a new sketch to the Arduino but old data
  // remains on the display. Let's clear the LCD using the
  // clear() command from the LiquidCrystal library:

  lcd.clear();

  // Now we'll display a message on the LCD!

  // Just as with the Arduino IDE, there's a cursor that
  // determines where the data you type will appear. By default,
  // this cursor is invisible, though you can make it visible
  // with other library commands if you wish.

  // When the display powers up, the invisible cursor starts
  // on the top row and first column.

  lcd.print("hello, world!");

  // Adjusting the contrast (IMPORTANT!)

  // When you run the sketch for the first time, there's a
  // very good chance you won't see anything on the LCD display.
  // This is because the contrast likely won't be set correctly.
  // Don't worry, it's easy to set, and once you set it you won't
  // need to change it again.

  // Run the sketch, then turn the potentiometer until you can
  // clearly see the "hello, world!" text. If you still can't
  // see anything, check all of your connections, and ensure that
  // the sketch was successfully uploaded to the Arduino.
}

void loop()
{
  // You can move the invisible cursor to any location on the
  // LCD before sending data. Counting starts from 0, so the top
  // line is line 0 and the bottom line is line 1. Columns range
  // from 0 on the left side, to 15 on the right.

  // In additon to the "hello, world!" printed above, let's
  // display a running count of the seconds since the Arduino
  // was last reset. Note that the data you send to the display
  // will stay there unless you erase it by overwriting it or
  // sending a lcd.clear() command.

  // Here we'll set the invisible cursor to the first column
  // (column 0) of the second line (line 1):

  lcd.setCursor(0,1);

  // Now we'll print the number of seconds (millis() / 1000)
  // since the Arduino last reset:

  lcd.print(millis()/1000);

  // TIP: Since the numeric data we're sending is always growing
  // in length, new values will always overwrite the previous ones.
  // However, if you want to display varying or decreasing numbers
  // like a countdown, you'll find that the display will leave
  // "orphan" characters when the new value is shorter than the
  // old one.

  // To prevent this, you'll need to erase the old number before
  // writing the new one. You can do this by overwriting the
  // last number with spaces. If you erase the old number and
  // immediately write the new one, the momentary erase won't
  // be noticeable. Here's a typical sequence of code:

  // lcd.setCursor(0,1);   // Set the cursor to the position
  // lcd.print(""); // Erase the largest possible number
  // lcd.setCursor(0,1);   // Reset the cursor to the original position
  // lcd.print(millis()/1000); // Print our value

  // NEXT STEPS:

  // Now you know the basics of hooking up an LCD to the Arduino,
  // and sending text and numeric data to the display!

  // The LCD library has many commands for turning the
  // cursor on and off, scrolling the screen, etc. See:
  // http://arduino.cc/en/Reference/LiquidCrystal
  // for more information.

  // Arduino also comes with a number of built-in examples
  // showing off the features of the LiquidCrystal library.
  // These are locted in the file/examples/LiquidCrystal menu.

  // Have fun, and let us know what you create!
  // Your friends at SparkFun.
}

What You Should See

Initially, you should see the words “hello, world!” pop up on your LCD. Remember you can adjust the contrast using the potentiometer if you can’t make out the words clearly. If you have any issues, make sure your code is correct and double-check your connections.

Galileo LCD

Real World Application:

LCDs are everywhere! From advanced LCDs like your television, to simple notification screens, this is a very common and useful display!

Troubleshooting

The Screen is Blank or Completely Lit?

Fiddle with the contrast by twisting the potentiometer. If it’s incorrectly adjusted, you won’t be able to read the text.

Not Working At All?

Double check the code, specifically that you include the LCD library.

Screen Is Flickering

Double check your connections to your breadboard and Galileo.

Resources and Going Further

Ready to continue? Have fun learning about the Galileo and continue along with other LCD tutorials!

OLED Display Hookup Guide

October 22, 2013

A simple hookup guide to get you started with the OLED LCD.

Serial Graphic LCD Hookup

December 3, 2013

Learn how to use the Serial Graphic LCD.

Graphic LCD Hookup Guide

November 18, 2013

How to add some flashy graphics to your project with a 84x48 monochrome graphic LCD.

learn.sparkfun.com |CC BY-SA 3.0 | SparkFun Electronics | Niwot, Colorado

Twinkling Trick or Treat Bag

$
0
0

Twinkling Trick or Treat Bag a learn.sparkfun.com tutorial

Available online at: http://sfe.io/t296

Introduction

Get started crafting a twinkling treat bag! Download one of our pre-made designs and attach to your bag using an iron-on transfer. For this tutorial we’ll be using the Haunted House design, but the process is similar for every template.

Trick or Treat Bags

Dark Bags

This tutorial uses the ProtoSnap LilyTwinkle Kit.

ProtoSnap - LilyTwinkle

ProtoSnap - LilyTwinkle

15 available DEV-11590

The ProtoSnap series is a new way to prototype your project without a breadboard. Everything is wired together on a single bo…

19.9500 16.96

Suggested Reading

If you’ve never worked with e-textiles before, you may want to have a look at these other tutorials.

Materials and Tools

Let’s go over all the things you’ll need to sew your project together:

  • Cotton Tote Bag
  • Iron-On Fabric Transfers (check your local craft or hobby store)
  • Inkjet Printer (if using Iron-On Transfers)
  • Felt or Fabric (Black, Yellow, Orange, Gray, and White - depending on your design)
  • Scissors
  • Hot Glue Gun
  • Velcro
  • Insulating material (examples: acrylic/fabric paint, fabric glue, iron-on interfacing, or extra fabric) see Step 7 for more info.

ProtoSnap LilyPad Twinkle Kit Includes:

  • LilyTwinkle Microcontroller
  • 4 White LilyPad LEDs
  • LilyPad Coin Cell Battery Holder (Switched)
  • 3V Coin Cell Battery
  • Bobbin of Conductive Thread
  • Sewing Needles - We recommend you use the smaller needles that come with your kit, the big needles will leave large holes around your stitches when sewing through the iron-on transfer.

alt text


For the graphics in this tutorial, we’ll be using a key that helps explain what is going on at each step:

alt text

Step 1: Prepare Your Canvas

We’ll be translating the circuit from our ProtoSnap LilyTwinkle onto the tote bag. First, choose one of the Halloween designs to transfer onto the bag.


Download House DesignDownload Cat DesignDownload Bat DesignDownload Ghost Design

After downloading a design, follow the directions on the package of your iron-on transfers to prepare your print. Tip: do a test print on plain paper before using the transfer paper to make sure your printer’s margins show the whole template.

Let the transfer dry (typically 30 minutes after printing), then cut around the design to remove all the instructional text and info. Place the image on the tote bag and follow the package instructions to iron it on. After ironing, let the transfer cool for a few minutes before peeling the backing away.

While we are waiting for the design to cool off, let’s break apart our LilyTwinkle pieces and fire up the glue gun for the next step. You may need to use snips to break them apart. Remove the battery and set it aside until all the sewing is completed.

alt text

Step 2: Attach Components

Look at your design to identify the outlines where each component is placed. Line up the positive and negative symbols on your components with their matching outline on the tote bag. Then use a little dab of hot glue on the back of the pieces to adhere to the fabric. Be careful not to fill any of the sewing holes with hot glue. If your glue is seeping through the first layer of fabric and accidentally gluing the bag shut, use a piece of cardboard inside the tote while attaching components.

Gluing LilyPad components

alt text

If you’d rather have your battery holder on the inside of the bag than the outside, it will look like this (picture is of finished project):

alt text

Step 3: Sew Power Lines

Double check that all your components are face up and positioned correctly. Thread a needle with ~12 inches of conductive thread and tie a knot at the end.

Stitching Tip: Occasionally check both the front and back of your stitches as you work to make sure you aren’t accidentally sewing the bag closed or tangling the conductive thread inside the bag.

  1. Start by looping 2-3 times through and around the positive pin of the battery holder closest to the LilyTwinkle.alt text
  2. Stitch along the marked line until you reach the positive pin on the LilyTwinkle. Loop 2-3 times and knot it there. Cut off any excess thread.
  3. Repeat this process for the LEDs, following the lines to connect the positive ends to the marked holes on the LilyTwinkle as shown below.

Color KeySewing guide for positive stitches

Differences in Templates:

The other designs group LEDs together in a parallel circuit. The Bat, Cat, and Ghost designs use two LEDS to one pin on the LilyTwinkle so that they light up together. For these LEDs, loop 2-3 times over the first LED in the pair and then continue stitching until you reach the next one, loop 2-3 times around, then tie a knot.

Want to learn more about multiple LED circuits? Check out LDK Experiment 2: Multiple LED Circuits.

alt textalt text
Note: Bat design uses both negative pins on the battery holder instead of one so that the stitching doesn’t accidentally touch the board.

alt text

Step 4: Sew Negative Lines

The negative lines work a little differently - we can connect all of them together with one piece of conductive thread. Make sure you have a really long piece of thread to start with.

Remember to keep checking both the front and back of your stitches to avoid tangles or knots.

  1. With a new piece of thread loop 2-3 times through and around the negative pin of the LilyTwinkle and follow the line to connect it to the negative pin of the battery holder.
  2. Continue sewing up to your first negative pin on LED 1.
  3. Loop through and around it there 2-3 times and continue your trace from right to left. Loop 2-3 times through and around each of the negative pins on LEDs 2-4.
  4. Once you reach the negative pin on LED 4, loop and knot it there. Cut off any excess thread.
  5. Hooray! This completes your sewing.

Color Key

alt text

Step 5: Power It Up

After all the stitching is done, check your design for any loose thread tails or short circuits (threads overlapping where they shouldn’t). If everything looks okay, insert the battery into the battery holder and turn the switch to the ON position. Your design should start twinkling!

Insert battery into battery holder

If your design is not lighting up, you may need to do some troubleshooting. Refer to the E-Textile Basics tutorial for help if you need it.

Now let’s finish decorating our tote by adding some felt shapes to hide the components.

Step 6: Decorate

Time to cover up the electronics so they shine through your design! Use the provided templates to cut shapes out of felt or fabric.

Download House ShapesDownload Cat ShapesDownload Bat ShapesDownload Ghost Shapes

Attaching Velcro

For the shapes covering the battery holder and LilyTwinkle, use velcro to turn them into a flap so you can still access the battery to change it out if needed. You can also cut a small hold right above the switch so that you can turn the bag on/off without needed to lift the flap.

Glue the other shapes over the LEDs to hide them away. Adding a layer of contrasting fabric under the eyes of the ghost and cat designs make for an even spookier look.

Step 7: Insulate

Once the front of your project is decorated, it’s time to insulate the conductive thread so that stitches won’t accidentally touch each other and short circuit when the fabric moves. Isolating conductive thread also protects it from wear and tear and will prolong the life of your project. These methods are shown for the inside of your project, the paint and glue methods also work well on the outside.

Some ways to insulate conductive thread (choose one):

  • Use acrylic or fabric paints to paint over the stitching.
  • Use fabric glue to cover the stitches.
  • Use iron-on interfacing to cover the stitches (on the back of your project) - be careful not to iron directly on any LilyPad components, they could melt.
  • Attach a piece of fabric on the inside of the tote to protect the stitches.

alt text

Example of painted insulation - the orange is the paint and grey is the conductive thread. Tip: Use a paintbrush to paint accurate lines. 3D puff paint in squeezable containers also works well.


alt text

Example of fabric glue insulation - clear fabric glue lets the stitching show through while still protecting it. Tip: Rub a tiny bit of baby powder or flour over the glue if it is still tacky after drying.


alt text

Example of interfacing insulation - cut interfacing to cover stitches only. Tip: Use a craft iron to get into small spaces.


alt text

Example of fabric insulation - glue or stitch over the conductive thread. Tip: Use the backing from your iron-on as a template to trace onto felt/fabric.

Other Insulation Techniques:

Kobakant’s wearables website has a great overview of different insulation/isolation methods: How To Get What You Want: Isolating Traces

Further Reading

Now that you know how to light up the night with LilyTwinkle, you may want to check out some of these other tutorials:


learn.sparkfun.com |CC BY-SA 3.0 | SparkFun Electronics | Niwot, Colorado

FTDI SmartBasic Hookup Guide

$
0
0

FTDI SmartBasic Hookup Guide a learn.sparkfun.com tutorial

Available online at: http://sfe.io/t264

Introduction

SmartBasic Hero Pic

The FTDI SmartBasic is a variation on our classic FTDI Basic which allows you to connect a second device to the hardware serial port on an Arduino Pro, Pro Mini, or other USB-less board without compromising the ability to bootload code from the Arduino IDE.

Normally, to use a device which requires a serial port resource on an Arduino board, one must either use a software serial port or plug and unplug the device during programming. The SmartBasic board adds a multiplexer to the serial port pins coming from the Arduino, which allows the application code to switch the serial signals from the USB port to another device. No special code is required to enable programming, either!

Suggested Reading

Before we get started, you might want to review these other tutorials:

  • Logic levels- Setting the jumper on the FTDI SmartBasic to the wrong voltage level may cause damage to one or more of the boards hooked up to it.
  • Serial communications - The FTDI SmartBasic is a device for multiplexing serial signals; learn a bit more about serial data and how it works with this tutorial.
  • Installing FTDI Drivers

Hardware Tour

The FTDI SmartBasic hardware is pretty simple. It routes the serial signals from an Arduino Pro, Pro Mini, Fio, or LilyPad board (along with any other board which uses the standard FTDI header footprint) either to the programming PC via a USB-to-serial bridge or to any other device with the FTDI Basic-type header. It uses the venerable FT232RL chip used on the [original FTDI Basic boards(https://www.sparkfun.com/search/results?term=ftdi+basic)] and the [TS3USB221A signal multiplexer from TI(http://www.ti.com/product/ts3usb221)] to make connecting to multiple serial devices easy.

The Board

Hardware tour image

The actual board design is fairly compact. We’ve left the headers off, so you can choose the header most appropriate for your application.

The header labeled “CLIENT” is basically the same as the output header on a standard FTDI Basic board. If you connect that header to the Arduino as you would with a normal Basic, you can program the Arduino exactly as you would normally, and never notice a difference.

The benefit comes in with the “HOST” header. That header can be connected to any host-type device (such as another FTDI board, or any of our Bluetooth [Mate(https://www.sparkfun.com/products/12576)] type] boards). You can then wire the !OE and SEL lines to pins on the Arduino to enable the application code to route serial data from the hardware port to either the USB serial bridge or the device connected to the HOST header.

Because of the pull-down resistor on the SEL line, if that pin is left floating, the default destination for the traffic is the USB serial bridge. When in bootloader mode, all non-serial pins will be high impedance inputs, so after the Arduino IDE resets the Arduino board the bootloader and the PC will be able to communicate until the application loaded changes the level of that pin.

The AUX/!USB LED will be lit when the HOST port is selected and off when the data is being routed to the USB serial bridge. There is a solder jumper which can be adjusted to change the voltage on the VCC pins on the two headers (and the IO voltage on the FT232RL chip) from 3.3V to 5V; if that jumper is cleared completely, a supply on one of the two serial headers can be used to power both devices and the VDDIO, should you need a voltage other than 5V or 3.3V.

Connecting the SmartBasic

One of the common problems encountered when developing with a serial-connected Bluetooth dongle is the inadequacy of the Arduino SoftwareSerial library. Transmissions with software serial are resource intensive, blocking the processor for the duration of the transmission. Long receives easily overrun the buffer, and can throw off the internal clocks used for millis() and micros().

Obviously, it’s desirable to use the hardware serial port, if possible, as it bypasses most of these issues. However, connecting anything other than an FTDI-type serial port to the hardware serial port header prevents it being used for loading code unless the other device is removed. Here’s a diagram showing how to connect the FTDI SmartBasic in a way that removes that problem.

Programming hookup diagram

You can see that the connections from the Bluetooth Mate and the Arduino Pro Mini are straight-through; no need to cross wires, so you can plug them right in. Also note the connection of digital I/O pin 2 to the SEL line on the FTDI basic. This is what allows the multiplexing of the serial data: when the board is in bootloader mode, that pin will be a digital input and the SEL line will be pulled low by a pull down resistor on the SmartBasic. That will route the data to the FTDI chip to be sent to the PC, and data from the FTDI chip will be routed to the Pro Mini board, and bootloading of a sketch can occur normally.

Note, as well, that the CTS and DTR pins between the SmartBasic and the Bluetooth Mate are not connected. Since the multiplexer on the SmartBasic only has two channels, only the data channels can be swapped. That’s important, though, because DTR is needed to reset the Arduino at bootload time. If it were being re-routed, that would defeat the purpose of this board.

After the application sketch has loaded, the user can switch between the two data endpoints (the PC and the Bluetooth Mate) by asserting pin 2 high (for the Bluetooth Mate) or low (for the PC). Here’s a simple Arduino sketch showing that in action.

#define SEL 2  // When the SEL pin is held low, the data will be
               //  routed to the PC via the USB-serial bridge.
               //  That port is also the port used for programming
               //  by the Arduino IDE. When in bootloading mode, a
               //  pull-down resistor on the SmartBasic causes it
               //  to remain in programming mode.

#define ARDUINO_IDE   LOW  // Constants to make our routing change
#define AUX_TERMINAL  HIGH //  more obvious. When the SEL pin is
                           //  LOW, data is routed to the
                           //  programming port.

void setup()
{
  Serial.begin(115200);    // Set up the hardware serial port.

  pinMode(SEL, OUTPUT);    // Make the select line an output...
  digitalWrite(SEL, ARDUINO_IDE); // ...and connect the board to
                           //  the Arduino IDE's terminal.
}

void loop()
{
  // The loop just says "Hello" to the two terminals, over and
  //  over, forever. Note the use of the "flush()" function. If
  //  omitted, the Arduino will re-route the serial data before
  //  the transmission has been completed; flush() causes the
  //  Arduino to block until the serial data output buffer is
  //  empty. Failure to use flush() will result in data being
  //  sent to the wrong device, or to multiplexer changes during
  //  transmission which may cause framing errors or data
  //  corruption. *Always put in a flush() before you change
  //  destination devices or disable the output.*
  Serial.flush();
  digitalWrite(SEL, ARDUINO_IDE);
  Serial.println("Hello, Arduino IDE!");

  // Swap to the non-Arduino terminal and say hello.
  Serial.flush();
  digitalWrite(SEL, AUX_TERMINAL);
  Serial.println("Hello, auxilliary terminal!");

  Serial.flush();

  delay(500); // This is a rate-limiter only. The temptation to use
              //  delay() instead of flush() is strong, but fight it.
              //  If you use delay, you will *certainly* make a change
              //  to the code which makes the original delay time too
              //  short for the new serial data stream, resulting in
              //  data corruption. flush() will *always* be the right
              //  length.
}

Finally, I’ve omitted discussion of the OE pin. It can be left unconnected during normal use; however, if for some reason it becomes useful to disconnect the TX and RX pins on the SmartBasic from the target board, that pin can be asserted HIGH, which will put the target-side pins on the multiplexer into a high-impedance mode.

Further Reading


learn.sparkfun.com |CC BY-SA 3.0 | SparkFun Electronics | Niwot, Colorado

Hackers in Residence - Sound and Motion Reactivity for Wearables

$
0
0

Hackers in Residence - Sound and Motion Reactivity for Wearables a learn.sparkfun.com tutorial

Available online at: http://sfe.io/t12

A Dance of Sound, Light and Motion

At SparkFun, I wanted a smarter jacket: a color changing jacket that would react to my surroundings. The concept seemed simple enough. Using sound and motion sensing as an interface I’m able to change colors to merge with the environment. This elevates the need for buttons or switches that might otherwise take our user out of the present moment.

alt text

The finished product.

There are a number of challenges, mainly comfort and control. I find one of the keys to comfort in wearing a lit up garment is having symbiosis with the surrounding environment. However, I needed to distinguish between the high energy atmosphere of a frenetic art opening and otherwise subdued activities like sharing a meal or waiting in line. We often don’t take into account how bright our garments may be to in the eyes of others, and the aim of this project was to tackle this problem. One way to accomplish this synergy with one’s environment is to listen before emoting, or, this this case, sense before lighting too brightly or deploying patterns too quickly.

alt text

A long exposure photo displaying how sounds can be viewed across various frequencies.

I used an accelerometer and microphone to sense the environment and wearers energy level. Rapid changes in acceleration and specifically rotations of the wearer are interpreted as being in an environment where lighting may be a bit brighter and patterns cycle faster.

I used a microphone to sense the ranges and volume of various frequencies. Fairly normal frequencies of human voices and minimal volumes would be interpreted to give a fairly consistent color without much movement. If there were low frequencies and louder volumes, the design assumes music is being played and introduces more colors.

alt text

With little motion or sound, the colored spine appears to reflect the given color rather than emit.

A specific color pallet was chosen to also merge the wearer into their surrounding. A pinkish mid range is in harmony with the rest of the design to blend in during times of inactivity while blues and turquoises become present during repeated audio with more low end. These blues are in direct contrast to the rest of the design and thereby become quite apparent.

Planning it Out

SparkFun’s amazing facilities and warehouse made for the problem of choice. Generally, I choose components based on what is readily available or least costly. Given my unique circumstance, I wanted to choose the very best components to ease the development and optimize for the overall quality of the affect.

alt text

Assembling the Hardware

Here is the hardware I ended up using in the project.


Let’s go over each component in detail.

Battery Power

I love these cell phone boost charger external batteries. Having the charger, boost regulator, battery, and protection circuitry all in one packages saves a ton of time and money. You can always charge your phone from it in a pinch and carrying an extra is easy with this thin design.

Of course I have to include a Wake-on-Shake. I’m starting to put them in all my mobile projects and have all but stop using power switches to turn things off. I’d been having entirely too much fun with these.

Motion

I choose to put a combined accelerometer and gyro on board to detect certain types of motion. Specifically, I wanted to isolate when one is spinning or turning around. I find this could in the future be a compelling control signal. The up and down motion of the body could be an indicator of walking, stillness, running, or dancing.

LEDs

I developed a variety of techniques for mounting LEDs for wearable use. WS2812 LEDs are by far my favorite. By only needing 3 conductors, I can now use the best conductive ribbon to attach them to my jacket. Using this very flexible e-textile spine makes it much more resilient to any movements and folding that a normal garment might undergo.

I cut a small portion out of the data trace of the conductive ribbon under where I’ll solder each LED. This allows the data lines to not be shared by multiple LEDs, so the signal can pass cleanly. I’ve started doing this a lot at Crashspace and even helped with a tutorial if you want to try sewing and wearing these NeoPixel/WS2812 style addressable strip LEDs yourself.

alt text

alt text

I ended up affixing these within a 3d printed led housing It adds some much needed diffusion and allows the LEDs to be unbuttoned should i want to wash the jacket.

alt text

alt text

alt text

I encourage you to go more extreme with your 3d printed led diffusors, if you dare.

Sound

Microphones are fun! Yet, sound reactivity is hard. It is a ton of data to parse through. It takes some serious sophistication to even determine the frequency of incoming sound.

Luckily, there is help. An Arduino can determine what frequencies are present, but I found you don’t get much indication of the volume within each frequency range.

I ended up testing a bunch of microphones (and their pre-amps) to determine which would give me the most fidelity at louder volumes. Using a set of pure data patches I was able to generate tones, read the Arduino’s frequency analysis, and compare.

I found the sound detector performed better overall. I love the added benefits of having the preamp broken out so it is easily tuned and the sound detection portion works very well as an additional sensor.

alt text

alt text

alt text

Mic Test - Pure Data

Performing some Mic tests with Pure Data.

alt text

Graph of all the results using different mic boards.

MSGEQ7 - Graphic Equalizer Display Filter

After digging into the microphone performance and testing the software FFT. I decided a hardware solution would make more sense. The MSGEQ7 did a much better job of analyzing the sound for various frequencies. Also, delegating this responsibility to an external piece of hardware simplifies the code and frees up my Arduino to control the lighting and analyze the motion data.

The circuit for the MSGEQ7 required some components I didn’t readily have on on hand. The Spectrum Shield works very well, but it way too big to wear in any comfortable way. After consulting the eagle files, I decided the best approach it was to cut it down to a more wearable size.

At half the size it still isn’t small, but it matches the size of all my other components and will now layout quite consistently within the collar.

Cutting the Spectrum Shield

Teensy 3.1

The Teensy is nice because you can power and program it directly from USB. This works well to get thing tested and running quickly.

The 5v tolerant inputs of the new Teensy 3.1 are great for the audio part of this project as running my microphone at 5v gets me more range.

Ultimately, I’m happy to run a 3.3v micro to avoid all the voltage level conversion required to interface with most accelerometers.

The 3.3v logic also happens to work well enough for the ws2812/Neopixel LEDs, barely.

alt text

Using any Teensy is a bit more complex to get up and running. You need to add a bunch of configuration, code, and libraries to your Arduino IDE. Luckily there is a great installer available that make this very straight forward for any operating system.

The Teensy has very recently added some audio offerings, which I may utilize to replace the msgeq7 portion of this project.

Software, Integration, and Smoothing

After selecting these components it comes time for some serious code, integration, and smoothing.

EWMA: Exponentially Weighted Moving Average

I hope we’ve all learned what it means to take the average of a given dataset. The average volume wouldn’t be very interesting and certainly not very reactive. By calculating simple average over time of results will converge on a single value. This doesn’t work because even large changes in sound or motion would not even be detected. It can also be a somewhat expensive operation to always be adding to bigger numbers and dividing.

A moving average is a great optimization and it allows you to recalculate each time a new datapoint arrives. This is a great optimization but continues to lack reactivity. I want instant feedback when loud sounds occur.

Exponential weighting really helps maintain this reactivity by weighting new data much more than the past values. This allows for instant feedback upon drastic changes while still avoiding the flicking and flashing experienced from noisy data.

In doing my research I found an EWMA is very often used to analyze financial markets as they need to quickly detect sudden rises and falls without paying too much mind to the minimal changes. This blog post does an excellent job of describing EWMA in detail for our purposes of smoothing.

EWMA Correction

I found a great Arduino library for EWMA and was quickly able to apply this smoothing with different coefficients to my motion axes and sound frequency ranges.

Resources and Going Further

You can learn more by digging through the some of code that integrates these four things (EWMA, MSGEQ7, NeoPixels, and an IMU).

I hope you enjoy the project and comment on what you like.

Many, many special thanks to my SparkFun family for the amazing learning opportunity and hosting me for the all too short residency.

alt text


learn.sparkfun.com |CC BY-SA 3.0 | SparkFun Electronics | Niwot, Colorado

Using AT&T's M2X With the CC3000

$
0
0

Using AT&T's M2X With the CC3000 a learn.sparkfun.com tutorial

Available online at: http://sfe.io/t291

Introduction

M2X is AT&T’s Machine-to-Machine (M2M) cloud solution. You can set up any number of “streams” on https://m2x.att.com/ and post, fetch, delete data from any number of Internet-connected devices.

Great, but what does all that mean? Well, let’s say you have a sensor (temperature, pressure, carbon monoxide, wind speed, etc.), and you want to log all that data to somewhere on the Internet. M2X allows you to post that sensor data and view that data from any computer or smart phone connected to the Internet.

Office temperature logging

Logging the temperature in my office for about 3 hours on M2X

Conversely, we can control a device connected to M2X from anywhere (as long as we have Internet access). While M2X is not explicitly set up to push data to connected devices, we can write a program for the device that polls an M2X stream for data and performs some action based on that data.

Lighting up an LED using M2X

All of this falls under the umbrella of Internet of Things (IOT), in which Internet-connected embedded systems can communicate with Internet services, such as web sites or other connected devices.

In this tutorial, we use a SparkFun RedBoard (an Arduino Uno R3 will work, as well) and a CC3000 Shield to connect to M2X via WiFi. A temperature sensor, level shifter, LED, and resistor will also be needed for the tutorials. The specific components will be covered in each section.

We show how to set up an M2X account, create a stream, post sensor data to that stream, and control an LED from a stream. Keep in mind that these are just starting points for projects; if you want to monitor your oven or control your refrigerator, go for it!

Note: At the time of this tutorial’s publication, M2X is still in beta form. You may find some bugs along the way. Feel free to ask questions or post bugs on the M2X Forums. Also, expect things to change as AT&T improves the M2X service.

Suggested Reading

M2X Setup

In order to use the M2X streams, we need to set up an AT&T M2X account.

Navigate to m2x.att.com.

M2X Site

Click on the “Sign Up” button.

M2X Sign Up

Follow the instructions on the screen to sign up for an account using your GitHub or email. If you use your email, you will need to verify your account through a link in an email from the M2X site.

Once you click on the link, you will be presented with your dashboard and a “Welcome to M2X” pop-up. Feel free to read the welcome messages or click “Skip.”

After you are done with the welcome screen, you will see your dashboard.

M2X Dashboard

Click “Create Data Source Blueprint.” Blueprints are a collection of data sources (streams) that can be multiplied and scaled to handle production data (known as a “batch”).

M2X Blueprint info

You will be asked to give your Blueprint some information. Fill out whatever you like in the Name and Description fields. For now, leave the Visibility at “Private.” Click “Create.” You will be presented with the dashboard for your Blueprint.

M2X Blueprint Dashboard

And that’s it! We created a blueprint, which will hold our data streams for the tutorials. Before we can add data, we need to install a few Arduino libraries.

Install Libraries

In order to use the CC3000 and M2X with Arduino, we need to install a few libraries. Make sure you do not have the Arduino IDE open at this time.

SFE_CC3000

Download the SFE_CC3000_Library from GitHub: https://github.com/sparkfun/SFE_CC3000_Library. You can clone the library or download a ZIP of the whole library here.

If you downloaded the ZIP, extract the folder.

Extract ZIP file

Navigate to <Arduino installation folder>\libraries (e.g. C:\Program Files (x86)\Arduino\libraries in Windows) and create a folder named “SFE_CC3000_Library.”

Create library folder

Navigate back to the downloaded library and copy all of the files inside SFE_CC3000_Library-master/SFE_CC3000_Library-master to <Arduino installation folder>\libraries\SFE_CC3000_Library.

Copy library files

jsonlite

Just like we did with the CC3000 library, clone or download the ZIP file for the jsonlite library. The ZIP can be downloaded here.

If you downloaded the ZIP, extract it.

Create a folder named “jsonlite” in <Arduino installation folder>\libraries. Copy in the contents from the downloaded jsonlite-master\jsonlite-master\amalgamated\jsonlite directory.

Copied jsonlite library files

M2XStreamClient

Clone or download the ZIP file for the m2x-arduino library. The ZIP can be downloaded here.

If you downloaded the ZIP, extract it.

Create a folder named “M2XStreamClient” in <Arduino installation folder>\libraries. Copy in the contents from the downloaded m2x-arduino-master\m2x-arduino-master\M2XStreamClient directory.

Copied m2x-arduino library files

Note: AT&T maintains their own m2x-arduino library, but at the time of this writing, that library did not have a “Delete” function, which is necessary for one of the tutorials. We forked the git repository and added a “Delete” function. If “Delete” is added to the AT&T library, we will update this tutorial to use theirs.

Post Temperature Data

The first logical step in using the M2X service is to create a data stream and post information to it. In this tutorial, we connect a temperature sensor to an Arduino equipped with a CC3000 shield and send temperature readings to our M2X stream. This stream will automatically display the data in an easy-to-read chart for us to look at.

Posting temperature and humidity data to M2X

Required Materials

The Circuit

Connect the CC3000 shield to the Arduino, and connect the level shifter and temperature sensor as shown.

Fritzing of CC3000 with HTU21D

Example Code

Open up the Arduino IDE and paste in the following code:

language:c
/****************************************************************
M2X_CC3000_Post.ino
Post temperature data to AT&T's M2X
Shawn Hymel @ SparkFun Electronics
August 19, 2014

Manually connects to a WiFi network and an M2X stream. Reads
temperature data from an HTU21D temperature and posts it to the
M2X stream.

Change AP_SSID, AP_PASSWORD, AP_SECURITY, FEED_ID, STREAM_NAME,
and M2X_KEY to match your WiFi and M2X parameters.

The security mode is defined by one of the following:
WLAN_SEC_UNSEC, WLAN_SEC_WEP, WLAN_SEC_WPA, WLAN_SEC_WPA2

Resources:
Include SPI.h, SFE_CC3000.h, SFE_CC3000_Client.h, jsonlite.h,
M2XStreamClient.h, Wire.h, HTU21D.h

Development environment specifics:
Written in Arduino 1.0.5
Tested with Arduino UNO R3

This code is beerware; if you see me (or any other SparkFun
employee) at the local, and you've found our code helpful, please
buy us a round!

Distributed as-is; no warranty is given.
****************************************************************/

#include <SPI.h>
#include <SFE_CC3000.h>
#include <SFE_CC3000_Client.h>
#include <jsonlite.h>
#include <M2XStreamClient.h>
#include <Wire.h>
#include <HTU21D.h>

// Parameters
#define POST_DELAY_MS   10000 // Post to stream every 10 seconds
#define DEGREE_SYMBOL   176   // Degree symbol for Serial.write

// Pins
#define CC3000_INT      2   // Needs to be an interrupt pin (D2/D3)
#define CC3000_EN       7   // Can be any digital pin
#define CC3000_CS       10  // Preferred is pin 10 on Uno

// Connection info data lengths
#define IP_ADDR_LEN     4   // Length of IP address in bytes

// WiFi Constants
#define AP_SSID         "<SSID>"      // SSID of network
#define AP_PASSWORD     "<PASSWORD>"  // Password of network
#define AP_SECURITY     WLAN_SEC_WPA2 // Security of network
#define TIMEOUT         30000         // Milliseconds

// M2X Constants
#define FEED_ID         "<FFED ID>"
#define STREAM_NAME     "<STREAM NAME>"
#define M2X_KEY         "<M2X MASTER KEY>"

// Global Variables
SFE_CC3000 wifi = SFE_CC3000(CC3000_INT, CC3000_EN, CC3000_CS);
SFE_CC3000_Client client = SFE_CC3000_Client(wifi);
M2XStreamClient m2x_client(&client, M2X_KEY);
HTU21D sensor;
float temp;
int g_response;

// Setup. Configure HTU21D, WiFi, and M2X.
void setup() {

  g_response = 0;

  // Initialize UART for debugging
  Serial.begin(9600);
  Serial.println();
  Serial.println(F("SparkFun CC3000 - M2X Post"));

  // Initialize HTU21D
  sensor.begin();

  // Initialize CC3000 (configure SPI communications)
  if ( wifi.init() ) {
    Serial.println(F("CC3000 initialization complete"));
  } else {
    Serial.println(F("Something went wrong during CC3000 init!"));
  }

  // Connect using DHCP
  Serial.print(F("Connecting to SSID: "));
  Serial.println(AP_SSID);
  if(wifi.connect(AP_SSID, AP_SECURITY, AP_PASSWORD, TIMEOUT)) {
    Serial.println(F("Connected!"));
  } else {
    Serial.println(F("Error: Could not connect to AP"));
  }
}

// Main loop. Post sensor readings at regular intervals.
void loop() {

  // Read sensor
  temp = sensor.readTemperature();

  // Print reading to console with degree symbol and 'C'
  Serial.print(F("Temperature: "));
  Serial.print(temp, 2);
  Serial.write(176);
  Serial.println("C");

  // Post data to your stream
  g_response = m2x_client.post(FEED_ID, STREAM_NAME, temp);

  // If we fail to receive a response, stop running
  Serial.print(F("Post response: "));
  Serial.println(g_response);
  if ( g_response == -1 ) {
    while(1);
  }

  // Wait to post to stream again
  delay(POST_DELAY_MS);
}

Before you can run the code, you will need to update a few variables:

  • <SSID> should be changed to your WiFi network name (SSID)
  • <PASSWORD> is your WiFi password
  • Make sure AP_SECURITY matches your WiFi security type (e.g. WPA, WEP)
  • Change <FEED ID>, <STREAM NAME>, and <M2X MASTER KEY> to match your M2X stream information (see next section)

Make a Data Stream

Log in to https://m2x.att.com/.

M2X Main Dashboard

Click on the Blueprint that we created (“CC3000 Test”).

M2X Blueprint Dashboard

Click on “Add Stream” and fill out some information about your stream. We call it “temperature.” Under “Units & Symbol,” start typing “Celsius,” and you will be presented with a drop-down list. Select “degree Celsius.”

M2X Add a Stream

Click “Add Stream.” You will be returned to your Blueprint dashboard with a new “temperature” stream added. Click “temperature” to drop down your stream data. There should not be anything in it right now (don’t worry, we are about to add some data!).

m2x new stream with no data

Scroll up on that same page to find your “FEED ID.” Copy that long string and paste it into our M2X_CC3000_Post sketch (replace <FEED ID>).

M2X Feed ID

Replace <STREAM NAME> in our code with the name of the stream (“temperature” in this case).

Back on the M2X site, click “ACCOUNT” to go to your account settings.

M2X Account Page

Click on “MASTER KEYS” to see your M2X Master Key. Copy that string and paste it into your code (replace <M2X MASTER KEY>).

M2X Master Key

Run Your Program

Verify that AP_SSID, AP_PASSWORD, AP_SECURITY, FEED_ID, STREAM_NAME, and M2X_KEY are correct in your code. Click “Upload” and wait for the Arduino IDE to upload the code to your Arduino or RedBoard. Open a Serial Monitor, and you should see temperature data being posted to your M2X stream!

Note: the response should be “204.” If you see “404” or “-1” it means there was an error connecting to your WiFi or to the M2X service. If you see “422” it means that your M2X_KEY, FEED_ID, or STREAM_NAME is incorrect. To learn more about response codes, see the M2X API documentation.

Temperature data logging

Temperature data logged to M2X

Public Data Stream

If you want others to be able to view your data, you can make your Blueprint (and associated streams) public. On the Blueprint dashboard, click the “Edit” button next to your Blueprint name and change the visibility from “Private” to “Public.” Click “Save” and wait a few minutes for this to update (this can take upwards of 15 minutes).

Underneath your Blueprint name on the dashboard, click the link “Preview Public Page URL.” This will take you to a separate page where you can view the streams associated with that Blueprint. If you made your Blueprint public, you can share this URL with anyone.

M2X Public Blueprint

Controlling a Device From M2X

Sending information to M2X is great for logging sensor data, but we can also control hardware devices from M2X. This technique requires a bit of trickery, as there is no way to push data to the Arduino (without turning the Arduino into a web server). So, we have the Arduino poll an M2X stream every few seconds looking for data. If it sees a “0” it will turn off the LED. If it sees any other value, it will turn the LED on. Any time the Arduino reads data from the stream, it immediately deletes all data on the stream.

Circuit for controlling an LED from M2X

Required Materials

The Circuit

Connect the CC3000 shield to the Arduino, and connect the resistor and LED as shown.

Fritzing of the CC3000 with LED

Make M2X Stream

Rather than use our “temperature” stream, we are going to make another stream in the same Blueprint. We will poll this stream from the Arduino, read values, and delete entries as we read them.

Log in to your AT&T M2X account.

Click on your Blueprint (e.g. “CC3000 Test”).

Scroll down, and click on “Add Steam.” Name the stream something memorable (we’ll call ours “control”). Pick any Unit and Symbol (it really does not matter. “Barn” seemed like a silly unit, so we used that).

Add a control stream to your Blueprint

Click “Add Stream.” Don’t add any values! We will add some data later.

Blank control data stream

Adjust Serial Buffer

Sadly, the poor Arduino UNO (i.e. ATmega328P) simply does not have enough RAM to control the CC3000 and process the incoming M2X data. To free up some space in the RAM, we are going to reduce the size of the Serial buffer. Don’t forget to change it back for your other projects!

Navigate to <Arduino installation folder>\hardware\arduino\cores\arduino and open up HardwareSerial.cpp with your favorite text editor.

Note: If you are using a different Arduino with more RAM (e.g. the Arduino Mega), then you don’t need to perform this step.

HardwareSerial.cpp location

Scroll down and change SERIAL_BUFFER_SIZE from 64 to 32.

HardwareSerial change serial buffer size

Example Code

Open up the Arduino IDE and paste in the following code:

language:c
/****************************************************************
M2X_CC3000_LED.ino
Control an LED with AT&T's M2X
Shawn Hymel @ SparkFun Electronics
August 19, 2014

Manually connects to a WiFi network and performs a GET to the
provided M2X stream. It reads the last data point available
and deletes all data points. This acts as a "producer-consumer"
model.

IMPORTANT: This WILL cause an Uno to run out of RAM. You need to
change SERIAL_BUFFER_SIZE from 64 to 32 in HardwareSerial.cpp,
which can be found in:
C:\Program Files (x86)\Arduino\hardware\arduino\cores\arduino

Change AP_SSID, AP_PASSWORD, AP_SECURITY, FEED_ID, STREAM_NAME,
and M2X_KEY to match your WiFi and M2X parameters.

The security mode is defined by one of the following:
WLAN_SEC_UNSEC, WLAN_SEC_WEP, WLAN_SEC_WPA, WLAN_SEC_WPA2

Resources:
Include SPI.h, SFE_CC3000.h, SFE_CC3000_Client.h, jsonlite.h,
M2XStreamClient.h

Development environment specifics:
Written in Arduino 1.0.5
Tested with Arduino UNO R3

This code is beerware; if you see me (or any other SparkFun
employee) at the local, and you've found our code helpful, please
buy us a round!

Distributed as-is; no warranty is given.
****************************************************************/

#include <jsonlite.h>
#include <SPI.h>
#include <SFE_CC3000.h>
#include <SFE_CC3000_Client.h>
#include <M2XStreamClient.h>

// Parameters
#define POLL_DELAY_MS   1000 // Poll M2X stream every 1 second

// Pins
#define CC3000_INT      2    // Needs to be an interrupt pin (D2/D3)
#define CC3000_EN       7    // Can be any digital pin
#define CC3000_CS       10   // Preferred is pin 10 on Uno
#define LED_PIN         9    // LED (we can't use pin 13!)

// Connection info data lengths
#define IP_ADDR_LEN     4    // Length of IP address in bytes
#define TIME_LEN        25   // Length of timestamp string

// WiFi Constants
#define AP_SSID         "<SSID>"      // SSID of network
#define AP_PASSWORD     "<PASSWORD>"  // Password of network
#define AP_SECURITY     WLAN_SEC_WPA2 // Security of network
#define TIMEOUT         30000         // Milliseconds

// M2X Constants
#define FEED_ID         "<FFED ID>"
#define STREAM_NAME     "<STREAM NAME>"
#define M2X_KEY         "<M2X MASTER KEY>"
#define FROM_TIME       "1970-01-01T00:00:00.000Z"

// Global Variables
SFE_CC3000 wifi = SFE_CC3000(CC3000_INT, CC3000_EN, CC3000_CS);
SFE_CC3000_Client client = SFE_CC3000_Client(wifi);
M2XStreamClient m2x_client(&client, M2X_KEY);
uint8_t g_new;
int g_response;
int g_index;
char g_time[TIME_LEN];
uint8_t led_state;

// M2X fetch callback. This is called for each entry found.
void on_data_point_found( const char* at, \
                          const char* value, \
                          int index, \
                          void* context) {

  // Index 0 is the most recent. Save the timestamp so we can
  // delete all the entries up to that point. If the value is
  // exactly 0, turn off the LED. Otherwise, turn it on.
  if ( index == 0 ) {
    g_new = 1;
    strncpy(g_time, at, TIME_LEN);
    if ( strcmp(value, "0") == 0 ) {
      led_state = 0;
    } else {
      led_state = 1;
    }
  }
}

// Setup. Configure WiFi and M2X connections.
void setup() {

  g_response = 0;
  g_new = 0;

  // Initialize LED
  led_state = 0;
  pinMode(LED_PIN, OUTPUT);
  digitalWrite(LED_PIN, LOW);

  // Initialize UART for debugging
  Serial.begin(9600);
  Serial.println();
  Serial.println(F("SparkFun CC3000 - M2X LED"));

  // Initialize CC3000 (configure SPI communications)
  if ( wifi.init() ) {
    Serial.println(F("CC3000 initialization complete"));
  } else {
    Serial.println(F("Something went wrong during CC3000 init!"));
  }

  // Connect using DHCP
  Serial.print(F("Connecting to SSID: "));
  Serial.println(AP_SSID);
  if(wifi.connect(AP_SSID, AP_SECURITY, AP_PASSWORD, TIMEOUT)) {
    Serial.println(F("Connected!"));
  } else {
    Serial.println(F("Error: Could not connect to AP"));
  }
}

// Main loop. Poll M2X stream, update LED, and delete entries.
void loop() {

  // Fetch values from M2X stream
  g_response = m2x_client.fetchValues(FEED_ID, \
                                      STREAM_NAME, \
                                      on_data_point_found, \
                                      NULL);

  // If we fail to receive a reponse, stop running
  Serial.print(F("Fetch response: "));
  Serial.println(g_response);
  if ( g_response == -1 ) {
    while(1);
  }

  // Update LED and delete entries if there was a new value
  if ( g_new ) {

    // Update LED state
    digitalWrite(LED_PIN, led_state);
    Serial.print(F("LED: "));
    Serial.println(led_state);

    // Fetch drops last 4 chars. Add some so we can delete entries.
    strncpy(g_time + 20, "999Z", 5);

    // Delete all entries
    g_response = m2x_client.deleteValues( FEED_ID, \
                                          STREAM_NAME, \
                                          FROM_TIME, \
                                          g_time);

    // If we fail to receive a reponse, stop running
    Serial.print(F("Delete response: "));
    Serial.println(g_response);
    if ( g_response == -1 ) {
      while(1);
    }

    // Reset new flag
    g_new = 0;
  }

  // Wait to poll stream again
  delay(POLL_DELAY_MS);
}

Don’t forget to update the WiFi and M2X stream parameters:

  • <SSID> should be changed to your WiFi network name (SSID)
  • <PASSWORD> is your WiFi password
  • Make sure AP_SECURITY matches your WiFi security type (e.g. WPA, WEP)
  • Change <FEED ID> and <M2X MASTER KEY> to match your M2X information (see the Post Temperature Data example)
  • Change <STREAM NAME> to your new stream name (e.g. “control”)

Run Your Program

Upload your program to the Arduino. Open up a Serial Monitor, and you should see the Arduino connect to WiFi and start to poll your M2X stream.

Arduino and CC3000 connected to M2X control stream

While your Arduino is polling the M2X stream, go back to your M2X Blueprint in your browser and expand our new data stream.

Expanded data stream

Click the “Edit” button and enter a value (anything other than “0”) into the “Log a Value” field.

M2X log a value

Click “Save Stream.” In a few seconds, your Arduino should see that a value was logged to the stream and turn on the LED as a result.

LED on

To turn off the LED, click on “Edit” again for your data stream. This time, set “Log a Value” to 0 and click “Save Stream.” Your LED should turn off within a few seconds.

LED off

So What?

OK, so blinking an LED might seem a little simplistic. However, being able to control a microcontroller from the Internet is a pretty big thing (and will garner the admiration of all your geek friends).

You could write a phone app to control the lights in your house by posting and reading values in M2X. You could remotely start your car, computer, stereo, etc. as long as there is Internet connectivity. The list goes on.

Resources and Going Further

We showed you how to set up an M2X account, connect your Arduino to an M2X stream to post some values, and even how to control an LED from M2X. These examples are really just the first few steps in the Internet of Things world.

Beyond the Tutorial

Resources


learn.sparkfun.com |CC BY-SA 3.0 | SparkFun Electronics | Niwot, Colorado

Viewing all 1123 articles
Browse latest View live


<script src="https://jsc.adskeeper.com/r/s/rssing.com.1596347.js" async> </script>