Introduction
In my quest to design a radio tracking system for my next HAB, I found it very easy to create applications on my computer and interact with embedded hardware over a serial port using the Python programming language. My goal was to have my HAB transmit GPS data (as well as other sensor data) over RF, to a base station, and graphically display position and altitude on a map. My base station is a radio receiver connected to my laptop over a serial to USB connection. However, in this tutorial, instead of using radios, we will use a GPS tethered to your computer over USB, as a proof of concept.
Of course, with an internet connection, I could easily load my waypoints into many different online tools to view my position on a map, but I didn't want to rely on internet coverage. I wanted the position of the balloon plotted on my own map, so that I could actively track, without the need for internet or paper maps. The program can also be used as a general purpose NMEA parser, that will plot positions on a map of your choice. Just enter your NMEA data into a text file and the program will do the rest.
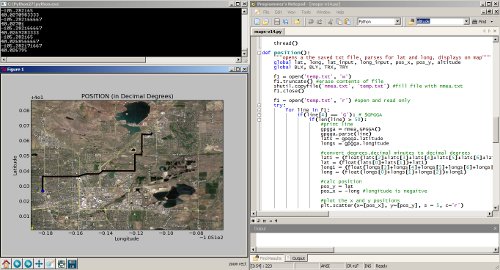
Showing a trip from SparkFun to Boulder, CO.
This tutorial will start with a general introduction to Python and Python programming. Once you can run a simple Python script, we move to an example that shows you how to perform a serial loop back test, by creating a stripped down serial terminal program. The loopback test demonstrates how to send and receive serial data through Python, which is the first step to interacting with all kinds of embedded hardware over the serial port. We will finish with a real-world example that takes GPS data over the serial port and plots position overlaid on a scaled map of your choice. If you want to follow along with everything in this tutorial, there are a few pieces of hardware you will need.
- 5V FTDI Basic
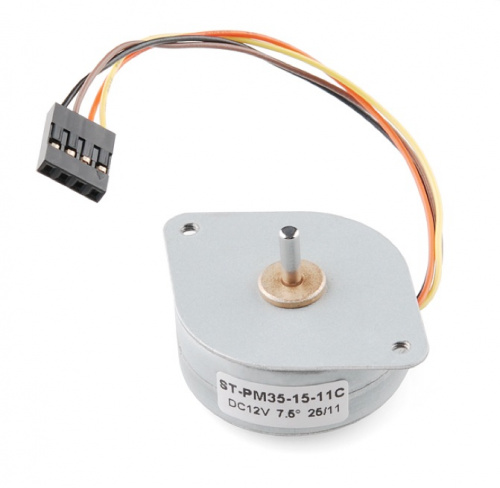
- EM-406 GPS module with Breakout Board (or any NMEA capable GPS)
For the loopback test, all you need is the FTDI Basic. For the GPS tracking example, you will need a GPS unit, as well as the FTDI.
What is Python?
If you are already familiar with installing and running Python, feel free to skip ahead. Python is an interpreted programming language, which is slightly different than something like Arduino or programming in C. The program you write isn't compiled as a whole, into machine code, rather each line of the program is sequentially fed into something called a Python interpreter. Once you get the Python interpreter installed, you can write scripts using any text editor. Your program is run by simply calling your Python script and, line by line, your code is fed into the interpreter. If your code has a mistake, the interpreter will stop at that line and give you an error code, along with the line number of the error.
The holy grail for Python 2.7 reference can be found here:
Installing Python
At the time of this tutorial, Python 2.7 is the most widely used version of Python and has the most compatible libraries (aka modules). Python 3 is available, but I suggest sticking with 2.7, if you want the greatest compatibility.
After you install Python, you should be able to open a command prompt within any directory and type 'python'. You should see the interpreter fire up.

If you don't see this, it is time to start some detective work. Copy your error code, enter it into your search engine along with the name 'python' and your OS name, and then you should see a wealth of solutions to issues similar, if not exact, to yours. Very likely, if the command 'python' is not found, you will need to edit your PATH variables. More information on this can be found here. FYI, be VERY careful editing PATH variables. If you don't do it correctly, you can really mess up your computer, so follow the instructions exactly. You have been warned.
If you don't want to edit PATH variables, you can always run Python.exe directly out of your Python installation folder.
Running a Python Script
Once you can invoke the Python interpreter, you can now run a simple test script. Now is a good time to choose a text editor, preferably one that knows you are writing Python code. In Windows, I suggest Programmers Notepad, and in Mac/Linux I use gedit. One of the main rules you need to follow when writing Python code is that code chunks are not enclosed by brackets {}, like they are in C programming. Instead, Python uses tabs to separate code blocks, specifically 4 space tabs. If you don't use 4 space tabs or don't use an editor that tabs correctly, you could get errant formatting, the interpreter will throw errors, and you will no doubt have a bad time.
For example, here is a simple script that will print 'test' continuously.
# simple script
def test():
    print "test"
while 1:
    test()
Now save this code in a text editor with the extention your_script_name.py.
The first line is a comment (text that isn't executed) and can be created by using a # .
The second line is a function definition named test().
The third line is spaced 4 times and is the function body, which just prints "test"to the command window.
The third line is where the code starts in a while loop, running the test() function.
To run this script, copy and paste the code into a file and save it with the extention .py. Now open a command line in the directory of your script and type:
python your_script_name.py
The window should see the word 'test' screaming by.

To stop the program, hit Ctrl+c or close the window.
Installing a Python Module
At some point in your development, you will want to use a library or module that someone else has written. There is a simple process of installing Python modules. The first one we want to install is pyserial.
Download the tar.gz file and un-compress it to an accessible location. Open a command prompt in the location of the pyserial directory and send the command (use sudo if using linux):
python setup.py install
You should see a bunch of action in the command window and hopefully no errors. All this process is doing is moving some files into your main Python installation location, so that when you call the module in your script, Python knows where to find it. You can actually delete the module folder and tar.gz file when you are done, since the relevant source code was just copied to a location in your main Python directory. More information on how this works can be found here:
FYI, many Python modules can be found in Windows .exe installation packages that allow you to forgo the above steps for a 'one-click' installation. A good resource for Windows binary files for 32-bit and 64-bit OS can be found here:
Python Serial Loopback Test
This example requires using an FTDI Basic or any other serial COM port device.

Simply, connect the TX pin to the RX pin with a wire to form a loopback. Anything that gets sent out of the serial port transmit pin gets bounced back to the receive pin. This test proves your serial device works and that you can send and receive data.
Now, plug your FTDI Basic into your computer and find your COM port number. We can see a list of available ports by typing this:
python -m serial.tools.list_ports
If you are using linux:
dmesg | grep tty
Note your COM port number.
Now download the piece of code below and open it in a text editor (make sure everything is tabbed in 4 space intervals!!):
import serial

#####Global Variables######################################
#be sure to declare the variable as 'global var' in the fxn
ser = 0

#####FUNCTIONS#############################################
#initialize serial connection
def init_serial():
    COMNUM = 9 #set you COM port # here
    global ser #must be declared in each fxn used
    ser = serial.Serial()
    ser.baudrate = 9600
    ser.port = COMNUM - 1 #starts at 0, so subtract 1
    #ser.port = '/dev/ttyUSB0' #uncomment for linux

    #you must specify a timeout (in seconds) so that the
    # serial port doesn't hang
    ser.timeout = 1
    ser.open() #open the serial port

    # print port open or closed
    if ser.isOpen():
        print 'Open: ' + ser.portstr
#####SETUP################################################
#this is a good spot to run your initializations
init_serial()

#####MAIN LOOP############################################
while 1:
    #prints what is sent in on the serial port
    temp = raw_input('Type what you want to send, hit enter:\n\r')
    ser.write(temp) #write to the serial port
    bytes = ser.readline() #reads in bytes followed by a newline
    print 'You sent: ' + bytes #print to the console
    break #jump out of loop
#hit ctr-c to close python window
First thing you need to do before running this code is to change the COM port number to the one that is attached to your FTDI. The COMNUM variable in the first few lines is where you enter your COM port number. If you are running linux, read the comments above for ser.port.
Now, if you want to send data over the serial port, use:
ser.write(your_data)
your_data can be one byte or multiple bytes.
If you want to receive data over the serial port, use:
your_data = ser.readline()
The readline() function will read in a series of bytes terminated with a new line character (i.e. typing something then hitting enter on your keyboard). This works great with GPS, because each GPS NMEA sentence is terminated with a newline. For more information on how to use pyserial, look here.
You might realize that there are three communication channels being used:
- ser.write - writes or transmitts data out of the serial port
- ser.read - reads or receives data from the serial port
- print - prints to the console window
Just be aware that 'print' does not mean print out to the serial port, it prints to the console window.
Notice, we don't define the type of variables (i.e. int i = 0). This is because Python treats all variables like strings, which makes parsing text/data very easy. If you need to make calculations, you will need to type cast your variables as floats. An example of this is in the GPS tracking section below.
Now try to run the script by typing (remember you need to be working out of the directory of the pythonGPS.py file):
python pythonGPS.py
This script will open a port and display the port number, then wait for you to enter a string followed by the enter key. If the loopback was successful, you should see what you sent and the program should end with a Python prompt >>>.
To close the window after successfully running, hit Ctrl + c.
Congratulations! You have just made yourself a very simple serial terminal program that can transmit and receive data!
Read a GPS and plot position with Python
Now that we know how to run a python script and open a serial port, there are many things you can do to create computer applications that communicate with embedded hardware. In this example, I am going to show you a program that reads GPS data over a serial port, saves the data to a txt file; then the data is read from the txt file, parsed, and plotted on a map.
There are a few steps that need to be followed in order for this program to work.Install the modules in the order below.
Install modules
Use the same module installation process as above or find an executable package.
- pyserial (should already be installed from above)
- numpy (use: this link for Windows and this link for Mac/Linux)
- matplotlib
- pynmea
The above process worked for me on my W7 machine, but I had to do some extra steps to get it to work on Ubuntu. Same might be said about Macs. With Ubuntu, you will need to completely clean your system of numpy, then build the source for numpy and matplotlib separately, so that you don't mess up all of the dependencies. Here is the process I used for Ubuntu.
Once you have all of these modules installed without errors, you can download my project from github and run the program with a pre-loaded map and GPS NMEA data to see how it works:
Or you can proceed and create your own map and GPS NMEA data.
Select a map
Any map image will work, all you need to know are the bottom left and top right coordinates of the image. The map I used was a screen shot from Google Earth. I set placemarks at each corner and noted the latitude and longitude of each corner. Be sure to use decimal degrees coordinates.

Then I cropped the image around the two points using gimp. The more accurate you crop the image the more accurate your tracking will be. Save the image as 'map.png' and keep it to the side for now.
Hardware Setup
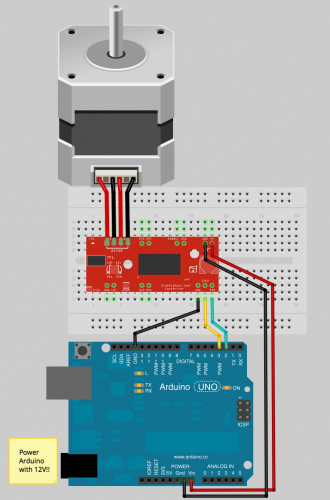
The hardware for this example includes a FTDI Basic and any NMEA capable GPS unit.

EM-406 GPS connected to a FTDI Basic
For the connections, all you need to do is power the GPS with the FTDI basic (3.3V or 5V and GND), then connect the TX pin of the GPS to the RX pin on the FTDI Basic.
It is probably best to allow the GPS to get a lock by leaving it powered for a few minutes before running the program. If the GPS doesn't have a lock when you run the program, the maps will not be generated and you will see the raw NMEA data streaming in the console window. If you don't have a GPS connected and you try to run the program, you will get out-of-bound errors from the parsing. You can verify your GPS is working correctly by opening a serial terminal program.
Run the program
Here is the main GPS tracking program file:
Save the python script into a folder and drop your map.png file along side maps.py. Here is what your program directory should look like if you have a GPS connected:

The nmea.txt file will automatically be created if you have your GPS connected. If you don't have a GPS connected and you already have NMEA sentences to be displayed, create a file called 'nmea.txt' and drop the data into the file.
Now open maps.py, we will need to edit some variables, so that your map image will scale correctly.
Edit these variables specific to the top right and bottom left corners of your map. Don't forget to use decimal degree units!
#adjust these values based on your location and map, lat and long are in decimal degrees
TRX = -105.1621     #top right longitude
TRY = 40.0868       #top right latitude
BLX = -105.2898     #bottom left longitude
BLY = 40.0010       #bottom left latitude
Run the program by typing:
python gpsmap.py
The program starts by getting some information from the user.
You will select to either run the program with a GPS device connected or you can load your own GPS NMEA sentences into a file called nmea.txt. Since you have your GPS connected, you will select your COM port and be presented with two mapping options: a position map...

...or an altitude map.

Once you open the serial port to your GPS, the nmea.txt file will automatically be created and raw GPS NMEA data, specifically GPGGA sentences, will be logged in a private thread. When you make a map selection, the nmea.txt file is copied into a file called temp.txt, which is parsed for latitude and longitude (or altitude). The temp.txt file is created to parse the data so that we don't corrupt or happen to change the main nmea.txt log file.
The maps are generated in their own windows with options to save, zoom, and hover your mouse over points to get fine grain x,y coordinates.
Also, the maps don't refresh automatically, so as your GPS logs data, you will need to close the map window and run the map generation commands to get new data. If you close the entire Python program, the logging to nmea.txt halts.
This program isn't finished by any means. I found myself constantly wanting to add features and fix bugs. I binged on Python for a weekend, simply because there are so many modules to work with: GUI tools, interfacing to the web, etc. It is seriously addicting. If you have any modifications or suggestions, please feel free to leave them in the comments below. Thanks for reading!