Sensor Kit Resource Hub a learn.sparkfun.com tutorial
Available online at: http://sfe.io/t509
Introduction
The SparkFun Sensor Kit is a conglomeration of all of our favorite sensors. The contents of this kit give you the ability to sense touch, vibration, flex, motion, weather patterns, magnetism…nearly every physical quantity known to man. Combine them all together to create a tricorder, or divide them up into tons of unique projects!

This guide is a hub for all-things-Sensor Kit. It introduces the basic skills and tools you’ll need to use the sensors and points you in all the right directions to hook them up. It’ll have you on your way to SENSING ALL THE THINGS in no time!
Encouraged Extras
The Sensor Kit includes a huge variety of sensors and some supporting components for those devices, but it doesn’t include everything you’ll need to hook them up. Here are a few extra tools and components you may need to get started.
Prototyping Bits
About half of the sensors in this kit are immediately breadboard-compatible, ready to plug in and connect to a development board. Here is what you’ll need to get started with those components.
Arduino Uno– Every sensor in the kit is supported by a hookup tutorial, which includes an example Arduino circuit, and code written specifically for the popular development platform. The reliable Arduino Uno can interface with any-and-every sensor in this kit. Alternatively, any Arduino-compatible development platform – be it a RedBoard, Pro or Pro Mini– should be able to substitute.


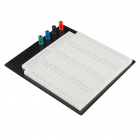
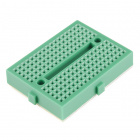
Breadboard– These are a recurring player in every example circuit for every sensor in the kit. The breadboard holds your sensors, resistors, and other components, and even does some of the wiring for you.
Jumper Wires– Like the breadboard, jumper wires are a part of every example circuit. These jumper wires act as an intermediary between breadboard and Arduino.


Soldering Tools
Once you move beyond some of the simple components in this kit, like photocells and flex sensors, you’ll advance to the breakout boards. Breakout boards, like the LSM9DS1 and MPL115A1, are shipped without interface connectors, which means you’ll need to whip out your soldering tools before connecting them to a development board.
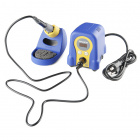
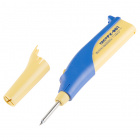
Soldering Iron– An iron obviously tops the soldering tool list. Even the most basic soldering iron will be enough to get you by, or invest in your future tinkering with a Hakko.

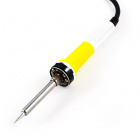
Solder– Large, small, leaded, lead-free…there are a few options to consider when you’re picking out solder. Leaded solder is easier to use, and produces shinier joints, but has a certain stigma to it.


Headers or Wire– You’ll need to solder something to the breakout board. Whether that something is male headers, female headers, stranded wire, solid-core wire, or something else is completely up to you.


Suggested Skills
The Sensor Kit’s sensors are a great entry-point for electronics beginners, but they do build on some assumed knowledge. Here are a few electrical engineering-specific tutorials you may want to check out before venturing further into the sensor depths.
What is a Circuit?
What is Electricity?
We’ll be relying heavily on Arduino throughout these tutorials. New to the Arduino scene? We’ve got a lot of reading material for you!
How to Use a Breadboard
Installing Arduino IDE
One last biggie: If you’ve never soldered before, don’t fret – this is a great opportunity to get started! Check out our How to Solder - Through-Hole Soldering guide for tips, tricks, and a tutorial.
How to Solder - Through-hole Soldering
September 19, 2013
Resource Rundown
This section briefly overviews each sensor included in the Sensor Kit – describing what the sensor senses, how it relays that data, and what kind of power it requires. Links to separate tutorials are also provided. When you’re ready to hook a sensor up and do some sensing, check out the tutorial for that device.
All of these sensors can be organized into one of two categories analog or digital. Analog sensors are generally easier to set up and use, but digital sensors can be more powerful and accurate. If you’re just getting started with electronics, consider exploring some of the analog sensors first.
Analog Sensors
Force-Sensitive Resistor
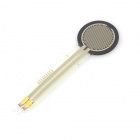
A force-sensitive resistor (FSR) is a variable resistor that increases or decreases depending on how hard something is pressing down on it. When no pressure is being applied to the FSR its resistance will be larger than 1MΩ.
The harder you press on the sensor’s circular head, the lower the resistance between the two terminals drops. This FSR can sense applied force anywhere in the range of 0.1kg-10kg.
By creating a voltage divider with the FSR and another resistor, you can create a variable voltage output, which can be read by a microcontroller’s ADC input.
These sensors are simple to set up and great for sensing pressure, but they aren’t incredibly accurate. They’re useful for sensing the presence of something, but not all that great at measuring something’s weight.
(Note: force-sensitive resistors cannot detect the presence of Midichlorians.)
The Force Sensitive Resistor Hookup Guide examines the basic characteristics of FSR’s, and demonstrates how to hook them up to an Arduino so you can start gauging pressure.
Flex Sensor
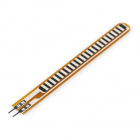
This flex sensor is a variable resistor like no other. The resistance of the flex sensor increases as the body of the component bends. Sensors like these were used in the Nintendo Power Glove.
Left flat, the sensor will look like a 30kΩ resistor. As it bends, the resistance will increase to as much as 70kΩ at a 90° angle.
Combined with another resistor to create a voltage divider, the flex sensor can produce a variable analog voltage to be read by a microcontroller’s ADC pin.
Consult the Flex Sensor Hookup Guide for help connecting the bend-sensor up to an Arduino.
Mini Photocell
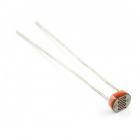
Photocell’s are light-sensitive, variable resistors. As more light shines of the sensor’s head, the resistance between the photocell’s terminals decreases.
In pitch-black conditions, the photocell’s resistance will be in the megaohm’s (1.0MΩ+). Shining an LED on the sensor can drop the resistance to near-zero. Usually the resistance of the photocell will range between 8k-20kΩ in normal lighting conditions.
As with other resistive sensors, to use the photocell with an ADC they’re usually paired with a static resistor to form a voltage divider.
Photoresistor’s won’t give you incredibly accurate lux readings (that’s what sensors like the TSL2561 is for), but they’re great for at least identifying the general state of ambient light.
The Photocell Hookup Guide provides a quick overview of the photocell’s resistive characteristics, plus an example circuit and code.
See the Light With a Photocell
Soft Potentiometer
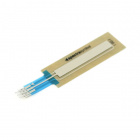
Soft potentiometers, or “softpots”, are very thin potentiometers “wiped” by pressing down on various parts of the strip.
Like any potentiometer, the softpot is a three terminal device. The middle pin is the wiper, and the other two terminals are the high and low ends of the resistive element.
The resistance between the wiper and either of the other two terminals varies between 0Ω and 10kΩ. Or, if nothing is pressing down on the softpot, the connection between the two terminals looks like an (almost) open circuit. By applying a voltage across the two outside terminals, the middle terminal can produce a voltage somewhere in the applied range.
These sensors can be used for position detection or in projects that require linear user input, like a volume slider.
Take a stroll through the SoftPot Hookup Guide to learn how simple and fun these sensors are to use!
Piezo Vibration Sensor
Piezo sensors are flexible devices that generate electric charge when they’re stressed. This characteristic makes piezo’s an ideal solution for low-power flex, touch, and vibration sensing. This piezo sensor in particular has a heavy mass at the end to help accentuate its vibrations.
In more advanced applications, piezo’s can be the foundation for energy harvesting. They produce large AC voltage spikes – ranging as high as ±90V – when vibrating, but the current and total power they produce is still minuscule.
Because they produce such high voltage spikes, large resistors are often used to “load down” the piezo sensor in vibration-sensing applications. The 1MΩ resistors included with the sensor kit are designed to help dampen the piezo’s voltage output.
The Piezo Vibration Sensor Hookup Guide examines the AC-voltage-supplying capabilities of Piezo sensors, then shows how you can dampen that voltage and hook it up to an Arduino.
Sense Good Vibrations with a Piezo Sensor
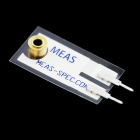
Soil Moisture Sensor
The Soil Moisture Sensor is a simple breakout for measuring the moisture in soil and similar materials. By monitoring soil conditions you can create a tweeting plant, that will alert you when it’s thirsty.
The sensor consists of two conductive “stakes”, that plug into the ground. Three wires – power, ground, and a signal – are all it takes to get the sensor up-and-running.

These probes measure the soil’s conductivity. Soaked soil is much less resistive to current flow than flaky, dry dirt, so the lower the moisture sensor’s reading, the happier your plant will be.
Check out the Soil Moisture Sensor Hookup Guide for assembly and implementation tips.
Monitor Your Plant's Moisture Levels and Keep it Thriving!
Sound Detector
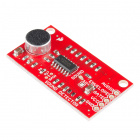
The Sound Detector is a small and very easy to use audio-sensing board. It has three different outputs: binary sound detection, audio envelope, and a true audio output. The 3 outputs are simultaneous and independent, so you can use as many or as few as you want at once.
The digital binary output produces you a high or low signal indicating if sensed audio is over a set threshold – it’s an incredibly handy feature, which offboards complicated firmware programming onto pre-built hardware! The analog envelope filter is equally useful, especially if all you really want to monitor is the general amplitude of local sounds.
The sound detector has a built-in electret microphone, and all sorts of amplifying goodies on-board as well. You can add external resistors to customize the detector’s gain and binary threshold.
The comprehensive Sound Detector Hookup Guide will walk you through assembly, hookup, and custom-modification of the breakout.
Monitor for Aural Disturbances with Sound Detector
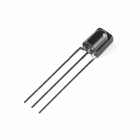
Optical Detector/Phototransistor - QRD1114

Photodetectors like the QRD1114 are actually built out of two components: an LED to emit infrared light and a phototransistor to detect it. The sensor can measure proximity or even color by measuring the amount of IR light that gets reflected back into it.
One of the most common applications for these sensors is black-or-white color detection – they’re a popular sensor choice for line following robots. A black, sharpie-marked line will absorb more light, meaning less light is reflected back into the sensor’s phototransistor. When the sensor transitions over a white surface, more light is reflected and the sensor’s output increases.
These sensors can be used with a microcontroller’s ADC input to measure the amount of IR light reflected back. The LED does not have a current-limiting resistor built-in, so an external 330Ω resistor is usually added for that purpose.
Head over to the QRD1114 Optical Detector Hookup Guide to learn how the QRD1114 senses proximity by measuring reflectance of an IR LED. Then hook it up to an Arduino to do some proximity sensing of your own.
Reflect on Proximity With the QRD1114
Digital Sensors
Reed Switch
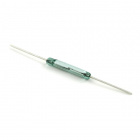
A reed switch is a magnetically actuated switch. When the switch is exposed to a magnetic field, two ferrous materials inside pull together and the switch closes. When there is not a strong enough magnetic field nearby, the switch acts as an open circuit.
Magnets, like the small, square magnet included with this kit, can be used to actuate the reed switch. Just hold it about 1cm away, and let your current flow!
Reed switches are perfect for applications that require non-contact control. For example, a reed switch is present in magnetic door switches– both parts of the switch are separate, allowing the door to open and close (maintaining its duties as a door).
The Reed Switch Hookup Guide describes the general characteristics of reed switches, and shows how to use one to turn on an LED with the magic power of magnets.
Flip a Reed Switch Without Ever Touching It
PIR Motion Sensor
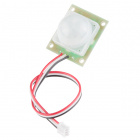
PIR (passive infrared) sensors are motion-detecting devices used in security systems across the world – even though you may not see them, they probably see you!
PIR sensors consist of an infrared “camera”, which periodically measures the amount of infrared light it sees, and compares that against past measurements. When the IR measurement changes beyond a set threshold, the PIR sends a digital signal communicating that something in its field-of-view has moved.
PIR’s are easy to hook up – all they require is power (5-12V) and a pin to read the digital output. When motion is detected, the alarm output line goes low.
For help hooking up the PIR sensor to an Arduino, check out our PIR Motion Sensor Hookup Guide.
Monitor Your Hallways with the PIR Sensor
IR Receiver & IR LED
The TSOP38238 Infrared Receiver Diode– or a part like it – is embedded into every TV, cable receiver, and Blu-Ray player in your house. These IR receivers look for encoded infrared light, carrying messages like “channel up” or “volume down”, and produce a signal that can be read by any microcontroller.
Before emitting a signal, infrared remotes modulate their signals at a set frequency. This diode has brains built into it that can automatically demodulate a standard 38kHz infrared signal. What comes out of the chip are a series of specifically timed 1’s and 0’s, that can in turn be converted to common IR remote commands.
The IR receiver diode can be paired with any household remote. Or you can use the included 950nm Infrared LED to create a remote of your own!
The IR Control Kit Hookup Guide demonstrates how to hook up the IR receiver diode, and set it to listen to any remote you may have in your household. It also shows how to create your own IR remote, by combining an Arduino with an IR LED.
Control Your Arduino, Control the World – with IR!
Capacitive Touch Breakout - AT42QT1010

The AT42QT1010 is a dedicated, single-button capacitive sensing chip. Our breakout board for this chip wires it up to a fingertip-sized, circular electrode – perfect for creating non-contact user-input.
The problem with physical buttons is they wear out over time. Even the hardiest of mechanical switches may only be rated for millions of key presses. Capacitive buttons are less prone to degrading over time. Plus, tapping them feels like tapping the future!
The breakout produces a digital output, just as if you were reading the state of a switch. The output signal will be low if the button is inactive and high if the button is pressed.
The breakout also includes an LED indicator, which will illuminate whenever the board senses a “press.”
Check out the AT42QT1010 Capacitive Touch Breakout Hookup Guide for all of your capacitive switch needs. This tutorial documents assembly, wiring, and code.
Add Non-Contact User Input to your Project!
9 Degrees of Freedom IMU Breakout - LSM9DS1

The LSM9DS1 is actually three sensors in one– it houses an accelerometer, gyroscope, and magnetometer. Plus, each of these sensors are three-dimensional, meaning this sensor produces nine degrees of motion information.
The accelerometer measures acceleration – how fast an object is speeding up or slowing down. They’re often used to monitor the direction of the force of gravity, which helps determine the orientation of a device. They can also be used to watch for an object in free-fall, or to count steps like a pedometer.
The gyroscope measures angular rotation – how fast an object is spinning around an axis. Gyroscopes can be used by autonomous robots (drones, balancing bots, etc) to sense any sudden “rolling” movements and compensate for them.
The magnetometer measures the strength of nearby magnetic fields. These sensors can measure any magnetic field, but they’re primarily used to sense that of Earth. By sensing Earth’s magnetic field, magnetometers can be used as a compass, to help determine the orientation of movement.
I2C– a two-wire, serial interface – is the primary communication interface, although it also supports SPI. Don’t worry, the SparkFun LSM9DS1 Arduino Library simplifies all of that for you.
For all-things-LSM9DS1, check out the LSM9DS1 IMU Hookup Guide. That tutorial will demonstrate how to assemble the sensor, connect it to an Arduino, and interface with it over an I2C interface.
Start Using the LSM9DS1 9DOF IMU!
RGB and Gesture Sensor - APDS-9960

The APDS-9960 is a multi-talented, powerful sensor that can measure light, color, proximity, and even hand gestures.
At it’s most basic, the APDS-9960 is an ambient light sensor (much like the photocell). It can be used to monitor whether lights are on or off, or what time the sun rises. But it can also tell you how much red, green, and blue it’s detecting in that light, so you can use it to sense nearby colors.
The sensor also features proximity detection. It can determine the sensor’s distance from a nearby object anywhere from 4 to 8 inches away.
Finally, the APDS-9960 can sense nearby hand wave gestures (anywhere from 2-10 inches (5-25 cm) away). It can tell you if a hand is waving up, down, left, or right. Sensor’s like these are the magic behind touchless toilet’s!
The APDS-9960 is another I2C-based device. If you’re using an Arduino, the Wire library helps take care of I2C.
The APDS-9960 RGB and Gesture Sensor Hookup Guide demonstrates how to assemble the breakout board, connect it to an Arduino, and interface with it over an I2C interface.
Start Using the APDS-9960 Color, Light, and Gesture Sensor!
Humidity and Temperature Sensor Breakout - Si7021

The Si7021 is an easy-to-use, highly accurate, humidity and temperature sensor.
This sensor is perfect for a weather stations or humidor control systems. You can log the data to memory, to be read later, or you can use an Internet-enabled microcontroller, and log the data, in real-time, to data.sparkfun.com.
All you need is two lines for I2C communication and you’ll have relative humidity readings and very accurate temperature readings as a bonus!
The Si7021 Breakout Hookup Guide demonstrates how to assemble the breakout board, connect it to an Arduino, and interface with it over an I2C interface.
Sense Temperature and Humidity with the Si7021 Breakout!
Altitude and Pressure Sensor Breakout - MPL3115A2

The MPL3115A2 is a air pressure sensor. Air pressure is inversely proportional to altitude, which means the higher you go, the lower the pressure. The relationship between altitude and pressure makes these sensors a common component in altitude-dependent projects, like weather balloons and quadcopters.
Of course, the MPL3115A2 can also be used to monitor pressure as it relates to changing weather patterns. Higher-than-normal pressure may indicate a sunny day, while low pressure systems might indicate precipitation. Not coincidentally, the chip includes a built-in temperature sensor, putting you one step closer to creating a comprehensive weather station.
Like most of the other breakout boards, the MPL3115A2 features an I2C interface. That’s actually a huge bonus. I2C interfaces are powerful because they support communication with multiple devices on a single, two-wire bus. For example, you could control both this sensor and the Si7021 humidity sensor – creating the basis for a weather monitor – with just a pair of I/O pins.
The MPL3115A2 is documented in our MPL3115A2 Pressure Sensor Hookup Guide. The hookup guide demonstrates how to assemble the breakout and use it with an Arduino.
Measure Altutide or Monitor Weather Patterns with the MPL3115A2
Resources and Going Further
With one hookup guide per sensor, you’ve already got plenty of reading material. We don’t want to overwhelm you, but we do want to instill some project ideas in the back of your mind. There are plenty of directions you can take a project with all of the sensors in this kit.
You can take the pressure, humidity, and temperature sensors to build a weather station– one that can wirelessly post to Weather Underground.
Weather Station Wirelessly Connected to Wunderground
April 11, 2014
You can use the piezo vibration sensor or the accelerometer third of the 9DOF to create a laundry monitor.
Blynk Board Washer/Dryer Alarm
March 31, 2016
Maybe use the reed switch to control a TARDIS-themed music box.
Or just combine all of the sensors to create your very own tricorder! It’s up to you from here. Go sense!
learn.sparkfun.com |CC BY-SA 3.0 | SparkFun Electronics | Niwot, Colorado